Since November 2022 Microsoft requires that you purchase a Cross Tenant User Data Migration license in order to use their cross tenant migration services for Exchange or OneDrive. But there is very little information about this license type available online. Here are the basic details for this license type for anyone who is curious:
But you get the following error: “This mail enabled user cannot be permanently deleted since there is a user associated with this mail enabled user in Azure Active Directory. You will first need to delete the user in Azure Active Directory. Please refer to documentation for more details.”
Oh… okay then. So you remove the user in Microsoft Entra ID (Azure AD) and also make sure it has been removed from Deleted users. Now you try to remove the MailUser in Exchange Online again, this time running:
But now you get a new error: “Unable to permanently delete mail enabled user. The mail enabled user has litigation hold or In-Place hold applied on it. Please remove the hold before trying to delete”
This is probably due to a default policy that is applied to all UserMailbox / MailUser objects in your organisation. Not a problem… except, how do you remove litigation hold / in-place hold from an object that is now soft-deleted? Especially considering that you cannot restore it because you already deleted the user in Entra ID.
Thankfully the answer is fairly straightforward, just not completely intuitive in my opinion. Run the following command:
This guide follows the official guide from Microsoft (which can be found here) with each step shown in more detail and more screenshots to help you validate what you’re doing. This sort of work should be done by experienced Office 365 administrators, however this guide could also be used by people looking to learn (say, by migrating mailboxes between two test Office 365 tenants).
It is also worth highlighting that at the time of writing, this feature is in public preview, meaning you should test it and ensure that the process works correctly for you before committing to using it in a fully-fledged mailbox migration project.
You will need to set aside at least a few hours to follow this guide all the way through. The process uses a combination of configuration in Azure and Exchange Online PowerShell.
I also recommend having a OneNote (or other note taking app) page ready to paste various GUIDs and notes throughout this process.
Preparing the target tenant (where the mailboxes will be migrated to)
Go to the Azure Portal and log in if needed (using target tenant credentials). Click on Azure Active Directory.
On the Overview page make a note of your Tenant ID. In your notes make sure this is clearly labelled as the target Tenant ID as you’ll be making a note of the source Tenant ID later.
On the left click App registrations, then click + New registration.
Give the app a descriptive name (such as “CrossTenantMailboxMigrationApplication”) and under Supported account types select “Accounts in any organizational directory (Any Azure AD directory – Multitenant)”. In the Select a platform drop down select Web and enter “https://office.com” in the box next to it.
Click register at the bottom of the page.
You should be taken to the Overview page for your new app, but if not, from the Azure Active Directory page click on App registrations on the left and click on your app to bring up the overview.
You need to note down the Application (client) ID here as this will be used later to create URL that will be used to register this app in the source tenant.
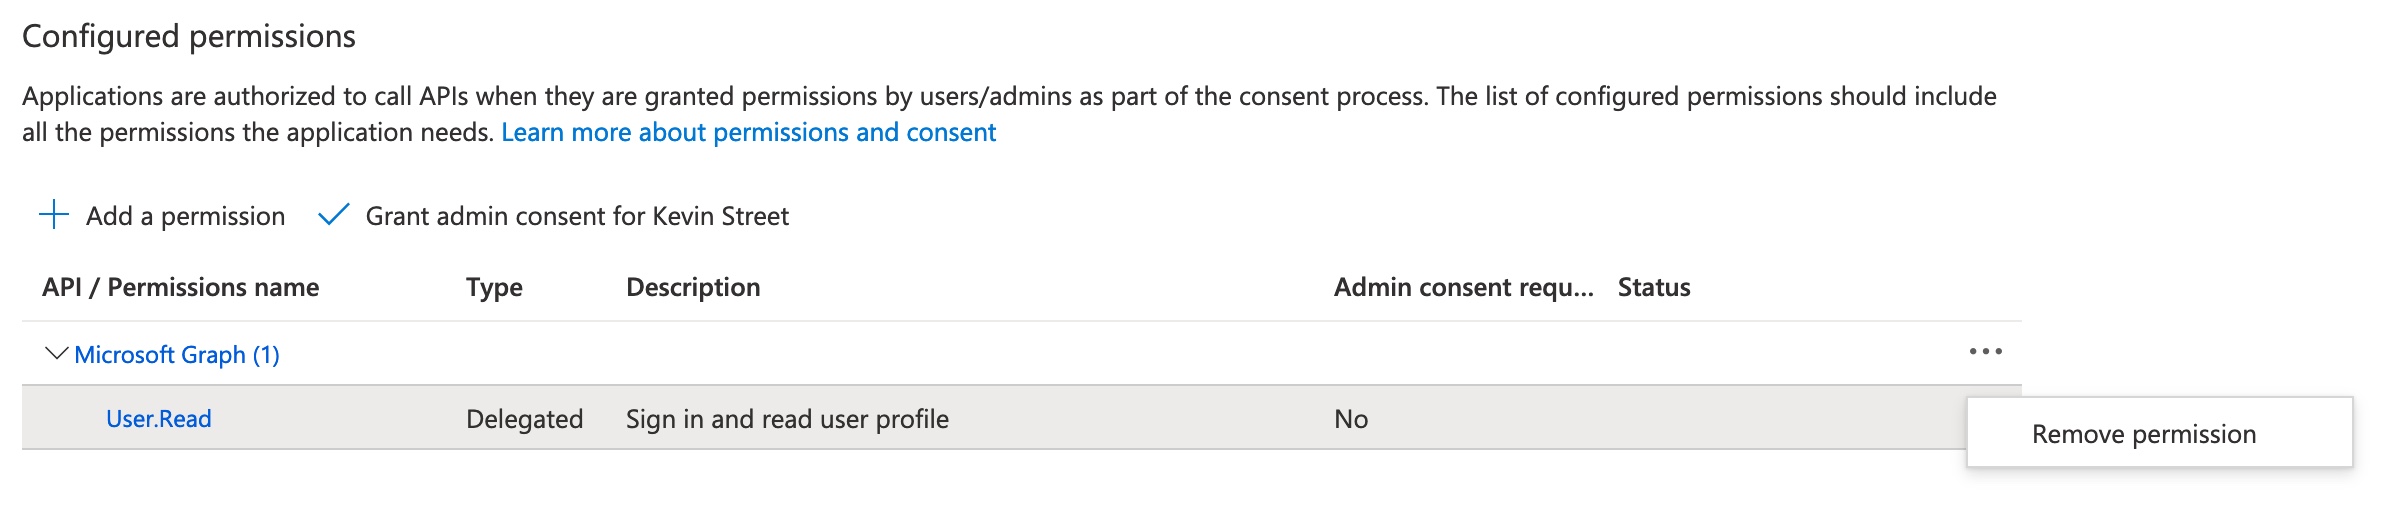
On the left, click on API permissions. By default, the permission User.Read will be granted, however this is not needed so remove it by clicking on the three dots at the end of the line and selecting Remove permission. Confirm this by clicking Yes, remove in the pop-up warning that appears.
Now to add the permissions that are needed, click + Add a permission. In the menu that appears on the right, click on the APIs my organisation uses tab and search for Office 365 Exchange Online.
Click on Office 365 Exchange Online and select Application permissions. Expand Mailbox and select Mailbox.Migration. Then click Add permissions at the bottom of the screen.
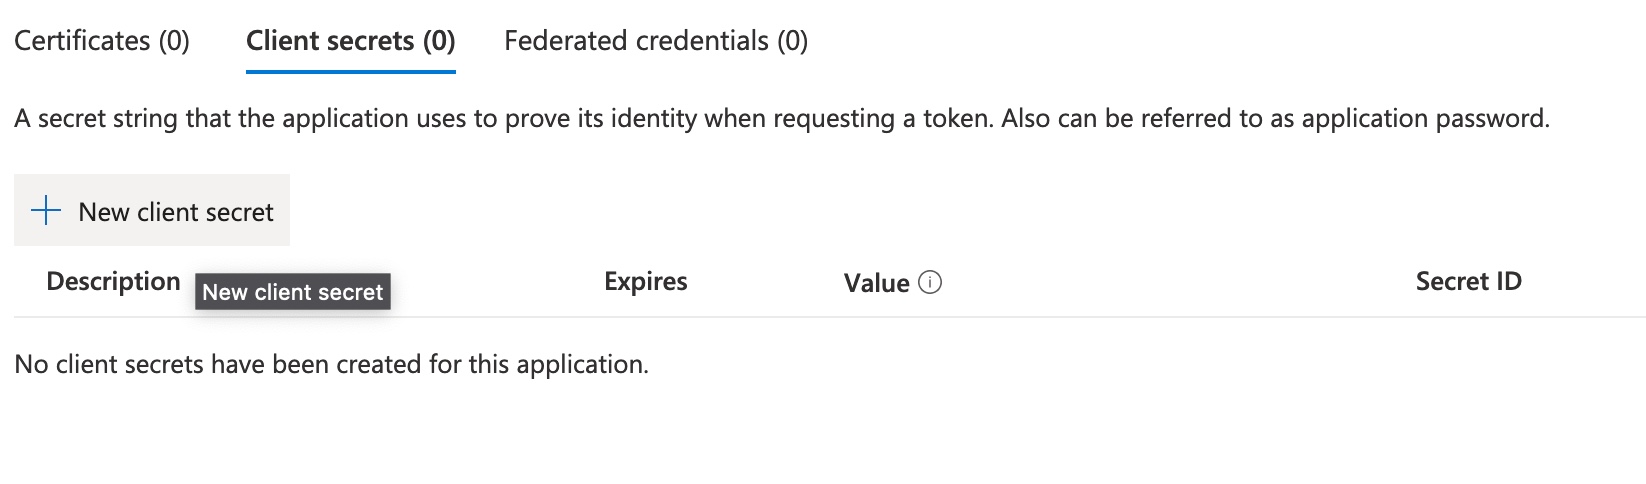
Next, click on Certificates & secrets on the left. Make sure you’re in the Client secrets tab and click + New client secret.
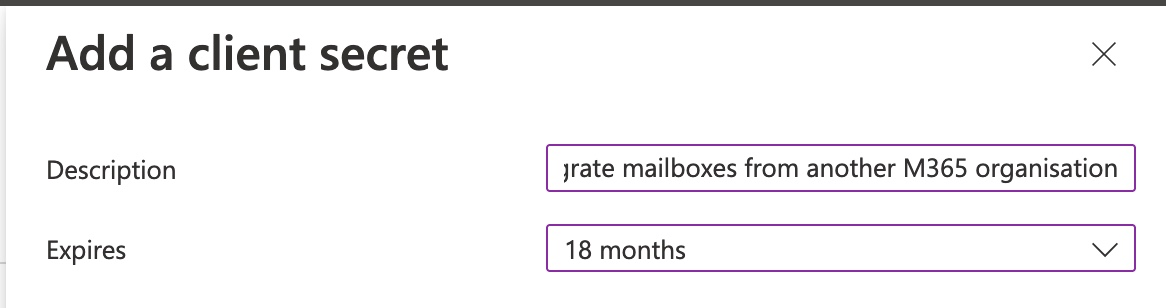
Give the secret a description (such as “Used to migrate mailboxes from another M365 organisation”) and an expiration date. This secret should remain valid for the duration of your mailbox migration project (or you’ll need to create a new client secret later when this one expires). Click Add at the bottom of the screen.
Make a note of the data in the value field; this is the client secret. You should endeavour to store this somewhere secure as it is a secret and should not end up the wrongs hands. This is also your only chance to store the secret as it will not be visible on this page on future visits.
Don’t worry, the secret that is visible here has been deleted before publication!
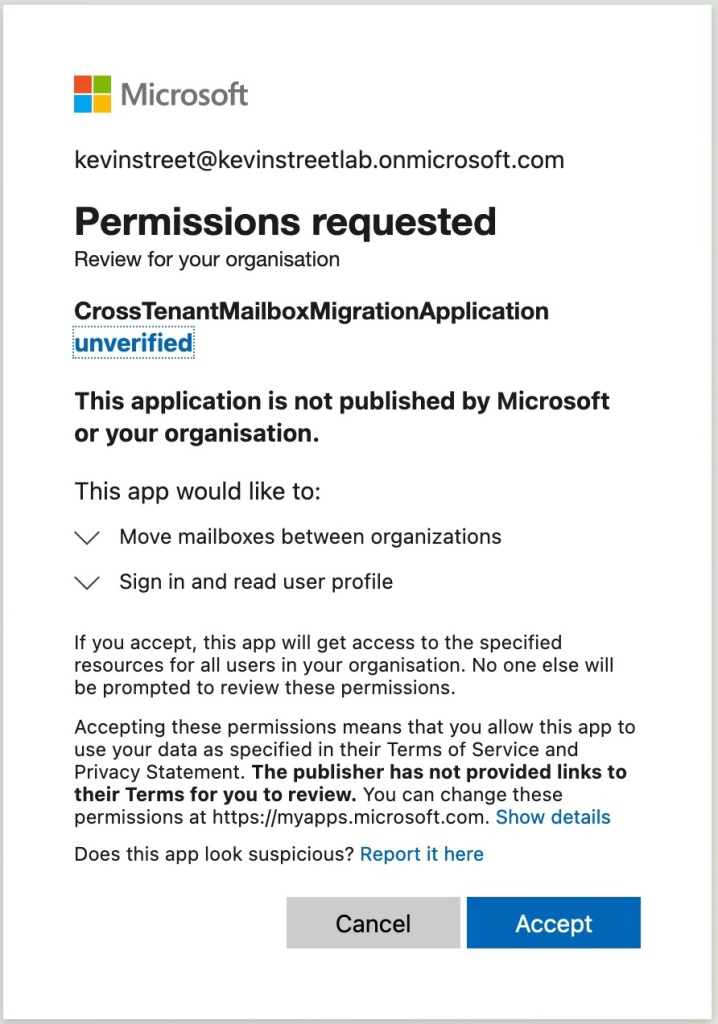
Now you must consent to the permissions you granted the application a few steps ago. To do this go back to the Azure Active Directory landing page by clicking Microsoft Azure in the top left corner of the screen and then select Azure Active Directory. From there, click on Enterprise applications on the left and then click on the application you created. On the left, select Permissions and then click Grant admin consent for [your tenant name].
A new browser window will pop up and you may be required to re-enter your account password. A Permissions requested box will follow on from that and you should review the permissions and click Accept.
Now, if you click Refresh at the top of the screen you should see the Office 365 Exchange Online – Mailbox.Migration permission granted.
Next it is time to formulate the URL that will be used to register this application in the source tenant. The URL template is:
sourcetenant = The onmicrosoft.com domain for the source tenant (where the mailboxes are migrating from). If you need to find out the onmicrosoft.com address for the source tenant, go to the Azure Portal -Domains page and log in with your source tenant admin credentials – be careful here as you may already be logged in with your target tenant credentials at this stage due to the work you’ve just been doing in Azure. Use an Incognito window to make sure you switch accounts to be certain. Amongst the listed domains will be a something.onmicrosoft.com domain – this is what you need. application_id = The Application (client) ID you noted down earlier.
In my environment my source tenant is kevinstreetlab.onmicrosoft.com and my Application (client) ID from the application I created is af9aed61-522c-4f94-b5b1-f415b6c6d5a1, so my URL is:
sourcetenant = The onmicrosoft.com domain for your source tenant (where the mailboxes are migrating from). This is the same as you used earlier when formulating the URL. endpoint_name = Any descriptive name you want for this endpoint (I used “MailboxMigrationEndpoint”).
The last bit of preparation to do in the target tenant is to create an organisation relationship between your source tenant and your target tenant.
First you need to log on to Azure in your source tenant to make a note of the source tenant ID.
Go to Azure Portal and log in if needed (source tenant credentials). Click on Azure Active Directory.
On the Overview page, make a note of your Tenant ID. In your notes make sure this is clearly labelled as the source Tenant ID so that you do not confuse it with the target Tenant ID that you noted down earlier.
Create the following variable:
$SourceTenantID="source_tenant_id"
source_tenant_id = The source Tenant ID that you just noted down.
Run the following two commands to see what existing organisation relationships exist (and particularly if any already exist for the same tenant):
organization_relationship_name = Any descriptive name of your choosing (such as “OrgRelationshipForMailboxMigrations”).
That’s it for the target tenant preparation.
Preparing the source tenant (where the mailboxes will be migrated from)
Now we move on to the preparation needed in the source tenant. If you are still logged in to the target tenant, you may prefer to log out to minimise the possibility of confusing which tenant you are working in.
Open your web browser and navigate to the URL you formulated earlier so that you can accept the migration application in the source tenant.
If you are asked to sign in, make sure you sign in with your source tenant admin account. You will be prompted to accept the permissions needed to use the migration app so click Accept to continue.
If you want to confirm the app has been registered, go to the Azure AD Portal, and select Enterprise applications from the left and confirm that the CrossTenantMailboxMigrationApplication appears in the list (or whatever name you chose).
For the next steps you need to connect to your source tenant through Exchange Online PowerShell. Start by disconnecting from the previous session:
Disconnect-ExchangeOnline
Press Y to confirm you want to disconnect from all active sessions. Now connect to your source tenant:
Before we can create the organisation relationship, we need to create a scoping group for the mailboxes that will be allowed to migrate. The idea here is that you add mailboxes to this group if they are allowed to migrate, which helps to protect mailboxes in your organisation that may not be migrating. To create the group, run the following command:
New-DistributionGroup -Type Security -Name "Mailboxes for Migration" -Alias "MigratingMailboxes"
You can choose anything for the Name and Alias fields. This will be a mail enabled security group so the value in the Alias field will become the email address that is created for this group.
We’ll add a mailbox to this group later when doing a test migration.
Now we’re going to create the organisation relationship in the source tenant, just like we did in the target tenant earlier. Run the following commands:
target_tenant_id = The target Tenant ID you noted down earlier. application_client_id = The Application (client) ID that you noted down earlier. scoping_group_name = The value you used for the Name of the scoping group you created earlier.
Run the following two commands to see what existing organisation relationships exist (and particularly if any already exist for the same tenant):
organization_relationship_name = Any descriptive name of your choosing (such as “OrgRelationshipForMailboxMigrations”).
This completes the preparation steps for both tenants and the next section will cover migrating a single test mailbox.
Migrating a mailbox from the source tenant to the target tenant
For any mailbox migrating to the target tenant, you must provision a MailUser object in the target tenant and assign it some very specific attributes that are gathered from the user’s mailbox in the source tenant. Specifically, you will need the ExchangeGUID value, the ArchiveGUID value (if the user has an Online Archive), the LegacyExchangeDN value and any x500 addresses already configured on the mailbox.
In this guide I am going to migrate one mailbox over, a pretend user called Alex Wilber. His primary email address will change from AlexW@dev.kevinstreet.co.uk to AlexW@kevinstreet.co.uk as his mailbox migrates from my dev/lab tenant to my production tenant.
To follow along select or create a test user and mailbox in your source Office 365 tenant.
The first thing to do is to add this mailbox to the scoping group that we created in the source tenant preparation. Start by logging in to your source tenant in Exchange Online PowerShell and run the following command:
mailboxes_for_migration = The name of the scoping distribution group you created. mailbox_alias = The alias of the mailbox you wish to migrate. If you do not know the alias, you can get it in PowerShell by using the following command:
Get-Mailbox -Filter { EmailAddresses -eq "user_email_address" } | Select-Object Alias
user_email_address = One of the email addresses assigned to the user.
With that done, it’s time to collect the information we need for the MailUser. Run the following command to get the information we need:
mailbox_alias = The alias of the mailbox you are migrating.
Make a note of the ExchangeGUID, LegacyExchangeDN and any existing x500 addresses in the EmailAddresses field. Also, if the ArchiveGUID has a value (other than 00000000-0000-0000-0000-000000000000) this means the Online Archive is enabled for the user and you should make a note of this value as well.
With these values gathered it’s time to create the MailUser in the target tenant. Disconnect from the current Exchange Online PowerShell session and re-connect to your target tenant.
When creating a MailUser you will need to assign it a password, so use a password generator or something similar to create a password you will use, and assign it to a variable with the following command:
Where the following value are: alias = The alias for this MailUser. This could be the same as the alias that is used in the source tenant. displayname = How the display name will appear for this user. This could be the same as the display name that is used in the source tenant. firstname = The users first name. lastname = The users last name. primary_smtp_address = This is the main email address that the user will have after they have migrated (this must use a domain that is registered in the target tenant). external_email_address = This is the email address that the user has in the source tenant. It must be prefixed with SMTP:. microsoft_online_services_id = This will be the UPN for the user and is most likely the same as the users primary_smtp_address.
Your organisation may have guidelines that are followed to assign values such as alias and display name, so you should follow those as required.
For my test user Alex Wilber that looks like this:
Now that the MailUser has been created we need to edit it to assign the values that we collected from the user in the source tenant. First let’s see what values are currently set:
alias = The alias of the MailUser you just created.
You should see that both ExchangeGUID and ArchiveGUID are set to 00000000-0000-0000-0000-000000000000. These values need to be identical to the values the user had in the source tenant. If your user didn’t have the Online Archive enabled in the source tenant, then there is no need to set this in the target tenant.
To set the ExchangeGUID, use the following command:
archive_guid = The users ArchiveGUID that you noted down earlier.
If you re-run the Get-MailUser command from a few steps ago you will now see the ExchangeGUID (and perhaps ArchiveGUID) are set to the same values that the user has in the source tenant.
The next thing that needs to be done is the LegacyExchangeDN that you noted down for the user needs to be added as a x500 proxy address to this MailUser. This is done by prefixing the LegacyExchangeDN value with x500: and adding it to the EmailAddresses value on the MailUser.
For example, the LegacyExchangeDN I noted down for my test user was:
/o=ExchangeLabs/ou=Exchange Administrative Group (FYDIBOHF23SPDLT)/cn=Recipients/cn=93531982d8b14ac389c31f982281535d-AlexW
So, this will become:
x500:/o=ExchangeLabs/ou=Exchange Administrative Group (FYDIBOHF23SPDLT)/cn=Recipients/cn=93531982d8b14ac389c31f982281535d-AlexW
alias = The alias you chose for the MailUser. legacy_exchange_dn_x500 = The x500 address you just created just now.
In addition to adding this address, you also need to ensure the user has a @targettenant.onmicrosoft.com email address. This usually takes the form of alias@targettenant.onmicrosoft.com (you can find the onmicrosoft.com domain for your target tenant in Azure AD or in the domains sections of your Office 365 portal).
If the MailUser does not already have one of these set, set it now:
Finally, you need to re-add any x500 addresses that the user already has set in the source tenant. These can be found in the EmailAddresses field and are prefixed with x500:. There’s a good chance there won’t be any, but if there are you should copy them and add them with the same Set-MailUser command used to add the previous 2 addresses.
Now re-run the following command to check that all the fields look correct:
endpoint_name = The name of the migration endpoint you created during the target tenant preparation (if you need to remind yourself what it was called run the command Get-MigrationEndpoint and take note of the identity value). migrating_user_smtp = The email address of the user who is migrating (this must be their new email address in the target tenant).
That’s it for the mailbox preparation and it is now time to migrate the mailbox.
Migration time!
Migrations are initiated and managed from the target tenant. In Exchange Online PowerShell connect to your target tenant (if you aren’t already). Next you need to create a simple CSV file with one header: EmailAddress. Then below that enter the primary SMTP address of the migrating user in the target tenant.
Note: There are other headers that you can add to the CSV if you wish and these are detailed in this article. However, EmailAddress is the only mandatory header. In this guide I am only migrating 1 user however you can have up to 2000 users per batch.
Save this CSV somewhere on your computer.
Now run the following command to create the migration batch:
migration_batch_name = You can choose any name for the batch. This could be “AllFinanceUsers” or just “Migration_20102022” – whatever works for you. endpoint_name = The name of the endpoint you created in the target tenant preparation. path_to_csv = The path to the CSV you created. targettenant.onmicrosoft.com = The onmicrosoft.com domain for your target tenant.
Now that you have created the migration batch, you can start it when ready. This will begin the sync of the mailbox to the target tenant, and it will reach 95% and then stop. Every 24 hours it will automatically do a delta sync to keep the mailbox at 95% until you are ready to complete the cutover. This will not affect the user and is a good way to get entire groups of users sync’d and ready to cutover in a single evening depending on your migration project plans.
Once the status moves to Completed the user will no longer be able to open their mailbox in the source tenant and should be able to open it in the target tenant!
Now that the migration has completed, the MailUser has converted to a UserMailbox and it has entered a 30 day grace period where it will work without a license. You should assign a license now or before the 30 days expires to avoid disruption to the user.
You should read the documentation for the New-MigrationBatch, Start-MigrationBatch and Complete-MigrationBatch commands to fully utilise them. For example, on the New-MigrationBatch command you can use the -AutoStart switch on so that it starts the sync immediately, and the -CompleteAfter switch to specify when it completes (removing the need to use Start-MigrationBatch and Complete-MigrationBatch separately).
If you have not read it before now, you should read the main article from Microsoft about this feature to learn about the limitations and gotcha’s. For example, if any user has an auto-expanding archive set their mailbox cannot be migrated using this tool. The FAQ on the Microsoft page answers many questions you may have and covers limitations and known issues with the tool.
Each release of SCCM current branch has been improving how it manages Office 365 clients, and the last couple of versions have improved the user experience the most. The only real issue remaining is that, under certain circumstances, the user will be prompted to reboot once the Office 365 update is complete. This reboot is not actually necessary, however. Here is how to go about setting up SCCM so that it delivers Office 365 updates to users without prompting them for an unnecessary reboot.
For starters, make sure your SCCM environment is syncing Office 365 client updates. To do this open the SCCM console and navigate to Administration > Site Configuration > Sites, select your site and select Configure Site Components > Software Update Point. Click on the Products tab and make sure Office 365 Client is ticked. Click OK to close that dialog and then head over to Software Library > Software Updates > All Software Updates and select Synchronize Software Updates in the ribbon.
Another thing to check is that the Office 365 client agent on users’ machines is configured to be managed by SCCM. You can set this in the Client Settings of SCCM. Go to Administration > Client Settings and click properties on the device settings policy your clients receive. Select Software Updates and ensure that Enable management of the Office 365 Client Agent is set to Yes.
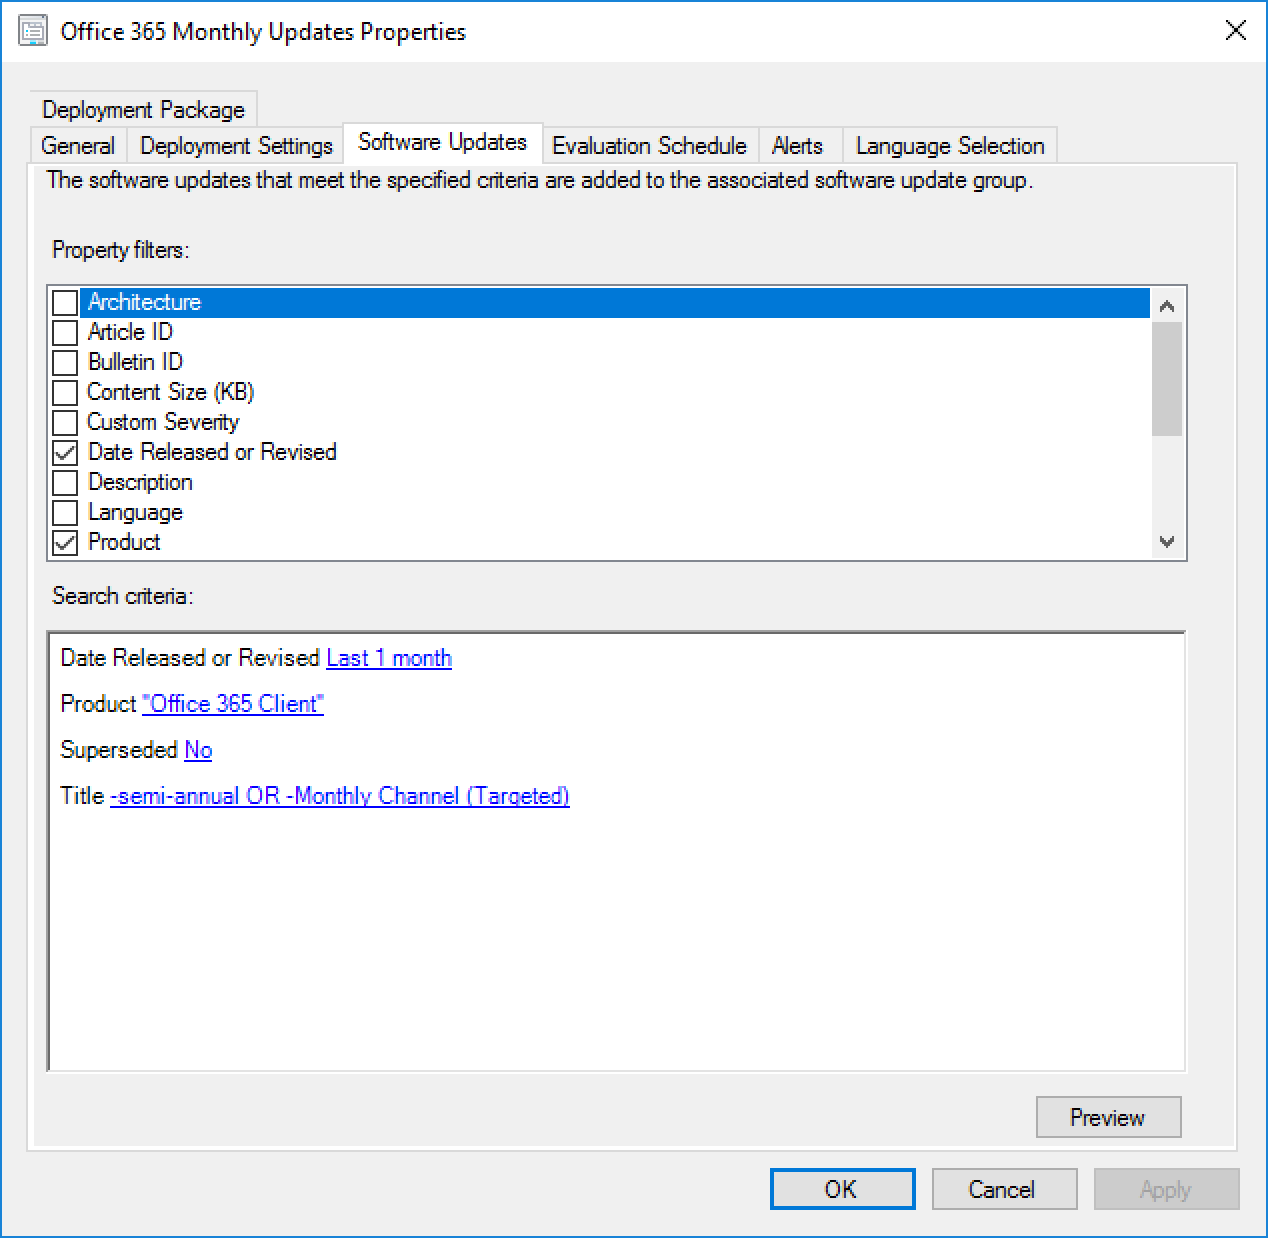
Once that’s had time to process, create an Automatic Deployment Rule to push out the updates each month (or on whatever schedule you prefer). Under Software Updates go to Automatic Deployment Rules and click Create Automatic Deployment Rule. Give it a name, such as Office 365 Monthly Updates, and select the target collection that contains your clients that need updating. Click Next, and Next again and now select the criteria for updates in the ADR.
Select the following options:
Date Released or Revised: Last 1 month
Product: Office 365 Client
Superseded: No
Title: -semi-annual OR -Monthly Channel (Targeted)
Those two items in the Title field (-semi-annual and -Monthly Channel (Targeted)) means exclude any updates with ‘semi-annual’ or ‘Monthly Channel (Targeted)’ in the name. This is because I only want the Monthly Channel updates in my ADR. If you prefer to get the semi-annual updates in yours, do not add that and add ‘-Monthly Channel Version’ to your title instead.
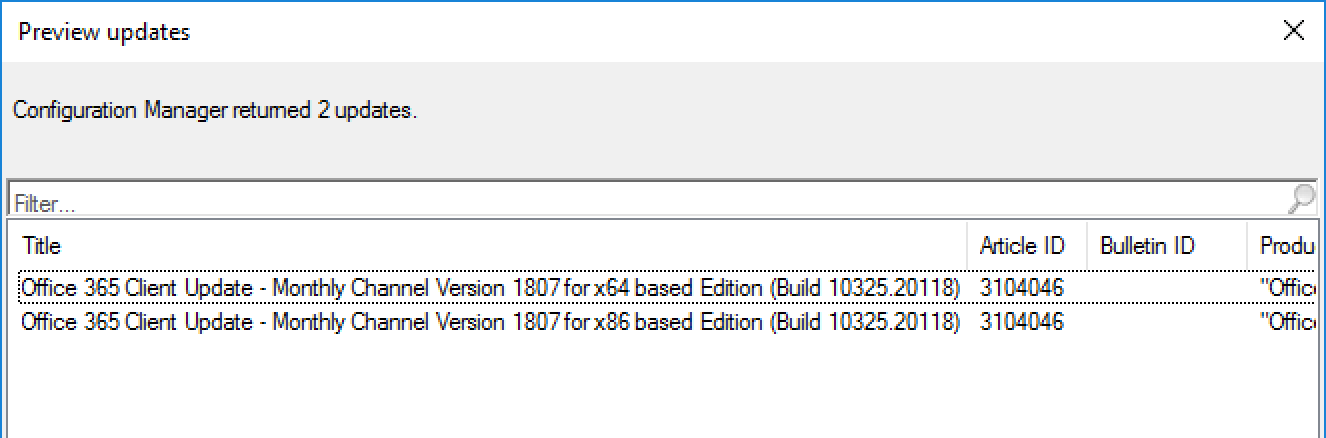
Click Preview to ensure you’re getting what you expect. If not, the updates may not have synchronized yet.
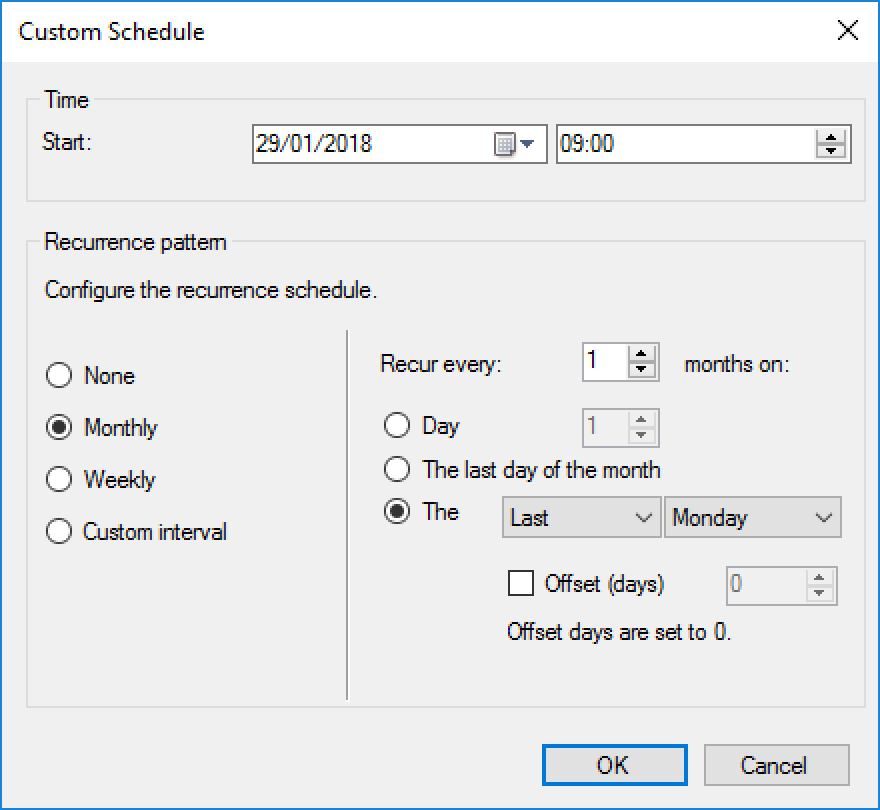
Click Next and select the schedule you want this ADR to evaluate on. Office 365 client updates are released every month (for monthly channel) but not on any particular day, so I have this rule run toward the end of each month to hopefully catch that month’s client update.
Click Next and select when you want these updates to be pushed to users. This will depend on your organisations patching schedules and agreements, however I set both the available time and deadline to As soon as possible. This is because I want these updates to be delivered to users as soon as their SCCM client receives the notification of the update.
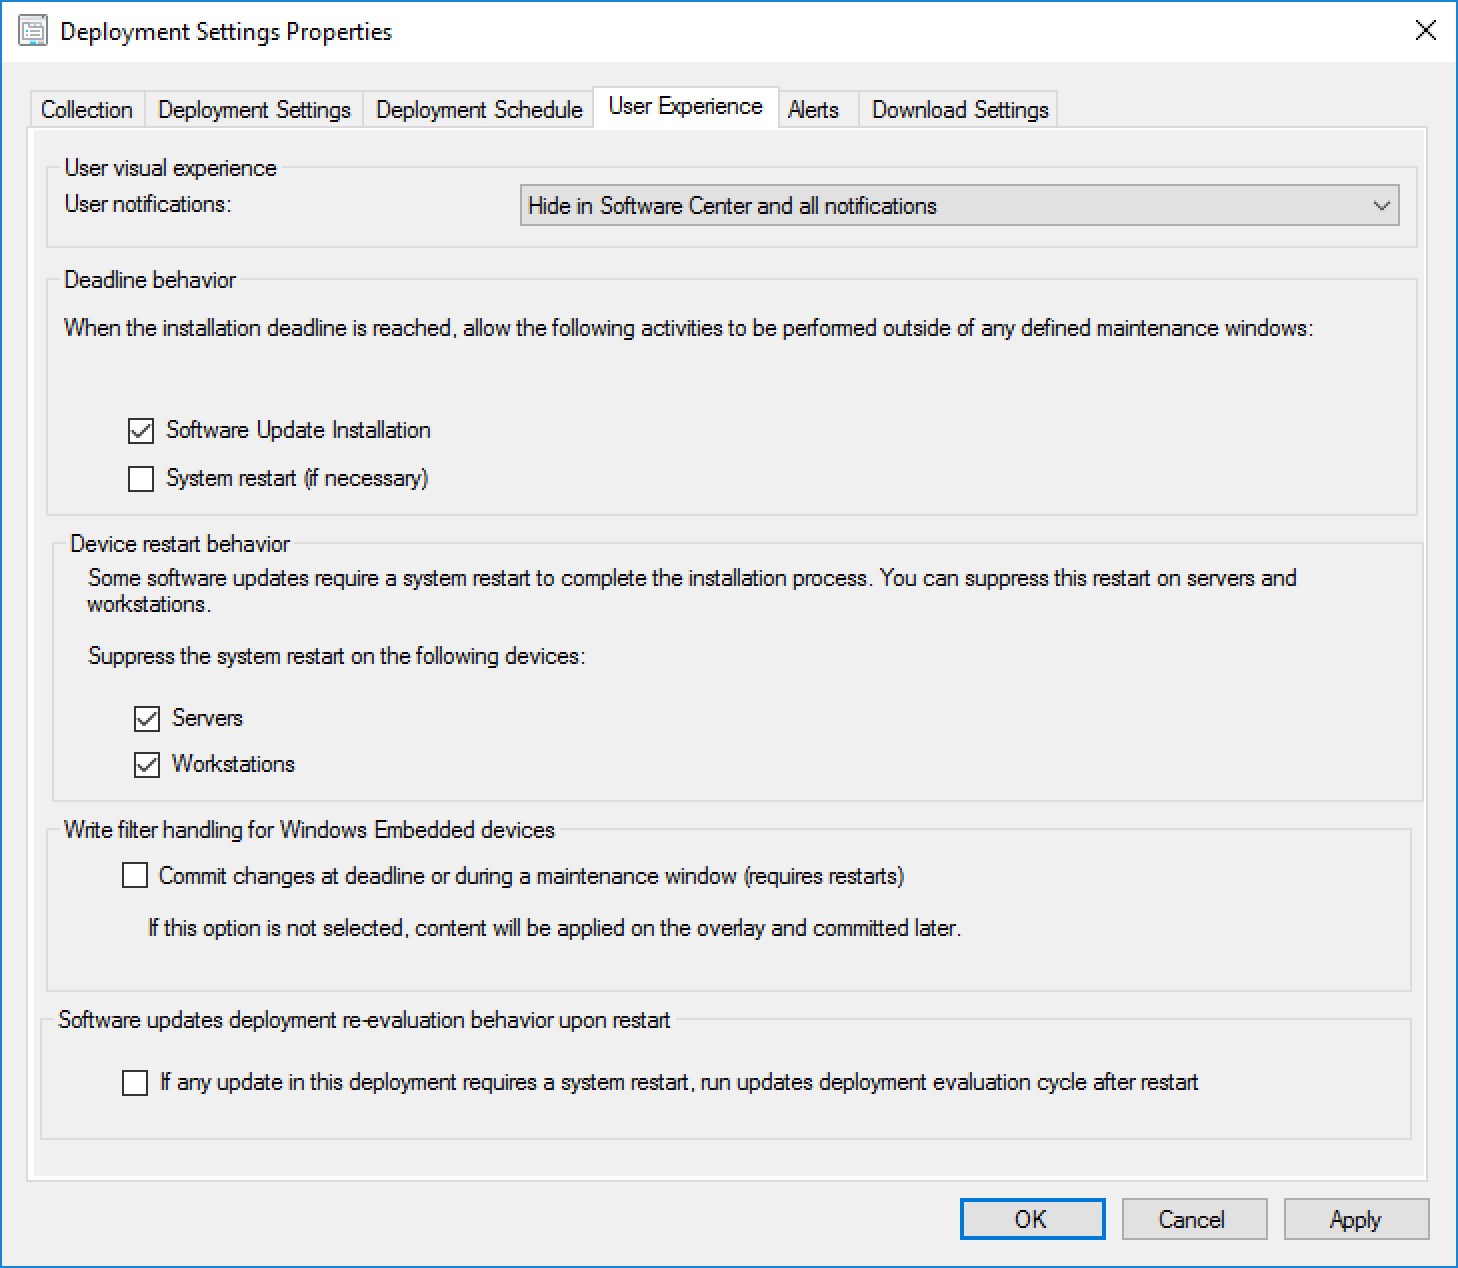
On the next screen, this is where you need to select specific options to get what I consider to be the best user experience for the Office 365 client updates. In User notifications select Hide in Software Center and all notifications. Under Deadline behaviour tick Software Update Installation, and under Device restart behaviour tick to suppress updates on both Servers and Workstations.
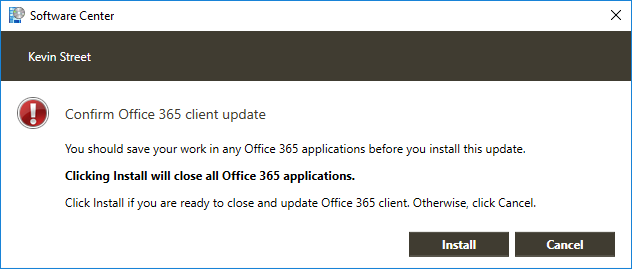
Okay, time for a tangent to explain how this is beneficial to the Office 365 update user experience. If you select Display in Software Center for the user experience and omit the system restart suppression the user will be notified that new updates are available. If they go to Software Center, find the update and click Install they will be presented with the following dialog:
As it suggests, when they click Install any Office applications they have open will close and the user will think they need to wait for the update to complete before they can continue to work. On top of that, when the update does complete, it will prompt the user to reboot their PC.
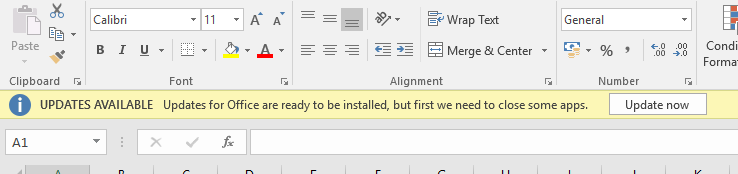
The problem is that the user waiting, and rebooting are a waste of their time. Office is able to install updates in the background while the user is working and only actually needs the user to close the apps right at the end of the install to complete the update. Office prompts the user to complete this step by means of a banner that appears in any of the Office apps that the user opens after the update has finished doing what it can. They can then click Update now at their leisure, and because most of the update process has taken place behind the scenes, the users’ downtime is only a few minutes. Office will even re-open the apps the user had open when it is complete!
So, to mitigate this sub-par user experience, the deployment settings for the ADR should be set to Hide in Software Center and all notifications, with the update allowed to install once the deadline is reached and all restarts supressed. From the users’ point of view, they will not see any indication that Office is being updated until they see the banner in their app prompting them to Update now. They can ignore this until a time that suits them, or it can just happen at the end of the day when they shut down their machine and pack up for the day. And better still, no unnecessary restart prompt.
Let’s get back to that ADR, there isn’t much left to do. Click Next and Next again to get to the Deployment Package page. Create a new deployment package (or add to an existing one, if you wish) and click Next. Continue through the ADR wizard, selecting the download location and which languages you wish to download and finally complete the wizard. Select your new ADR and click Run Now in the ribbon to get the Deployment Package and Software Update Group created. Be aware that this will also create the deployment to the client collection you selected at the start of the process, so make sure that’s acceptable! If it’s not, you may wish to change the deployment collection to a collection containing test clients or just your own machine at first to test that the user experience is what you expect it to be.
And that’s it! Office 365 client updates deployed to your users in the best possible way.
If there is one splash screen I have become sick of staring at over the past few weeks it is the one for Outlook 2016, with those irritating little dots sliding across the screen while Outlook is supposedly “Loading Profile” or “Processing”.
If you, like me, have spent quite a lot of time researching the cause of this problem you will probably have found that quite a lot of things can cause it. You’ve probably scanned and repaired your Outlook Data Files with SCANSPST.exe, created a new profile, repaired your Office 2016 install, opened Outlook in safe mode (or otherwise disabled all of the add-ins), removed any additional mailboxes or shared calendars and any number of other solutions you will find online.
These things probably do help to fix the issue if it is affecting only certain individuals, but what if the problem is affecting everyone in the office who upgrades to Outlook 2016? I had users who had previously been running Outlook 2010 or 2013 and were not seeing any problem with Outlook loading times, with it typically only taking between 10 to 15 seconds to load. But as soon as they were upgraded to Outlook 2016 it would take anywhere from 5 minutes to 15 minutes to load and some people reported times even longer than that.
A small curiosity about this problem was that it only affected the first launch of Outlook after turning on or restarting the machine. A user could close and reopen Outlook as many times as they liked once it had started the first time and it would load within a few seconds. Even more curious was that if a user did not launch Outlook immediately after logging in, but instead waited between 5 to 10 minutes before doing so, it would launch fine. I also found that if the machine was not connected to any network when Outlook was launched it would launch in just a few seconds. Obviously this meant Outlook was in offline mode and wasn’t very useful, but it did suggest that something was going on over the network that was causing Outlook to hang while loading.
To figure out the cause of this issue I started with a vanilla build of Windows 7 installed on a laptop with Office 2016 and connected it to the corporate network. I went through the steps of launching Outlook for the first time and setting up my profile and then proceeded to restart the laptop for the first proper test. The result? Outlook launched in 10 seconds. So it appeared the network on its own was not the cause.
Next I joined the laptop to the domain and left it in the Computers container. I also moved my user account into an OU with blocked inheritance. This meant that I could test with a minimal set of GPOs applied (the ones at the domain level only). I expected that I would have to apply one GPO at a time and test until I identified the GPO that was causing the problem (assuming that it even was a GPO causing the problem). However I did not have to go through that laborious process at all as the problem returned the first time I opened Outlook after adding the machine to the domain. This told me that one of the GPOs applied at the domain level was causing the problem.
That just left identifying which specific setting was causing the problem. Let’s see… a logon legal notice, some Internet Explorer site zoning and… hmm… the DNS suffix search list. Perhaps Outlook is taking ages looking for autodiscover on each of these domains? (Purely hypothesising; it wasn’t that).
As I was fairly sure the cause of the issue wouldn’t be the legal notice or the IE zoning I gave my attention on the DNS suffixes. There where quite a few of them so I thought it would be a good idea to first remove them all to see if the problem persists, and if it didn’t, add them back one at a time until the problem came back. To do this I navigated to the registry key HKEY_LOCAL_MACHINE\Software\Policies\Microsoft\Windows NT\DNSClient, made a note of what was in the SearchList value and then deleted it, leaving the SearchList value empty. I then amended the permissions on the DNSClient key to prevent Windows simply adding the values back in the next time GPOs where processed. To do this I right clicked on the DNSClient key and selected Permissions, clicked on Advanced and unticked Include inheritable permissions from this object’s parent and then in the security notice that comes up I clicked Add. This allowed me to freely change the permission I needed to change. I clicked OK to dismiss the advanced security settings box and in the simple permissions box, clicked on SYSTEM and removed the Full Control permission (leaving it with just Read). Following that I restarted the laptop and opened Outlook to see how long it would take; it took 10 seconds. Bingo.
Next I proceeded to add back one domain at a time to the SearchList registry value, each time restarting the laptop and opening Outlook until I struck on the one domain that was causing Outlook to take an age to load. I then confirmed that was the only domain causing the problem by adding them all back except that one, and once that was proven I added back the troublesome domain to prove that by adding it back, the problem returned. With about 50% of the root cause determined it was time to get Wireshark out and find out exactly why having that domain in the DNS search list was causing Outlook to load slowly.
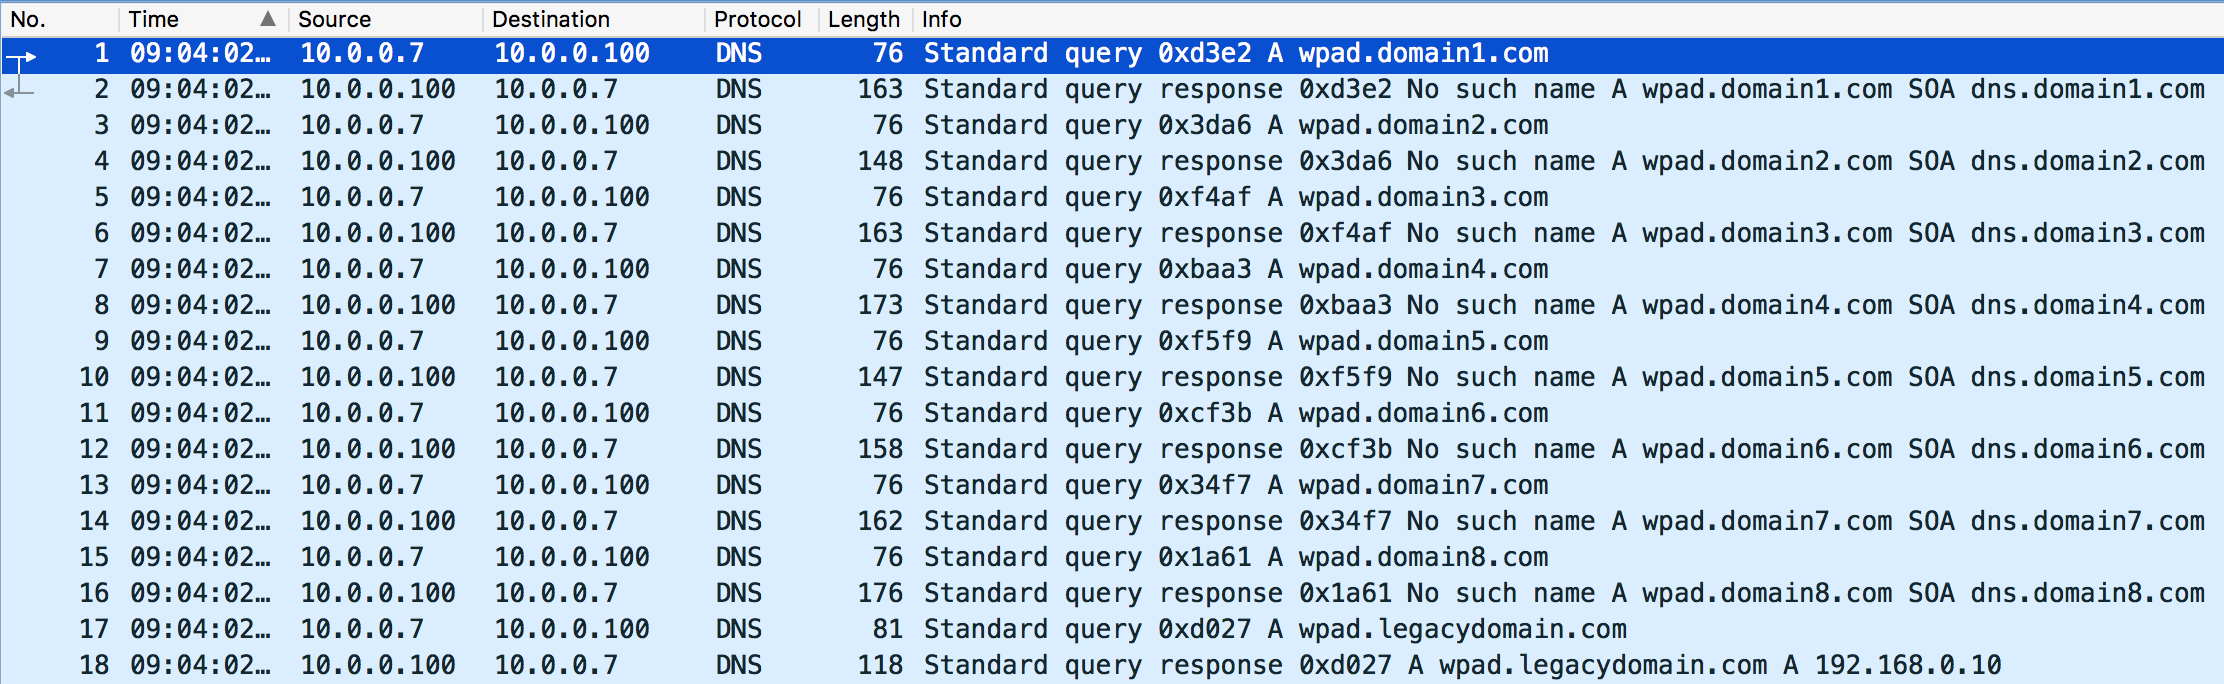
After restarting the laptop I immediately opened Wireshark to began a trace and then opened Outlook. Once Outlook had finished opening I stopped the trace and started looking through. I noticed at the start of the trace that there where several DNS lookups being made for WPAD on each domain in the DNS search list.
WPAD is the Web Proxy Auto-Discovery Protocol and is used by the WinHTTP Web Proxy Auto-Discovery Service and Internet Explorer to automatically find a proxy server on your network to route Internet traffic through. Windows checks for WPAD entries in each domain on your DNS search list even if you don’t use WPAD to assign a proxy. You may even believe you had WPAD turned off by having Automatically detect settings unticked in your Internet options, however this only turns it off for Internet Explorer. The WinHTTP Web Proxy Auto-Discovery Service still goes looking for them.
Most of the domains did not have a record for WPAD, however legacydomain.com did have a record and therefore wpad.legacydomain.com returned an IP address. This IP address was not assigned to any device (the device having been decommissioned at some point in the past) and this seems to be the key issue here. If no IP address is returned from DNS Windows moves straight on to the next domain, but if an IP address is returned Windows will attempt to route traffic through that IP address for several minutes before it gives up, and it is during this time that your Outlook client is hanging on the splash screen.
In this image you can see that my client attempted to send packets to 192.168.0.10 (the IP returned by wpad.legacydomain.com) several times with approximately 20 seconds between each attempt. The first packet was sent at 09:03:51 and the last packet (which is cropped out of the image below) was sent at 09:08:34 – 4 minutes and 45 seconds later!
As the network device that was originally assigned to 192.168.0.10 was no longer around I removed the DNS record for WPAD in the legacydomain.com DNS zone and the slow Outlook loading problem went away.
This explains some of the observations made at the beginning of this post regarding Outlook only being slow to load the first time you launch it and Outlook loading quickly if you wait a few minutes after logging on. The issue is not being caused by Outlook, Outlook is merely a victim of Windows’ HTTP proxy service latching on to the IP addresses returned by DNS and spending time trying to route traffic through them. If you wait a few minutes before launching Outlook or close and reopen it during the day the WPAD process has already happened so Outlook hasn’t got to wait for anything.
So if you are experiencing issues with Outlook starting slowly and have already tried everything you can find on the Internet, I would suggest making sure you haven’t got any stale WPAD entries in DNS! It could be a very quick fix for a very frustrating issue.
When trying to download Office 365 Click-to-run one of the steps you have to follow is to configure an XML file with your source path, client edition, channel etc. You also have to specify the language you want to download.
If you try to use a language ID that is not supported in Office 2016 you will get the error 30125-1007 (502):
The fix is to make sure you use one of the supported language IDs from the list at the following link: