If you are using the Cross-tenant OneDrive migration service offered by Microsoft to migrate users OneDrive content from one Microsoft 365 tenant to another, in rare cases you might find yourself receiving this error when you try to create the trust between the two tenants:
It has been detected that partners reside in the same SPO location that prevents them from migrating. Please contact MS to resolve this issue. Once the issue has been resolved, please try running the migration again.
This error means that both the source and target tenants have their SharePoint data being hosted on the same farm. This should be rare because even if both tenants are in the same geographical location, for them to both be hosted in the same SharePoint farm is … unlucky.
As the error message states, to fix this you will need to raise a ticket with Microsoft support. They will arrange with the SharePoint engineering team to migrate the data of one of the tenants to another farm. I recommend checking which tenant has the least amount of data in SharePoint and suggesting to the support representative that they migrate that one. You should also identify if this issue exists (by running the commands to create the tenant trust) as early as possible, because after you raise the ticket, it can take several weeks to be resolved. It took two weeks to resolve for me and that was with a small tenant. I imagine for tenants with more data it could take longer.
Sometimes it may be necessary to migrate Azure virtual machines between subscriptions or tenants, for example if you are splitting resources to set up more granular permissions or buying/selling parts of your business.
Microsoft has a built-in move system for many resources in Azure, which does include virtual machines. However, with virtual machines it comes with a few caveats; you can only migrate VMs between different subscriptions in the same tenant, and you must migrate all dependant resources at the same time. For a virtual machine this means that you must also migrate the virtual network and network security group (if you have one) that the virtual machine is attached to. But migrating a virtual network means you must migrate every other virtual machine that is attached to it at the same time, which may be inconvenient or simply not needed. Because of these caveats we need to look at alternative ways to migrate Azure virtual machines.
The way I migrate Azure virtual machines is by following these steps:
(If migrating to a different subscription in the same tenant) Create a snapshot of the virtual machine OS and data disks in the new subscription and then convert the snapshot to a disk
(If migrating to a different tenant) Export the virtual machine OS and data disks to a VHD which you download and then upload in the new tenant
Create a new virtual machine with the same size and image as the source virtual machine, and put it in the new resource group and virtual network when you get to that part of the creation process
When the new virtual machine is created, immediately stop it and swap out the OS disk to the one you migrated over
Reconfigure anything you need to in the virtual machine, test it and then tidy up by deleting the leftover snapshot and the source virtual machine
This method also has the advantage that the source virtual machine will remain in place until you have completed the migration, so if something goes wrong you can always fall-back to the existing virtual machine.
Ensure you have an account that you can use to log on to the virtual machine that does not rely on something like Active Directory, as this may not be available immediately after you complete the migration. In my case these are Windows virtual machines so I will ensure that there is a local admin user account available.
Before stopping the virtual machine, you also need to turn off Azure Disk Encryption (if you have it turned on) on both the OS disk and data disk. To do this follow these steps:
Using PowerShell, connect to your Azure tenant using:
Connect-AzAccount
If you have multiple subscriptions, use the following command to select the same subscription that your virtual machine is in (replacing the values between the pointy brackets with the correct values for you):
Set-AzContext -Subscription "<subscription name"
Now run the following command to get the current encryption status of the virtual machine you plan to migrate (replacing the values between the pointy brackets with the correct values for you):
Get-AzVMDiskEncryptionStatus -ResourceGroupName "<resource group name>" -VMName "<virtual machine name>"
If the value of either OsVolumeEncrypted or DataVolumesEncrypted is Encrypted, you will need to run this command to disable the encryption before you can create a snapshot or export the disk (replacing the values between the pointy brackets with the correct values for you):
Disable-AzVMDiskEncryption -ResourceGroupName "<resource group name>" -VMName "<virtual machine name>" -VolumeType All
That can take a few minutes to complete. Once it has completed, stop and virtual machine so that its status shows as “Stopped (deallocated)”.
Create a copy of the virtual machine disk(s) in the new subscription (same tenant)
Note: If you are moving the virtual machine to a new tenant, skip down to the next section.
If you are moving the virtual machine to a different subscription in the same tenant, the process of copying the disk to the new subscription is quick.
Go to the virtual machine in your Azure portal and click on Settings -> Disks. In the OS disk section, click on the disk and then click Create snapshot. In the first page of settings, select the new subscription name and the new resource group name (or create a new resource group here if needed).
Most of the rest of the page will be greyed out now, which is fine. You can select the storage type if you want, but Standard HDD is enough for this.
Complete the rest of the process for creating the snapshot and once validation has passed, click Create.
Once the deployment has completed, click Go to resource and from here you can click Create disk. This time the subscription and resource group should default to the same ones you selected for the snapshot (but always worth double checking), so give the disk a name and select the availability zone if needed. You can also change the size of the disk, however by default it will select the same size that the original disk used.
Continue through the rest of the process, setting the options you want in the Encryption page, the Networking page and so on until you get to the Review + create page. Once validation is done, click Create.
Once the disk creation has completed, you can delete the snapshot. Go to the Resource group and find the snapshot in the list of resources. Select it and click Delete, confirm you selected the right resource and confirm the deletion.
The OS disk is now ready to be attached to a new virtual machine. If this virtual machine has any data disks, you should repeat this process for the data disks. Once you are done head down to the Create new virtual machine section of this guide.
Create a copy of the virtual machine disk(s) in the new tenant
Note: If you are moving the virtual machine to a different subscription in the same tenant, you should follow the steps in the previous section and skip this one.
Copying the virtual machine to a new tenant is a slightly more complicated process than moving it between different subscription in the same tenant, but still not too bad.
Go to the virtual machine in your Azure portal and click on Settings -> Disks. In the OS disk section, click on the disk and then click on Disk Export which you can find in Settings on the left.
Note: If you have “Disable public and private access” set under Networking you will not be able to export the disk. As a temporary measure, set this to “Enable public access from all networks” while you go through this process to export the disk.
Click “Generate URLs” and wait for the links to be created. Once they are, click “Download the VHD file”. Now wait for the download to complete.
Once it has completed you need to upload it to the new tenant and new resource group (which you will need to create now if you haven’t already). The easiest way to do this is with PowerShell. If you connected earlier, disconnect from the tenant where the virtual machine currently resides using:
Disconnect-AzAccount
And reconnect to the new tenant using:
Connect-AzAccount
If you have multiple subscriptions, use the following command to select the subscription that you are migrating the virtual machine to (replacing the values between the pointy brackets with the correct values for you):
Set-AzContext -Subscription "<subscription name>"
Now run the following command to upload the VHD to the new tenant and resource group (replacing the values between the pointy brackets with the correct values for you):
Add-AzVhd -LocalFilePath "<path you downloaded VHD to>" -ResourceGroupName "<resource group name>" -Location "<your preferred Azure region>" -DiskName "<vm disk name of your choosing>" -DiskHyperVGeneration V2
Note: For the DiskHyperVGeneration switch this needs to match the virtual machine generation you intend to create when you migrate. Most likely this will be V2 unless you have specific reasons to remain with a V1 virtual machine.
The OS disk is now ready to be attached to a new virtual machine. If this virtual machine has any data disks, you should repeat this process for the data disks.
Create new virtual machine
In this guide I suggest you create a new virtual machine rather than creating the virtual machine from disk. This is because if you create a virtual machine from the disk, this is considered a “specialised image”, and it does not fill in the osProfile (see this issue on GitHub). You are not able to update the osProfile manually as the attributes are read only (in contradiction to an article from Microsoft which suggests that you can update certain attributes such as AllowExtensionOperations). However, virtual machines created from one of the Azure provided images is considered a “generalised image” and will have osProfile filled in as appropriate.
This may or may not matter to you, but to cover all bases I think it is best to create a new virtual machine so that the osProfile is correctly filled in.
In your Azure portal, go to Virtual Machines and click Create. Select the same subscription and Resource group that your migrated disk is in, give the virtual machine a name and select the region you want. In the Image selection box, select the same image that you did for the original virtual machine. This will ensure that the osProfile properties of this virtual machine get filled in correctly.
In the Security type drop down you need to select Standard at this point. If you set it to Trusted launch, you will not be able to attach the migrated disk after the virtual machine has been created. Once the migrated disk has been attached, you will be able to change the security type to Trusted launch if you want.
Select the appropriate size for the virtual machine and give it a username and password for the administrator account. You should ensure that the username you specify here is the same as the one in the virtual machine you are migrating over, as this gets stored in the osProfile.
In the Disks page, you can select any option here because the disk that is created during this creation wizard only last a few minutes. This is because you will be swapping it out with the one you migrated shortly after the virtual machine creation is complete. Don’t forget to tick Encryption at host if this is something you use (doing this will also re-enable it if you needed to disable it before copying the disk).
Complete the virtual machine creation process by selecting what you need from the remaining pages. Once the validation has passed, click Create.
When the deployment has finished, you can go to the resource. You will see that the virtual machine has started automatically, so stop it and wait for it to show as “Stopped (deallocated)”. Once this is done, go to Settings -> Disks and click on Swap OS disk. You will be presented with a drop down where you can select the disk you want to swap in, so find the disk you migrated over and select it.
Confirm your selection by entering the name of the virtual machine and click OK. Once the swap is complete, you can attach any data disks from the original virtual machine that you migrated over. From the same Disks screen, click Attach existing disks and select the disk name from the drop-down menu.
When creating the virtual machine, I mentioned that you had to set the Security type to Standard at that point in the process. If you do actually want to use Trusted launch, go to the Settings -> Configuration page and, under Security type select Trusted launch virtual machines.
Once that is all done, you can go back to the virtual machine Overview and start the virtual machine again. While you wait for it to start, you can delete the unused disk that was created when you created this virtual machine. Click on the Resource group to see all resources that are in it, select the unused disk and click Delete. Be careful not to select the wrong disk! Thankfully Azure will not let you delete a disk if it is attached to any virtual machine.
And that is it! Once you have done some testing and are happy the migration has been successful, you can also delete the virtual machine (and its disks and interfaces) in the original tenant / subscription to fully complete the process.
A fairly new service from Microsoft, the Cross-tenant OneDrive migration allows you to migrate a users OneDrive from one tenant to another. If you wish to use this service, you need a Cross-Tenant User Content Migration license that is available for purchase to Enterprise Agreement customers.
If you have followed Microsoft’s guide to setting it up, you know the first step in the process is to create a mapping that maps the source tenant user to the target tenant user. After that, you can start the migration by running:
Hopefully when you run this command it works without any issues! However, there are a few errors that you might encounter. Here is a list of errors that I have encountered and how to resolve them:
Error -161 This means that the LockState of the users OneDrive site is set to ReadOnly. This is most likely something that an administrator set on the Users OneDrive for one reason or another. You can resolve this by setting the users OneDrive site back to Unlock and starting the OneDrive migration again.
Error -102 This means that the LockState of the users OneDrive site is set to NoAccess. This happens if the user had a OneDrive site provisioned at some point, but since then has lost the right to access it. The most probable cause for this is the user once had a license that enabled them to have a OneDrive but was then moved to a license that does include OneDrive. You can resolve this by reallocating a license to the user that includes a OneDrive (SharePoint Plan 1 or Plan 2) and starting the OneDrive migration again.
The Cross-Tenant content move feature is not enabled for this tenant Assuming you have correctly set up the trust between the two tenants, this error occurs when you have not applied a Cross Tenant User Data Migration license to the user. This can be applied to either the source or the target user, so apply one and wait a short amount of time, then start the OneDrive migration again.
OneDrive site for source user UPN example@sourcetenant.com does not exist This means the user does not have a OneDrive provisioned.
Identity map entry for source UPN example@sourcetenant.com does not exist on the target tenant This means that no mapping exists for this user on the target tenant. Create a mapping for this user and then start the migration again.
The identity map entry for source UPN example@sourcetenant.com does not correspond with the requested target UPN example@targettenant.com This means that the mapping you created is incorrect. Perhaps the Source user UPN or the target user UPN was wrong. You should try recreating the mapping, or check the existing mapping, and start the OneDrive migration again when you have fixed the mapping.
The remote server returned an error: (429) This means that your SharePoint tenant is currently being throttled due to your usage limits being exceeded. You can read more about that here, but in the end, this means you just have to try starting the migration again a bit later.
Additionally, there is one other error I have met that does not immediately throw an error but does cause the MoveState to move to Failed (usually after several hours). This is an unusual case where a user is using more space in their OneDrive than their license allows. For example, someone with a Microsoft 365 F1 license assigned which only allows 2 GB of storage in OneDrive, but with more than 2 GB of used storage (which you can check in Microsoft admin center). I expect this happens if a user originally had a license that allows more storage (such as a Microsoft 365 E3 which allows 1 TB of OneDrive storage) but was then downgraded. This situation causes the migration service some confusion as it tries and retries several times before failing.
The solution is to simply apply a license that allows more OneDrive storage and then start the migration again.
This guide follows the official guide from Microsoft (which can be found here) with each step shown in more detail and more screenshots to help you validate what you’re doing. This sort of work should be done by experienced Office 365 administrators, however this guide could also be used by people looking to learn (say, by migrating mailboxes between two test Office 365 tenants).
It is also worth highlighting that at the time of writing, this feature is in public preview, meaning you should test it and ensure that the process works correctly for you before committing to using it in a fully-fledged mailbox migration project.
You will need to set aside at least a few hours to follow this guide all the way through. The process uses a combination of configuration in Azure and Exchange Online PowerShell.
I also recommend having a OneNote (or other note taking app) page ready to paste various GUIDs and notes throughout this process.
Preparing the target tenant (where the mailboxes will be migrated to)
Go to the Azure Portal and log in if needed (using target tenant credentials). Click on Azure Active Directory.
On the Overview page make a note of your Tenant ID. In your notes make sure this is clearly labelled as the target Tenant ID as you’ll be making a note of the source Tenant ID later.
On the left click App registrations, then click + New registration.
Give the app a descriptive name (such as “CrossTenantMailboxMigrationApplication”) and under Supported account types select “Accounts in any organizational directory (Any Azure AD directory – Multitenant)”. In the Select a platform drop down select Web and enter “https://office.com” in the box next to it.
Click register at the bottom of the page.
You should be taken to the Overview page for your new app, but if not, from the Azure Active Directory page click on App registrations on the left and click on your app to bring up the overview.
You need to note down the Application (client) ID here as this will be used later to create URL that will be used to register this app in the source tenant.
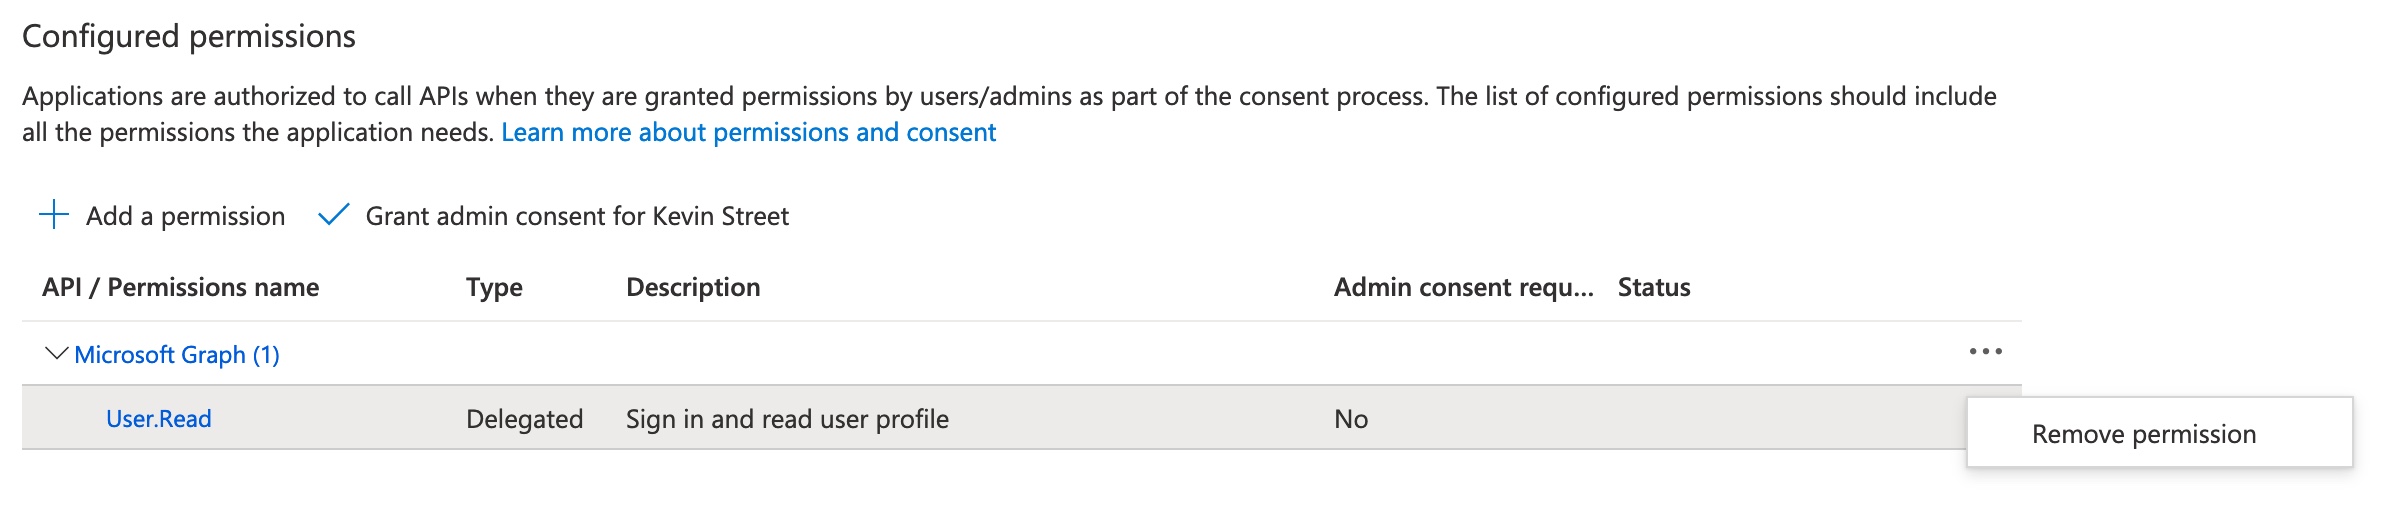
On the left, click on API permissions. By default, the permission User.Read will be granted, however this is not needed so remove it by clicking on the three dots at the end of the line and selecting Remove permission. Confirm this by clicking Yes, remove in the pop-up warning that appears.
Now to add the permissions that are needed, click + Add a permission. In the menu that appears on the right, click on the APIs my organisation uses tab and search for Office 365 Exchange Online.
Click on Office 365 Exchange Online and select Application permissions. Expand Mailbox and select Mailbox.Migration. Then click Add permissions at the bottom of the screen.
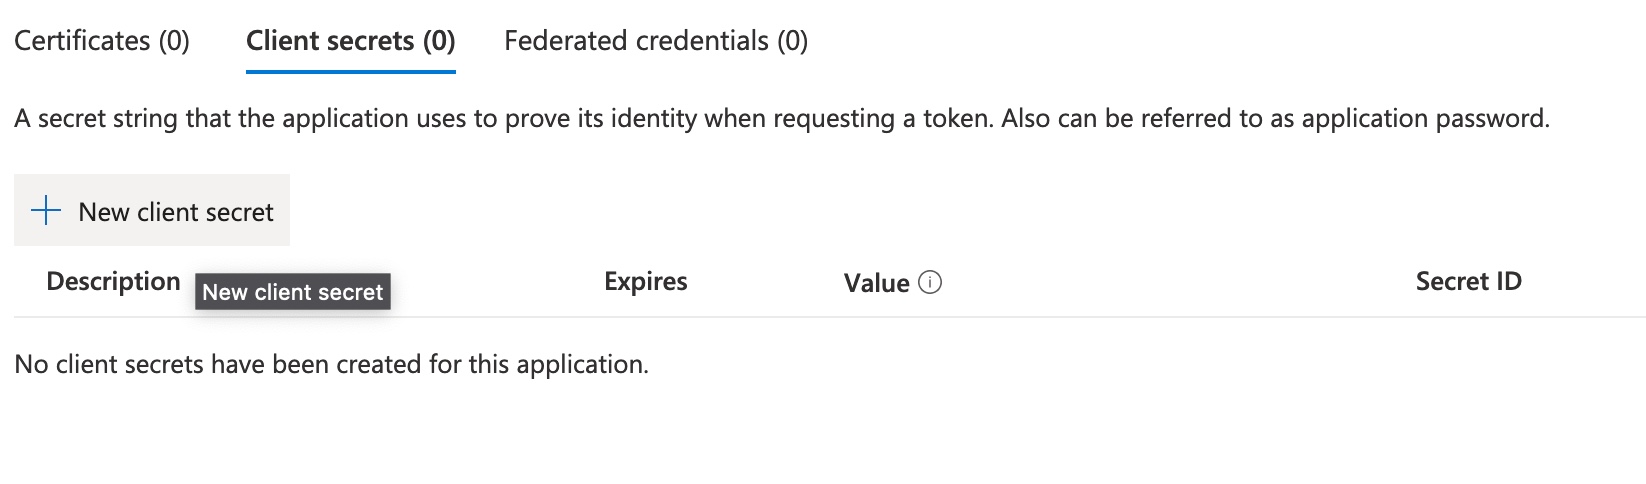
Next, click on Certificates & secrets on the left. Make sure you’re in the Client secrets tab and click + New client secret.
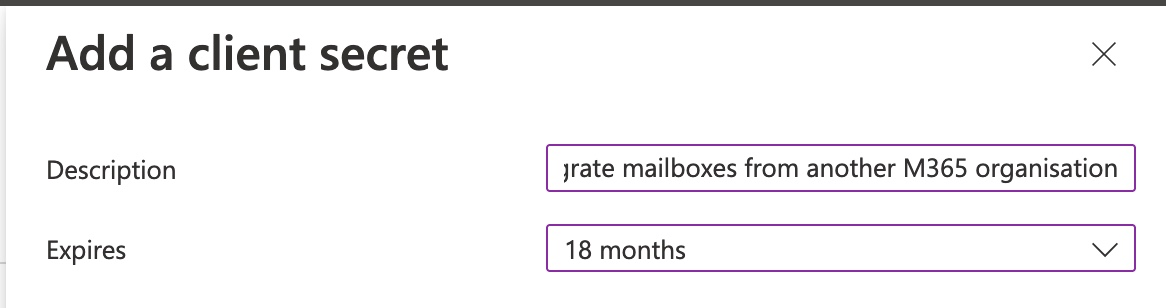
Give the secret a description (such as “Used to migrate mailboxes from another M365 organisation”) and an expiration date. This secret should remain valid for the duration of your mailbox migration project (or you’ll need to create a new client secret later when this one expires). Click Add at the bottom of the screen.
Make a note of the data in the value field; this is the client secret. You should endeavour to store this somewhere secure as it is a secret and should not end up the wrongs hands. This is also your only chance to store the secret as it will not be visible on this page on future visits.
Don’t worry, the secret that is visible here has been deleted before publication!
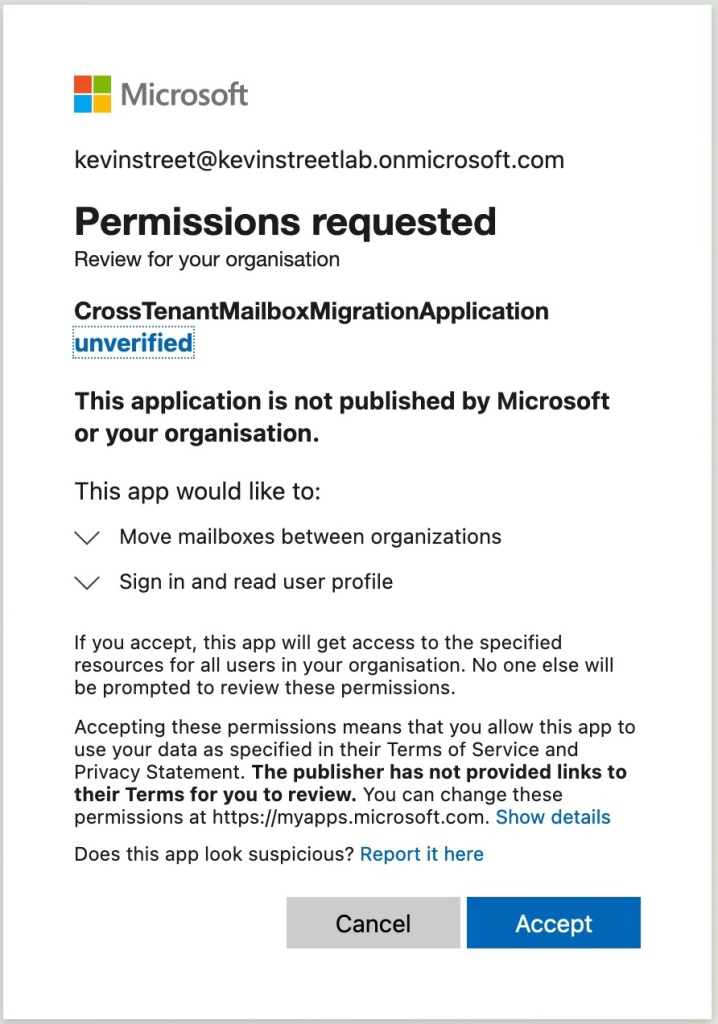
Now you must consent to the permissions you granted the application a few steps ago. To do this go back to the Azure Active Directory landing page by clicking Microsoft Azure in the top left corner of the screen and then select Azure Active Directory. From there, click on Enterprise applications on the left and then click on the application you created. On the left, select Permissions and then click Grant admin consent for [your tenant name].
A new browser window will pop up and you may be required to re-enter your account password. A Permissions requested box will follow on from that and you should review the permissions and click Accept.
Now, if you click Refresh at the top of the screen you should see the Office 365 Exchange Online – Mailbox.Migration permission granted.
Next it is time to formulate the URL that will be used to register this application in the source tenant. The URL template is:
sourcetenant = The onmicrosoft.com domain for the source tenant (where the mailboxes are migrating from). If you need to find out the onmicrosoft.com address for the source tenant, go to the Azure Portal -Domains page and log in with your source tenant admin credentials – be careful here as you may already be logged in with your target tenant credentials at this stage due to the work you’ve just been doing in Azure. Use an Incognito window to make sure you switch accounts to be certain. Amongst the listed domains will be a something.onmicrosoft.com domain – this is what you need. application_id = The Application (client) ID you noted down earlier.
In my environment my source tenant is kevinstreetlab.onmicrosoft.com and my Application (client) ID from the application I created is af9aed61-522c-4f94-b5b1-f415b6c6d5a1, so my URL is:
sourcetenant = The onmicrosoft.com domain for your source tenant (where the mailboxes are migrating from). This is the same as you used earlier when formulating the URL. endpoint_name = Any descriptive name you want for this endpoint (I used “MailboxMigrationEndpoint”).
The last bit of preparation to do in the target tenant is to create an organisation relationship between your source tenant and your target tenant.
First you need to log on to Azure in your source tenant to make a note of the source tenant ID.
Go to Azure Portal and log in if needed (source tenant credentials). Click on Azure Active Directory.
On the Overview page, make a note of your Tenant ID. In your notes make sure this is clearly labelled as the source Tenant ID so that you do not confuse it with the target Tenant ID that you noted down earlier.
Create the following variable:
$SourceTenantID="source_tenant_id"
source_tenant_id = The source Tenant ID that you just noted down.
Run the following two commands to see what existing organisation relationships exist (and particularly if any already exist for the same tenant):
organization_relationship_name = Any descriptive name of your choosing (such as “OrgRelationshipForMailboxMigrations”).
That’s it for the target tenant preparation.
Preparing the source tenant (where the mailboxes will be migrated from)
Now we move on to the preparation needed in the source tenant. If you are still logged in to the target tenant, you may prefer to log out to minimise the possibility of confusing which tenant you are working in.
Open your web browser and navigate to the URL you formulated earlier so that you can accept the migration application in the source tenant.
If you are asked to sign in, make sure you sign in with your source tenant admin account. You will be prompted to accept the permissions needed to use the migration app so click Accept to continue.
If you want to confirm the app has been registered, go to the Azure AD Portal, and select Enterprise applications from the left and confirm that the CrossTenantMailboxMigrationApplication appears in the list (or whatever name you chose).
For the next steps you need to connect to your source tenant through Exchange Online PowerShell. Start by disconnecting from the previous session:
Disconnect-ExchangeOnline
Press Y to confirm you want to disconnect from all active sessions. Now connect to your source tenant:
Before we can create the organisation relationship, we need to create a scoping group for the mailboxes that will be allowed to migrate. The idea here is that you add mailboxes to this group if they are allowed to migrate, which helps to protect mailboxes in your organisation that may not be migrating. To create the group, run the following command:
New-DistributionGroup -Type Security -Name "Mailboxes for Migration" -Alias "MigratingMailboxes"
You can choose anything for the Name and Alias fields. This will be a mail enabled security group so the value in the Alias field will become the email address that is created for this group.
We’ll add a mailbox to this group later when doing a test migration.
Now we’re going to create the organisation relationship in the source tenant, just like we did in the target tenant earlier. Run the following commands:
target_tenant_id = The target Tenant ID you noted down earlier. application_client_id = The Application (client) ID that you noted down earlier. scoping_group_name = The value you used for the Name of the scoping group you created earlier.
Run the following two commands to see what existing organisation relationships exist (and particularly if any already exist for the same tenant):
organization_relationship_name = Any descriptive name of your choosing (such as “OrgRelationshipForMailboxMigrations”).
This completes the preparation steps for both tenants and the next section will cover migrating a single test mailbox.
Migrating a mailbox from the source tenant to the target tenant
For any mailbox migrating to the target tenant, you must provision a MailUser object in the target tenant and assign it some very specific attributes that are gathered from the user’s mailbox in the source tenant. Specifically, you will need the ExchangeGUID value, the ArchiveGUID value (if the user has an Online Archive), the LegacyExchangeDN value and any x500 addresses already configured on the mailbox.
In this guide I am going to migrate one mailbox over, a pretend user called Alex Wilber. His primary email address will change from AlexW@dev.kevinstreet.co.uk to AlexW@kevinstreet.co.uk as his mailbox migrates from my dev/lab tenant to my production tenant.
To follow along select or create a test user and mailbox in your source Office 365 tenant.
The first thing to do is to add this mailbox to the scoping group that we created in the source tenant preparation. Start by logging in to your source tenant in Exchange Online PowerShell and run the following command:
mailboxes_for_migration = The name of the scoping distribution group you created. mailbox_alias = The alias of the mailbox you wish to migrate. If you do not know the alias, you can get it in PowerShell by using the following command:
Get-Mailbox -Filter { EmailAddresses -eq "user_email_address" } | Select-Object Alias
user_email_address = One of the email addresses assigned to the user.
With that done, it’s time to collect the information we need for the MailUser. Run the following command to get the information we need:
mailbox_alias = The alias of the mailbox you are migrating.
Make a note of the ExchangeGUID, LegacyExchangeDN and any existing x500 addresses in the EmailAddresses field. Also, if the ArchiveGUID has a value (other than 00000000-0000-0000-0000-000000000000) this means the Online Archive is enabled for the user and you should make a note of this value as well.
With these values gathered it’s time to create the MailUser in the target tenant. Disconnect from the current Exchange Online PowerShell session and re-connect to your target tenant.
When creating a MailUser you will need to assign it a password, so use a password generator or something similar to create a password you will use, and assign it to a variable with the following command:
Where the following value are: alias = The alias for this MailUser. This could be the same as the alias that is used in the source tenant. displayname = How the display name will appear for this user. This could be the same as the display name that is used in the source tenant. firstname = The users first name. lastname = The users last name. primary_smtp_address = This is the main email address that the user will have after they have migrated (this must use a domain that is registered in the target tenant). external_email_address = This is the email address that the user has in the source tenant. It must be prefixed with SMTP:. microsoft_online_services_id = This will be the UPN for the user and is most likely the same as the users primary_smtp_address.
Your organisation may have guidelines that are followed to assign values such as alias and display name, so you should follow those as required.
For my test user Alex Wilber that looks like this:
Now that the MailUser has been created we need to edit it to assign the values that we collected from the user in the source tenant. First let’s see what values are currently set:
alias = The alias of the MailUser you just created.
You should see that both ExchangeGUID and ArchiveGUID are set to 00000000-0000-0000-0000-000000000000. These values need to be identical to the values the user had in the source tenant. If your user didn’t have the Online Archive enabled in the source tenant, then there is no need to set this in the target tenant.
To set the ExchangeGUID, use the following command:
archive_guid = The users ArchiveGUID that you noted down earlier.
If you re-run the Get-MailUser command from a few steps ago you will now see the ExchangeGUID (and perhaps ArchiveGUID) are set to the same values that the user has in the source tenant.
The next thing that needs to be done is the LegacyExchangeDN that you noted down for the user needs to be added as a x500 proxy address to this MailUser. This is done by prefixing the LegacyExchangeDN value with x500: and adding it to the EmailAddresses value on the MailUser.
For example, the LegacyExchangeDN I noted down for my test user was:
/o=ExchangeLabs/ou=Exchange Administrative Group (FYDIBOHF23SPDLT)/cn=Recipients/cn=93531982d8b14ac389c31f982281535d-AlexW
So, this will become:
x500:/o=ExchangeLabs/ou=Exchange Administrative Group (FYDIBOHF23SPDLT)/cn=Recipients/cn=93531982d8b14ac389c31f982281535d-AlexW
alias = The alias you chose for the MailUser. legacy_exchange_dn_x500 = The x500 address you just created just now.
In addition to adding this address, you also need to ensure the user has a @targettenant.onmicrosoft.com email address. This usually takes the form of alias@targettenant.onmicrosoft.com (you can find the onmicrosoft.com domain for your target tenant in Azure AD or in the domains sections of your Office 365 portal).
If the MailUser does not already have one of these set, set it now:
Finally, you need to re-add any x500 addresses that the user already has set in the source tenant. These can be found in the EmailAddresses field and are prefixed with x500:. There’s a good chance there won’t be any, but if there are you should copy them and add them with the same Set-MailUser command used to add the previous 2 addresses.
Now re-run the following command to check that all the fields look correct:
endpoint_name = The name of the migration endpoint you created during the target tenant preparation (if you need to remind yourself what it was called run the command Get-MigrationEndpoint and take note of the identity value). migrating_user_smtp = The email address of the user who is migrating (this must be their new email address in the target tenant).
That’s it for the mailbox preparation and it is now time to migrate the mailbox.
Migration time!
Migrations are initiated and managed from the target tenant. In Exchange Online PowerShell connect to your target tenant (if you aren’t already). Next you need to create a simple CSV file with one header: EmailAddress. Then below that enter the primary SMTP address of the migrating user in the target tenant.
Note: There are other headers that you can add to the CSV if you wish and these are detailed in this article. However, EmailAddress is the only mandatory header. In this guide I am only migrating 1 user however you can have up to 2000 users per batch.
Save this CSV somewhere on your computer.
Now run the following command to create the migration batch:
migration_batch_name = You can choose any name for the batch. This could be “AllFinanceUsers” or just “Migration_20102022” – whatever works for you. endpoint_name = The name of the endpoint you created in the target tenant preparation. path_to_csv = The path to the CSV you created. targettenant.onmicrosoft.com = The onmicrosoft.com domain for your target tenant.
Now that you have created the migration batch, you can start it when ready. This will begin the sync of the mailbox to the target tenant, and it will reach 95% and then stop. Every 24 hours it will automatically do a delta sync to keep the mailbox at 95% until you are ready to complete the cutover. This will not affect the user and is a good way to get entire groups of users sync’d and ready to cutover in a single evening depending on your migration project plans.
Once the status moves to Completed the user will no longer be able to open their mailbox in the source tenant and should be able to open it in the target tenant!
Now that the migration has completed, the MailUser has converted to a UserMailbox and it has entered a 30 day grace period where it will work without a license. You should assign a license now or before the 30 days expires to avoid disruption to the user.
You should read the documentation for the New-MigrationBatch, Start-MigrationBatch and Complete-MigrationBatch commands to fully utilise them. For example, on the New-MigrationBatch command you can use the -AutoStart switch on so that it starts the sync immediately, and the -CompleteAfter switch to specify when it completes (removing the need to use Start-MigrationBatch and Complete-MigrationBatch separately).
If you have not read it before now, you should read the main article from Microsoft about this feature to learn about the limitations and gotcha’s. For example, if any user has an auto-expanding archive set their mailbox cannot be migrated using this tool. The FAQ on the Microsoft page answers many questions you may have and covers limitations and known issues with the tool.
With most modern servers now shipping with UEFI enabled by default and many virtual hypervisor platforms supporting it for guest VMs as well, you may wish to switch your existing installations of Windows Server 2012, 2012 R2 or 2016 from booting with legacy BIOS to booting with UEFI. Thanks to a small tool introduced by Microsoft in Windows 10 1703, MBR2GPT.EXE, this can be done very easily.
You will need to download a copy of Windows 10 1703 or later in order to follow this guide as you need a copy of MBR2GPT.EXE and you need to boot your server into the version of WinPE that comes with these releases of Windows 10. You cannot run the tool in versions of Windows prior to 1703 (which, technically, Window Server 2016 is as it uses the same codebase Windows 10 1607).
Make certain your platform supports UEFI booting before continuing with this guide. If it does not, you will no longer be able to boot into Windows after you have changed the partition table from MBR to GPT.
If this process fails it has the potential to make your server unbootable, corrupt your data and cause lengthy downtime. Make certain you have an adequate backup of your server and a restoration process in place before proceeding.
Okay, with the big scary warnings out of the way, let’s get going!
First start by loading the Window 10 1703 (or later) ISO onto a USB drive, DVD, or if you’re following this process on a VM, mount it directly on the VM. Restart your server and boot the server from the Windows installation media. Click Next on the language selection screen and on the next screen click Repair your computer.
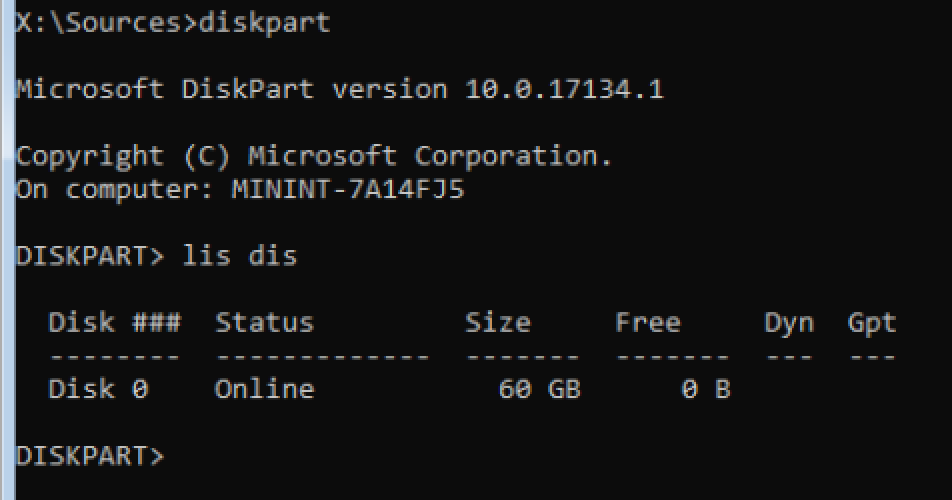
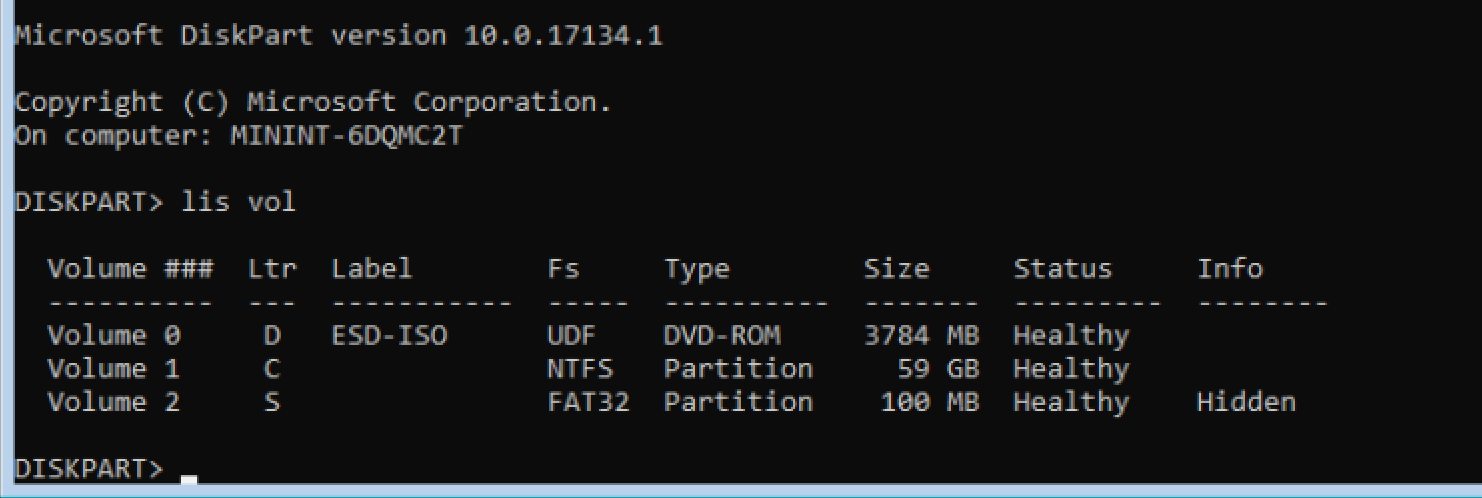
When the options screen comes up select Troubleshoot, and in Advanced Options select Command Prompt. You’ll find yourself at the command prompt in X:\Sources. Change directory to X:\Windows\system32 and start diskpart. Type list disk to list the disks attached to the system and note down the one that contains the OS. This will likely to be disk 0 but may not be depending on your servers’ disk layout.
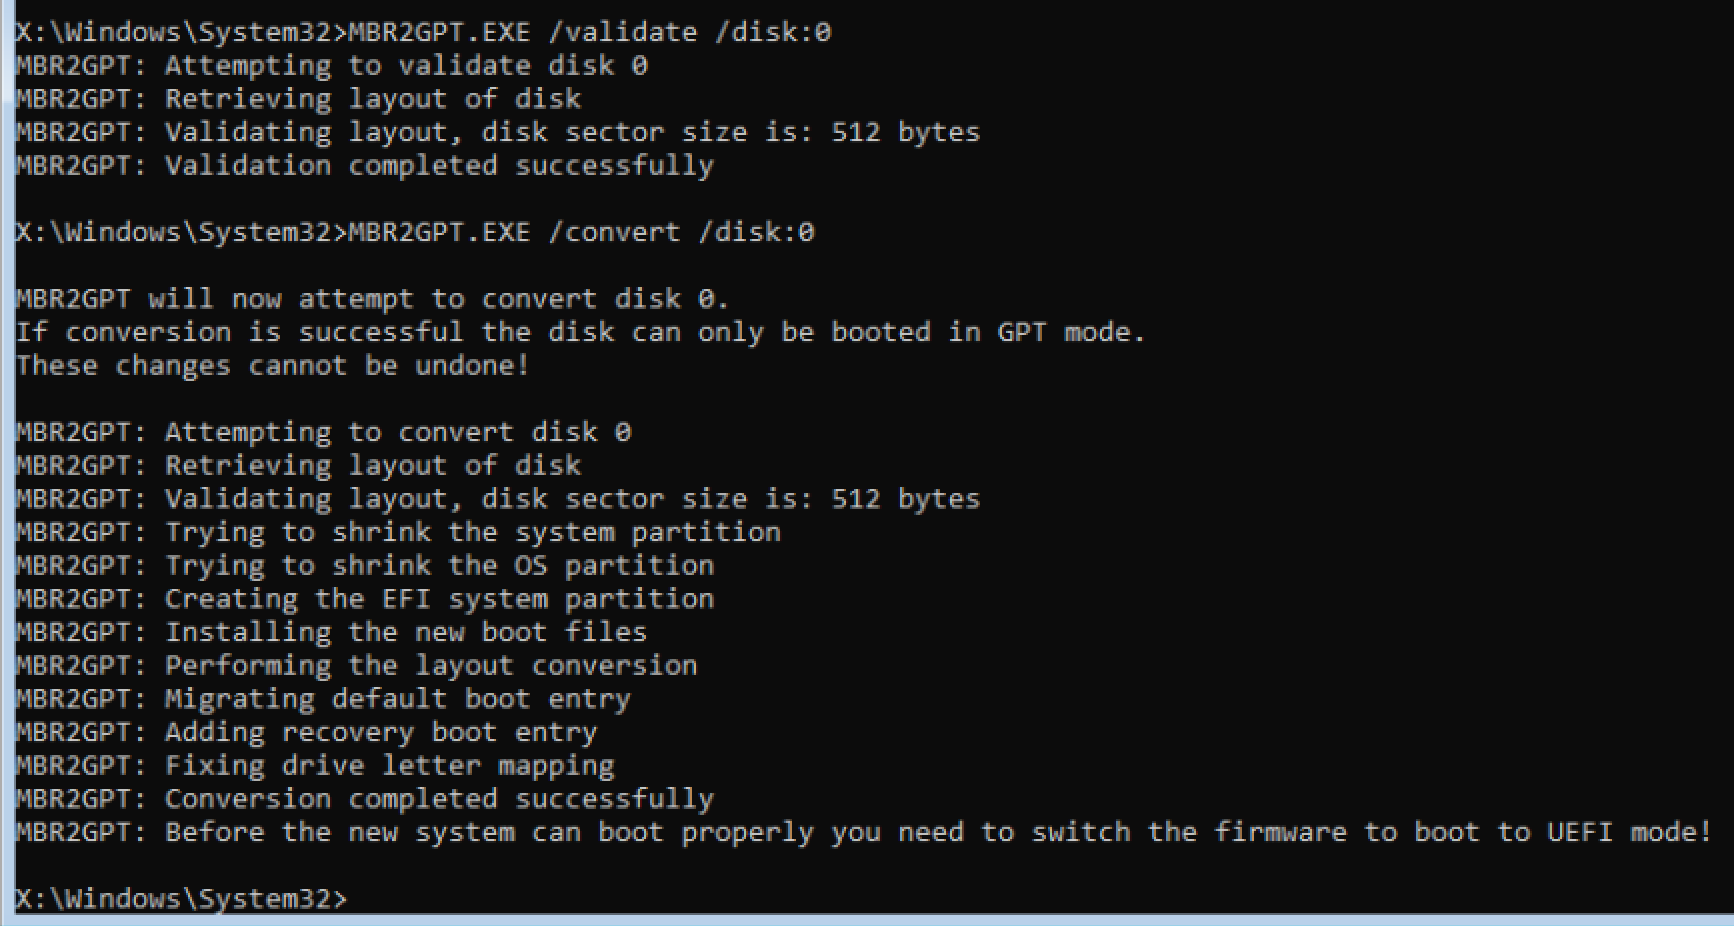
Exit diskpart and type MBR2GPT.exe /validate /disk:0. This will run the MBR2GPT tool on your OS disk to validate that it is ready for the conversion. If it is successful, run MBR2GPT.exe /convert /disk:0 and wait for the conversion to complete – it should not take long.
That’s it for the conversion. Now restart your server, enter setup and enable UEFI booting. Save and exit and Windows should boot right up without any issues.
Now there is some optional clean up you can do. How optional it is depends on if you’ll ever want to extend the size of the drive. On a physical server it is unlikely your partition doesn’t already use the full size of the drive, however on a VM where it is possible to increase the size of the disk, you may have need to extend it in the future. It also depends on if you use BitLocker or not – more on that in a moment.
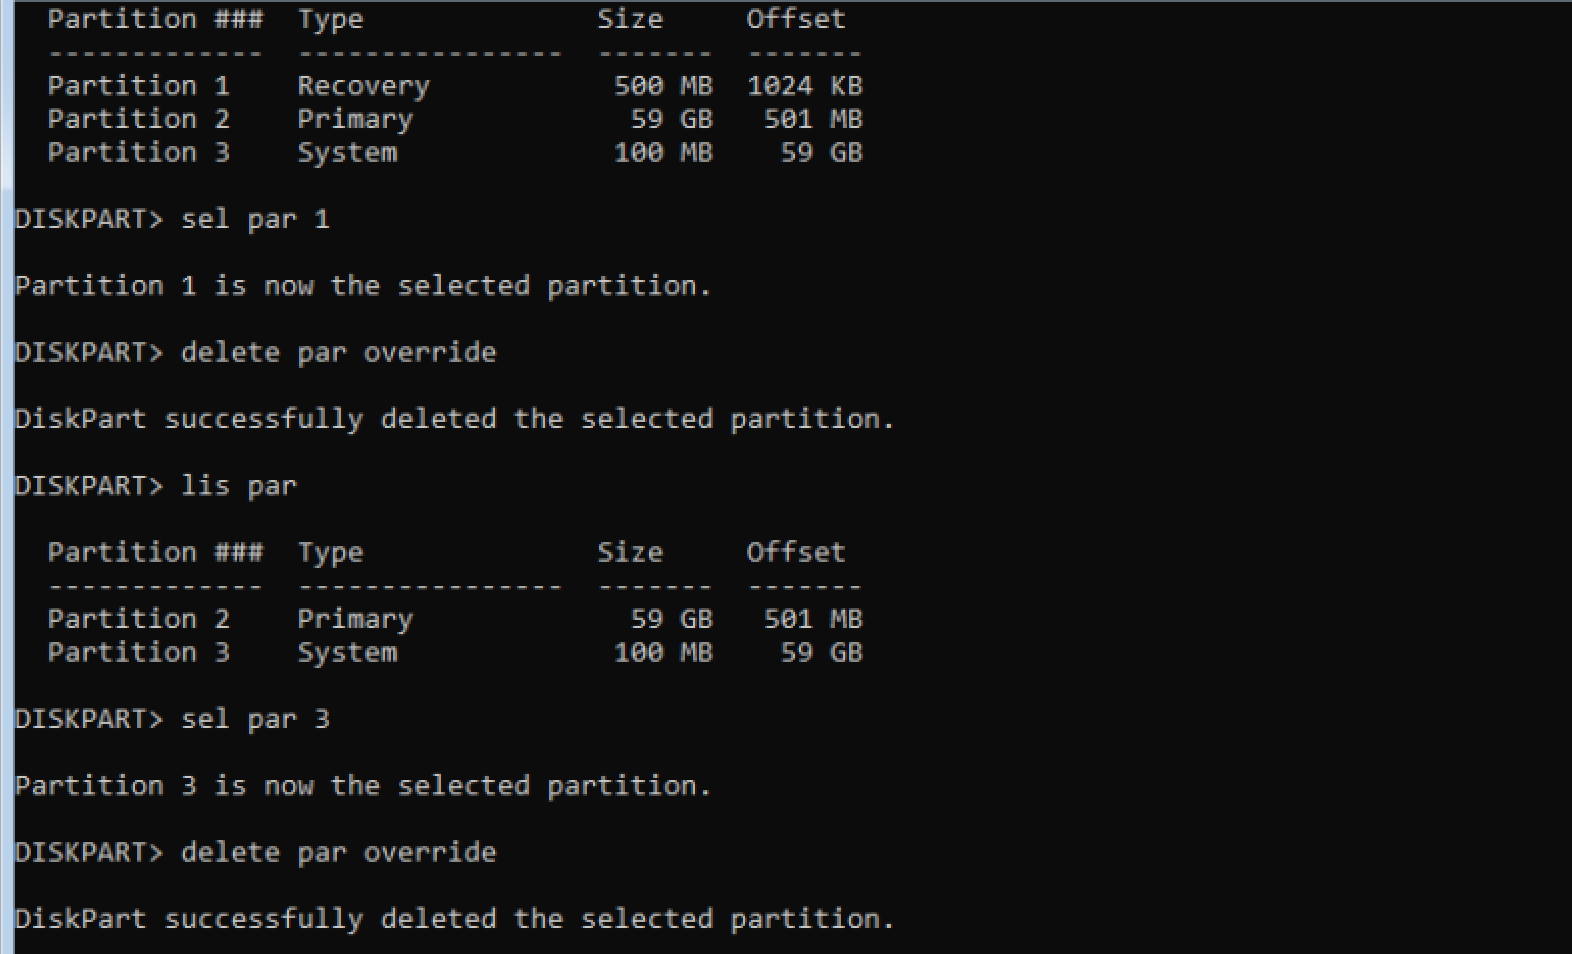
Here’s the deal. In Windows, open a command prompt and start diskpart. Type select disk 0 and then list partition. You will see three partitions – a 500 MB recovery partition, your OS partition and a 100 MB EFI system partition. That 500 MB partition is no longer in use since you no longer have an MBR partition. The new system partition is that 100 MB one at the end, and because it is at the end it will block you extending your OS partition. Fortunately, you can reuse that 500 MB of space and put the EFI system partition there instead.
If you use BitLocker to encrypt your drive the 500 MB partition also contains the unencrypted system files needed to start your computer. In this case, you cannot delete the partition. If you really need to be able to extend your partition in the future you can either unencrypt your drive, move the partition and then re-encrypt it, or use a third-party partitioning tool to move the EFI system partition to the front of the disk.
If you want to complete the partition clean up, here’s what to do. First, reboot the server and use the same steps as earlier with your Windows 10 installation media to end up back at the command prompt. From here, enter diskpart and type select disk 0 and then list partition. Note down which partitions are the 500 MB recovery partition and 100 MB system partition (typically these will be partition 1 and partition 3). Proceed to delete these partitions by first selecting them and then deleting them, using the commands select partition 1 followed by delete partition override and then select partition 3 followed by delete partition override.
Now create a new EFI system partition at the front of the disk using the command create partition efi size=100, format it using format quick fs=fat32 and assign it a drive letter using assign letter=s. Next, use the list volume command to get a list of volumes and make a note of the drive letter your OS drive is on (very likely C).
Exit diskpart and type bcdboot C:\Windows /s S: to copy the necessary system files to the new EFI system partition.
Finally, enter diskpart one last time, type select disk 0 and then select partition 2 and then type extend to reclaim that 100 MB of space at the end of the drive (may as well, right?) This will leave you with 2 partitions – the 100 MB EFI system partition at the beginning of the drive and your OS partition. Exit diskpart and restart your server.
And that’s it, the server now boots with UEFI and the partitions are all tidied up1.
1The astute among you will have realised that actually, the partitions aren’t quite as clean as you might like. Due to the old system partition being 500 MB and the new one being 100 MB, there is now 400 MB of unused space between the system partition and the OS partition. You have a few options here. The first, and simplest, is to actually create the new EFI partition with 500 MB of space rather than 100 MB. It doesn’t need that much space, but it will look better in Disk Management not having that random unused space between the partitions. Your second option is to simply leave it there, which could be beneficial in the future. If you ever turn on BitLocker it will need to create a 350 MB partition to store the unencrypted system files needed to boot your computer, and it can do so inside that 400 MB of space. Your third option is to use a third-party partitioning tool which is capable of extending your OS partition into the space in front of it, which is something that diskpart cannot do.
In the second part of this guide I will be migrating my online issuing CA to Windows Server 2016. As before this guide is written as a guide to upgrade from a Windows Server 2012 R2 CA to a Windows Server 2016 CA, however it is equally valid for moving a CA from any older version of Windows server to Windows Server 2016.
The majority of the steps in this guide are identical to the steps for the offline root CA, however there are a few differences as this is a domain joined system and at the end of the guide you will need to re-register any certificate templates you have.
Preparation
Start by building your new Windows Server 2016 server. I recommend again that you give it the same name as your current issuing CA, although it is possible to change it if you are willing to modify some registry keys later on in the process. If you do give this server the same name do not join it to the domain yet. This will be done later in the guide once the existing issuing CA has been removed from the domain. You should also patch the new server with the latest Microsoft patches at this time.
Migration – Backing up your existing issuing CA server
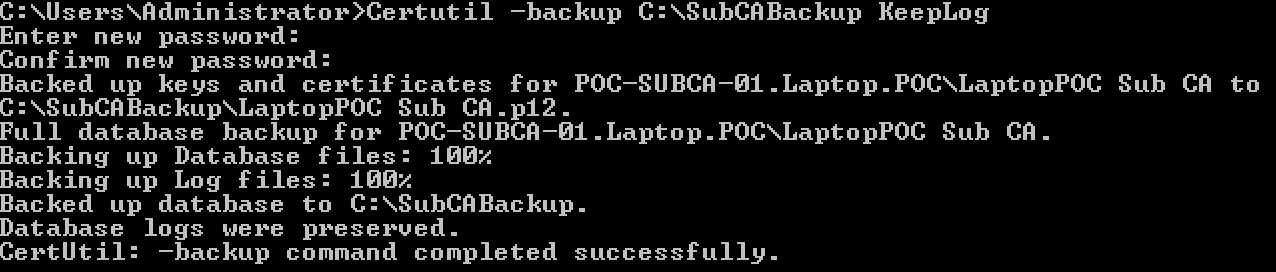
The first step is to back up the CA using the command certutil -backup C:\SubCABackup KeepLog. If you do not care about keeping the logs then you can omit the KeepLog part and instead the logs will be truncated.
You will need to enter a password, remember it and make it complex as this backup contains your issuing CA private key.
The next thing to backup is the CA configuration, which is stored in the registry in the following location: HKEY_LOCAL_MACHINE\SYSTEM\CurrentControlSet\Services\CertSvc. Back it up by typing reg export "HKEY_LOCAL_MACHINE\SYSTEM\CurrentControlSet\Services\CertSvc" C:\SubCABackup\CertSvcRegBackup.reg
You now also need to make a record of what certificate templates you have created as these will need to be re-registered on the new CA. The easiest way to do this is to run the command Certutil -catemplates > "C:\SubCABackup\Catemplates.txt". This pipes the output to a file called Catemplates.txt which you can open later to see the names of the templates.
It is also worth backing up your CAPolicy.inf file which you can do easily enough by copying it into the backup folder by typing copy C:\Windows\CAPolicy.inf C:\SubCABackup.
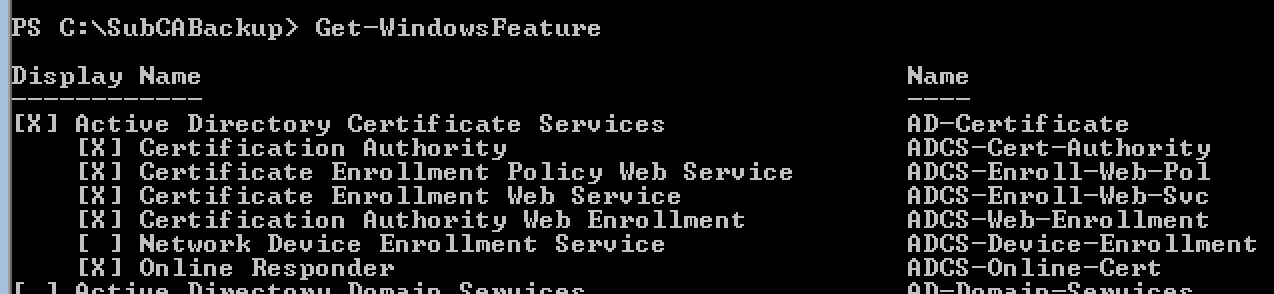
Once you have done the work to backup your existing issuing CA it is time to uninstall the CA role. Before doing this run Get-WindowsFeature in Powershell and have a look at what additional CA features you currently have installed (for example you may have the Web Enrolment service and/or Online Responder roles installed). Make a note of these so that you know what features to install on the new issuing CA server.
To uninstall the certificate authority role use the Powershell command Remove-WindowsFeature Adcs-Cert-Authority and press enter. If you did have any additional CA roles installed you may need to remove those first; in my case I had to remove the Web Enrollment service (this was done by running Uninstall-AdcsWebEnrollment).
You will need to restart the server to complete the role uninstall.
It is now important that you copy the SubCABackup folder to your new issuing CA as the next step is to remove the existing issuing CA from the domain and power it down.
To remove the old issuing CA from the domain using Powershell type Remove-Computer HOSTNAME replacing HOSTNAME with the name of your issuing CA. Restart the server to complete the domain removal and then power down the old issuing CA.
Load Active Directory Users and Computer from a management workstation and delete the computer account for the old issuing CA.
Migration – Configuring your new issuing CA and restoring from the backup
Power on your new issuing CA and join it to the domain. You can do this from Powershell by typing in Add-Computer –DomainName yourdomain.com -Credential YOURDOMAIN\Administrator replacing the domain with your domain and the admin account with your admin account. Restart the server to complete the domain join.
Once the reboot has completed you must install the CA role. Do this using Powershell by typing in Add-WindowsFeature ADCS-Cert-Authority and pressing enter. As with the root CA this now needs to be configured using the backup from the old issuing CA, which you do with the following Powershell command:
Replace the value after -CertFile with the path and name of the .p12 file from your issuing CA backup. When you press enter you will be prompted for the password you used to back up your original issuing CA.
If this step is successful you will receive ErrorID 0 as your return code.
Next you need to restore the database and logs. Before you do this the CA service must be stopped. Do that by typing in net stop certsvc and pressing enter. Once it has stopped restore the database and logs using the command certutil -f -restore C:\SubCABackup. The -f forces an overwrite of the data that was configured in the barebones CA setup. Once again you must enter the password you used to backup your original issuing CA.
Before starting the CA service you must import the registry configuration. If you opted to change the name of your issuing CA server you need to go through the C:\SubCABackup\CertSvcRegBackup.reg file and replace and reference to the old server name with your new server name. Once this is done you can import the configuration by typing reg import "C:\SubCABackup\CertSvcRegBackup.reg".
Finish up the restoration process by copying the CAPolicy.inf file back into the Windows directory by using the command copy C:\SubCABackup\CAPolicy.inf C:\Windows
One final thing
There may be one other thing you need to consider before you can start your new issuing CA and that is the location of the web CRL. This is a website that is likely hosted inside your network that contains an up to date certificate revocation list which your issuing CA needs to have access to before it will start. This may not be a problem for you at all if your web CRL is hosted on an separate web server that you did not touch during this migration. However, if like me your web CRL is hosted on your issuing CA, this will have been lost when you decommissioned your previous issuing CA.
To resolve this you will need to install IIS on your new issuing CA and configure a new site to host your CRL. The URL to the CRL must match the previously configured CRL location, so if it used to be accessible via http://PKI.yourdomain.com then it must still be accessible there now. You can find the URL for your CRL by looking at any certificate issued by your CA, going to the Details pane and looking at the CRL Distribution Points field.
Restoring your certificate templates
With everything else done you can now start your new issuing CA by typing in net start certsvc. Now you will need to re-register each of the certificate templates you had on your previous issuing CA. Open the Catemplates.txt file you saved by typing notepad Catemplates.txt and use it as a reference for the names for each of your templates. You will need to run the following command for each one:
certutil -setcatemplates +TEMPLATENAME
Replace TEMPLATENAME with the name of your certificate template. Note that + before the template name.
Do this for each of your templates. Once completed all of your templates will be available again and all issuing permissions will be retained.
That completes the process of migrating your issuing CA to a new server. If you have multiple issuing CA servers you will need to repeat this process for each of them. You may also need to reinstall any additional certificate service roles such as Web Enrollment1, which you can do either in Powershell or by using a management workstation with Server Manager. You should make sure you delete the C:\SubCABackup folder so that you don’t leave your issuing CA private key laying around.
As part of my efforts to upgrade my POC lab to Windows Server 2016 I got around to migrating my PKI infrastructure. This consists of an offline root CA and an online issuing CA. In Part 1 of this guide I will be migrating my offline root CA to Windows Server 2016.
This guide is written as a guide to upgrade from a Windows Server 2012 R2 CA to a Windows Server 2016 CA, however very little has changed since the Windows Server 2003 days and this guide is equally valid for moving a CA from any older version of Windows server to Windows Server 2016.
I am a big advocate of the core versions of Windows Server and in this guide I will be migrating from and to Windows Server core. A CA is a perfect example of a server that does not need the overhead of the GUI and additional services that comes with the full GUI edition of Windows Server and if you don’t already use core for your CA, this is a perfect opportunity to migrate to one!
Preparation
In preparation for the migration build your new Windows Server 2016 server. I recommend that you give it the same name as your current root CA server – it is possible to give it a different name however this will require changing registry keys later on in the migration process. Take this opportunity to patch it with the latest Microsoft patches!
Migration – Backing up your existing root CA server
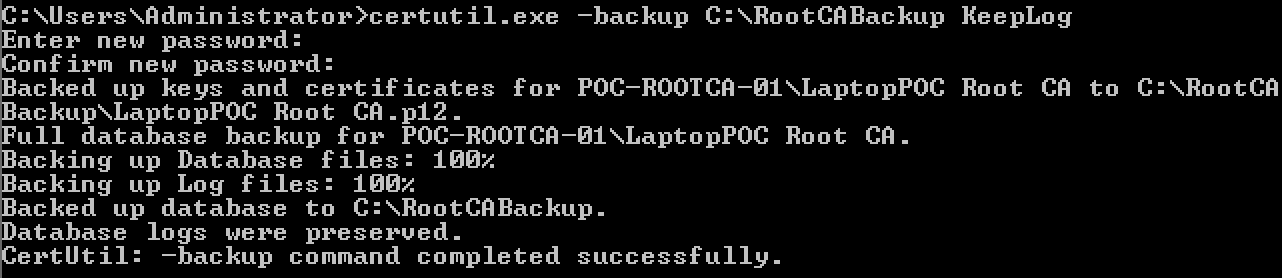
The first step is to back up the CA using the command certutil -backup C:\RootCABackup KeepLog. Note that the KeepLog part is optional, however without it the backup will truncate the logs. I prefer to bring the whole lot across in case the logs are ever needed in the future for auditing purposes.
You will need to enter a password, remember it and make it complex. This backup contains your root CA private key, do not make it easy for an attacker to obtain.
The next thing to backup is the CA configuration, which is stored in the registry in the following location: HKEY_LOCAL_MACHINE\SYSTEM\CurrentControlSet\Services\CertSvc. Back it up by typing reg export "HKEY_LOCAL_MACHINE\SYSTEM\CurrentControlSet\Services\CertSvc" C:\RootCABackup\CertSvcRegBackup.reg
Additionally it is worth backing up your CAPolicy.inf file which you can do easily enough by copying it into the backup folder, by typing copy C:\Windows\CAPolicy.inf C:\RootCABackup
Finally, copy the RootCABackup folder to your new CA.
Migration – Configuring your new root CA and restoring from the backup
Log on to your new root CA server and start by installing the CA role. The easiest way to do this is with PowerShell, so type powershell into your administrative CMD prompt and enter the following command to install the CA role: Add-WindowsFeature ADCS-Cert-Authority
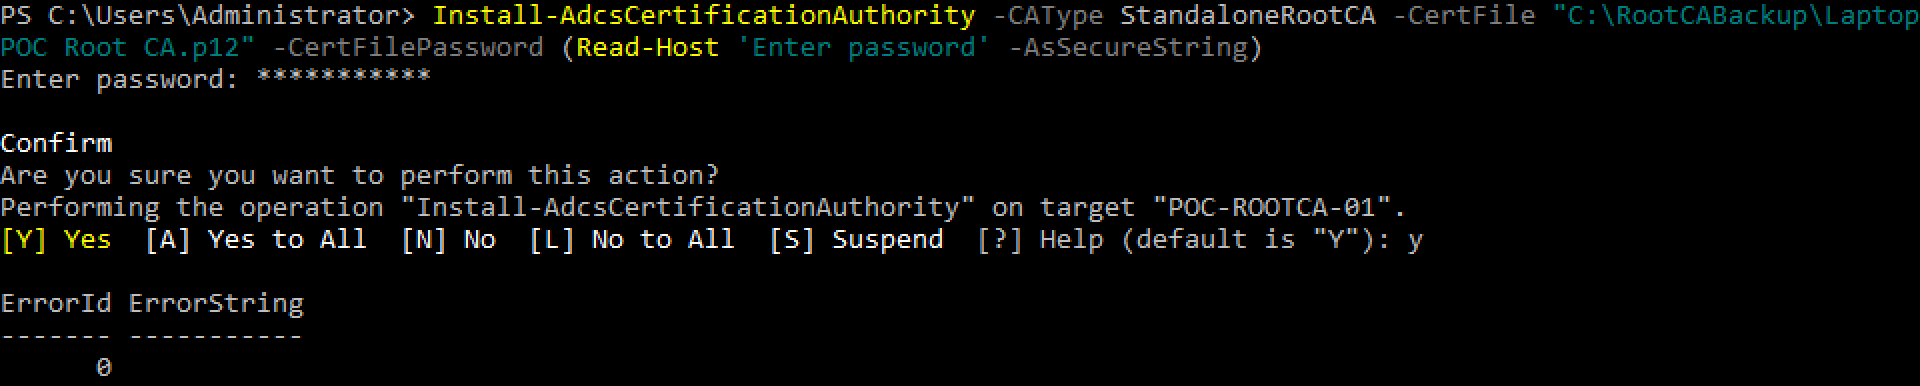
Now configure this new CA using the backup of the old CA. This can also be done with PowerShell using the following command:
Replace the value after -CertFile with the path and name of the .p12 file from your root CA backup. When you press enter you will be prompted for the password you used to back up your original root CA.
If this step is successful you will receive ErrorID 0 as your return code.
This restores the root CA private key, however next you need to restore the database and logs. Before you do this the CA service must be stopped. Do that by typing in net stop certsvc and pressing enter. Once it has stopped restore the database and logs using the command certutil -f -restore C:\RootCABackup. The -f forces an overwrite of the data that was configured in the barebones CA setup. Once again you must enter the password you used to backup your original root CA.
Do not start the certificate authority service just yet! Before doing that the registry settings from the previous root CA need to be restored. Do this by typing reg import "C:\RootCABackup\CertSvcRegBackup.reg"
Note: If you chose to change the name of your root CA server you will need to go through the values in this registry file and change any reference to the old server name to your new server name before importing it.
Finally copy the CAPolicy.inf file back into the Windows directory by using the command copy C:\RootCABackup\CAPolicy.inf C:\Windows
Now you can start the root CA by typing net start certsvc. The service should start with out any issues. To verify this you should log on to a management workstation and load the Certificate Authority MMC snap-in, connect to the new server and verify that your issued / revoked certificates are listed (as this is a root CA there should be very few issued certificates!)
Once you are satisfied that the new server is configured correctly and working, make sure that you delete the C:\RootCABackup folder. As previously mentioned, this contains your root CA private key, you do not want to leave that laying around!
Coming soon is Part 2, which will focus on migrating the issuing certificate authority. Thankfully the steps for this are very similar with only small differences due to it being a domain joined server.