Since November 2022 Microsoft requires that you purchase a Cross Tenant User Data Migration license in order to use their cross tenant migration services for Exchange or OneDrive. But there is very little information about this license type available online. Here are the basic details for this license type for anyone who is curious:
Deploying updated code to an Azure Function App can be done through a variety of methods, and one of those methods is by uploading a zip file to the Function App via the Kudu REST API.
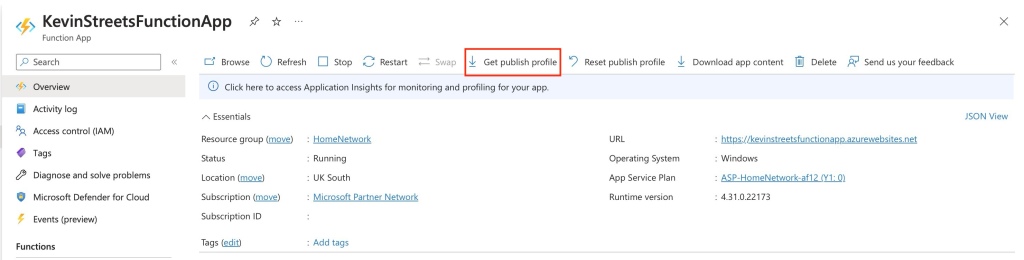
To start, go to your Function App in the Azure Portal and download the publish profile. This contains the ZipDeploy URL and the username and password that will be needed. You can do this from the Overview page of the Function App:
Download the publish profile for your Function App
This will download an xml file that contains a few different publish profiles that you can use. In this case, look for the ZipDeploy profile and take note of the publishURL, userName and userPWD. The URL will take the form of FunctionAppName.scm.azurewebsites.net, the username will be $FunctionAppName and the password will be a long, randomised string.
The ZipDeploy publish profile
Next you will need to make sure that SCM Basic Auth Publishing Credentials are enabled in the General Settings for your Function App. This can be found under Settings > Configuration > General Settings:
Enable SCM Basic Auth Publishing Credentials
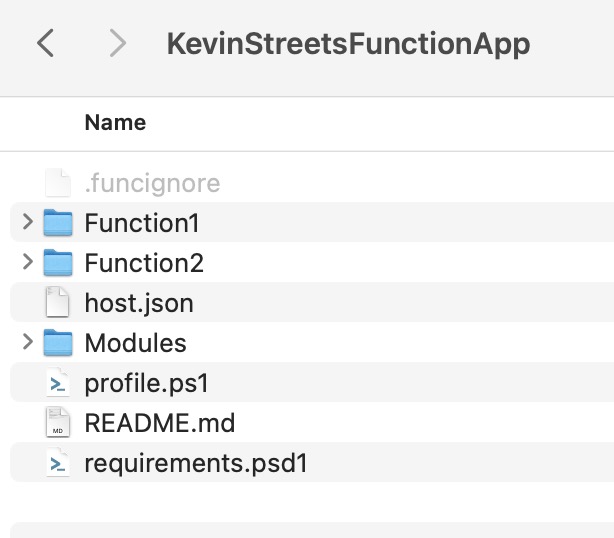
With this done let’s start coding the deployment, starting with the creation of the zip file. The root directory that you zip should contain the files that you want in the wwwroot folder of your Function App. Typically this will include your functions, a Modules folder, and a host.json file (and perhaps other files depending on the scripting language you selected for your Function App).
Let’s also say you have a .funcignore file that has a list of files or folders that are in the folder structure of the Function App but should not be included in the deployment.
So, your Function App source folder might look something like this:
Now that the zip file has been created it is time to deploy it. Start by defining some variables with the publishURL, userName and userPWD you noted down earlier. Also, update the publishURL to include the correct API and include “isAsync=true” which will immediately return a response that you can use to monitor the deployment status.
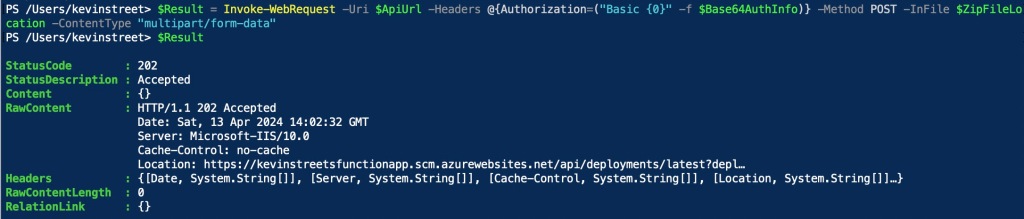
As mentioned above, this should return immediately, and you can this by checking the content of the $Result variable. If all has gone well, you will get a StatusCode 202 meaning it has been accepted.
Deployment has been accepted
As previously mentioned, you can now monitor the status of the deployment. The URL you use to monitor the deployment is contained in the Headers in the return of the previous request. You can view it by looking in $Result.Headers.Location:
$Result.Headers.Location
To query the status of the deployment, run the following command:
This will likely return one of two statuses: InProgress or Succeeded. In my experience it takes very little time to complete the deployment. I like to create a small loop that checks the status every 5 seconds until the status is completed:
do {
    $Complete = Invoke-WebRequest -Uri $($Result.Headers.Location) -Headers @{Authorization=("Basic {0}" -f $Base64AuthInfo)} -Method GET
    Write-Host -Object "Current deployment progress: $(($Complete.Content | ConvertFrom-Json).provisioningState)"
    if ($(($Complete.Content | ConvertFrom-Json).provisioningState) -ne "Succeeded") {
        Start-Sleep -Seconds 5
    }
}
until ($(($Complete.Content | ConvertFrom-Json).provisioningState) -eq "Succeeded")
This gives me a nice output that shows when my deployment has completed:
Monitoring status of deployment
That is the foundation needed to deploy a Function App with PowerShell. If you have multiple Function Apps you could wrap this code around a loop to deploy each in turn or include other configuration changes as part of a deployment pipeline.
But you get the following error: “This mail enabled user cannot be permanently deleted since there is a user associated with this mail enabled user in Azure Active Directory. You will first need to delete the user in Azure Active Directory. Please refer to documentation for more details.”
Oh… okay then. So you remove the user in Microsoft Entra ID (Azure AD) and also make sure it has been removed from Deleted users. Now you try to remove the MailUser in Exchange Online again, this time running:
But now you get a new error: “Unable to permanently delete mail enabled user. The mail enabled user has litigation hold or In-Place hold applied on it. Please remove the hold before trying to delete”
This is probably due to a default policy that is applied to all UserMailbox / MailUser objects in your organisation. Not a problem… except, how do you remove litigation hold / in-place hold from an object that is now soft-deleted? Especially considering that you cannot restore it because you already deleted the user in Entra ID.
Thankfully the answer is fairly straightforward, just not completely intuitive in my opinion. Run the following command:
This guide follows the official guide from Microsoft (which can be found here) with each step shown in more detail and more screenshots to help you validate what you’re doing. This sort of work should be done by experienced Office 365 administrators, however this guide could also be used by people looking to learn (say, by migrating mailboxes between two test Office 365 tenants).
It is also worth highlighting that at the time of writing, this feature is in public preview, meaning you should test it and ensure that the process works correctly for you before committing to using it in a fully-fledged mailbox migration project.
You will need to set aside at least a few hours to follow this guide all the way through. The process uses a combination of configuration in Azure and Exchange Online PowerShell.
I also recommend having a OneNote (or other note taking app) page ready to paste various GUIDs and notes throughout this process.
Preparing the target tenant (where the mailboxes will be migrated to)
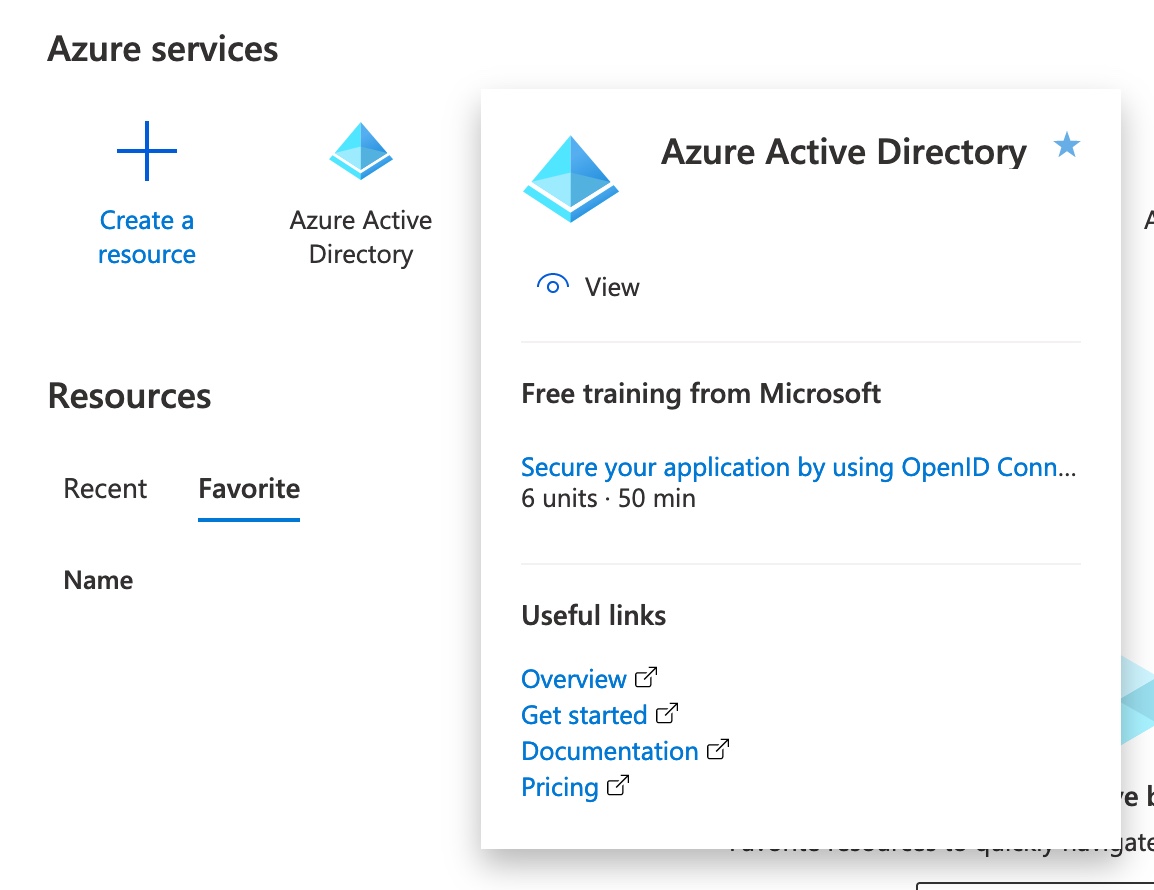
Go to the Azure Portal and log in if needed (using target tenant credentials). Click on Azure Active Directory.
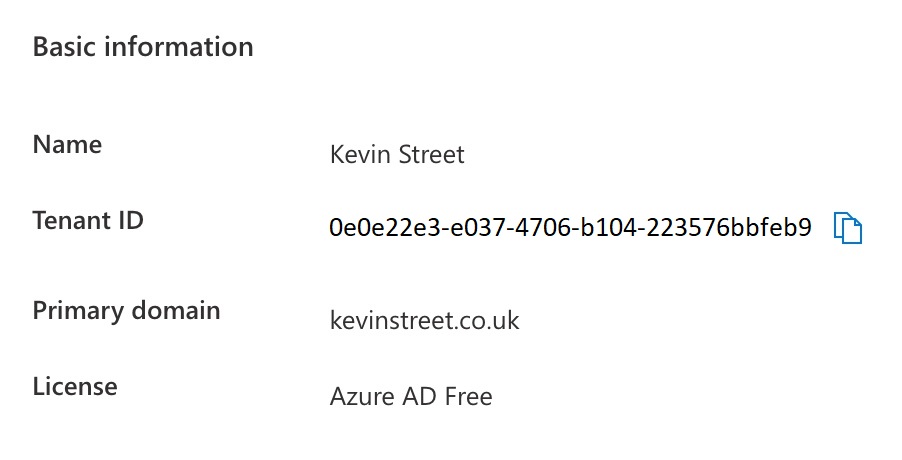
On the Overview page make a note of your Tenant ID. In your notes make sure this is clearly labelled as the target Tenant ID as you’ll be making a note of the source Tenant ID later.
On the left click App registrations, then click + New registration.
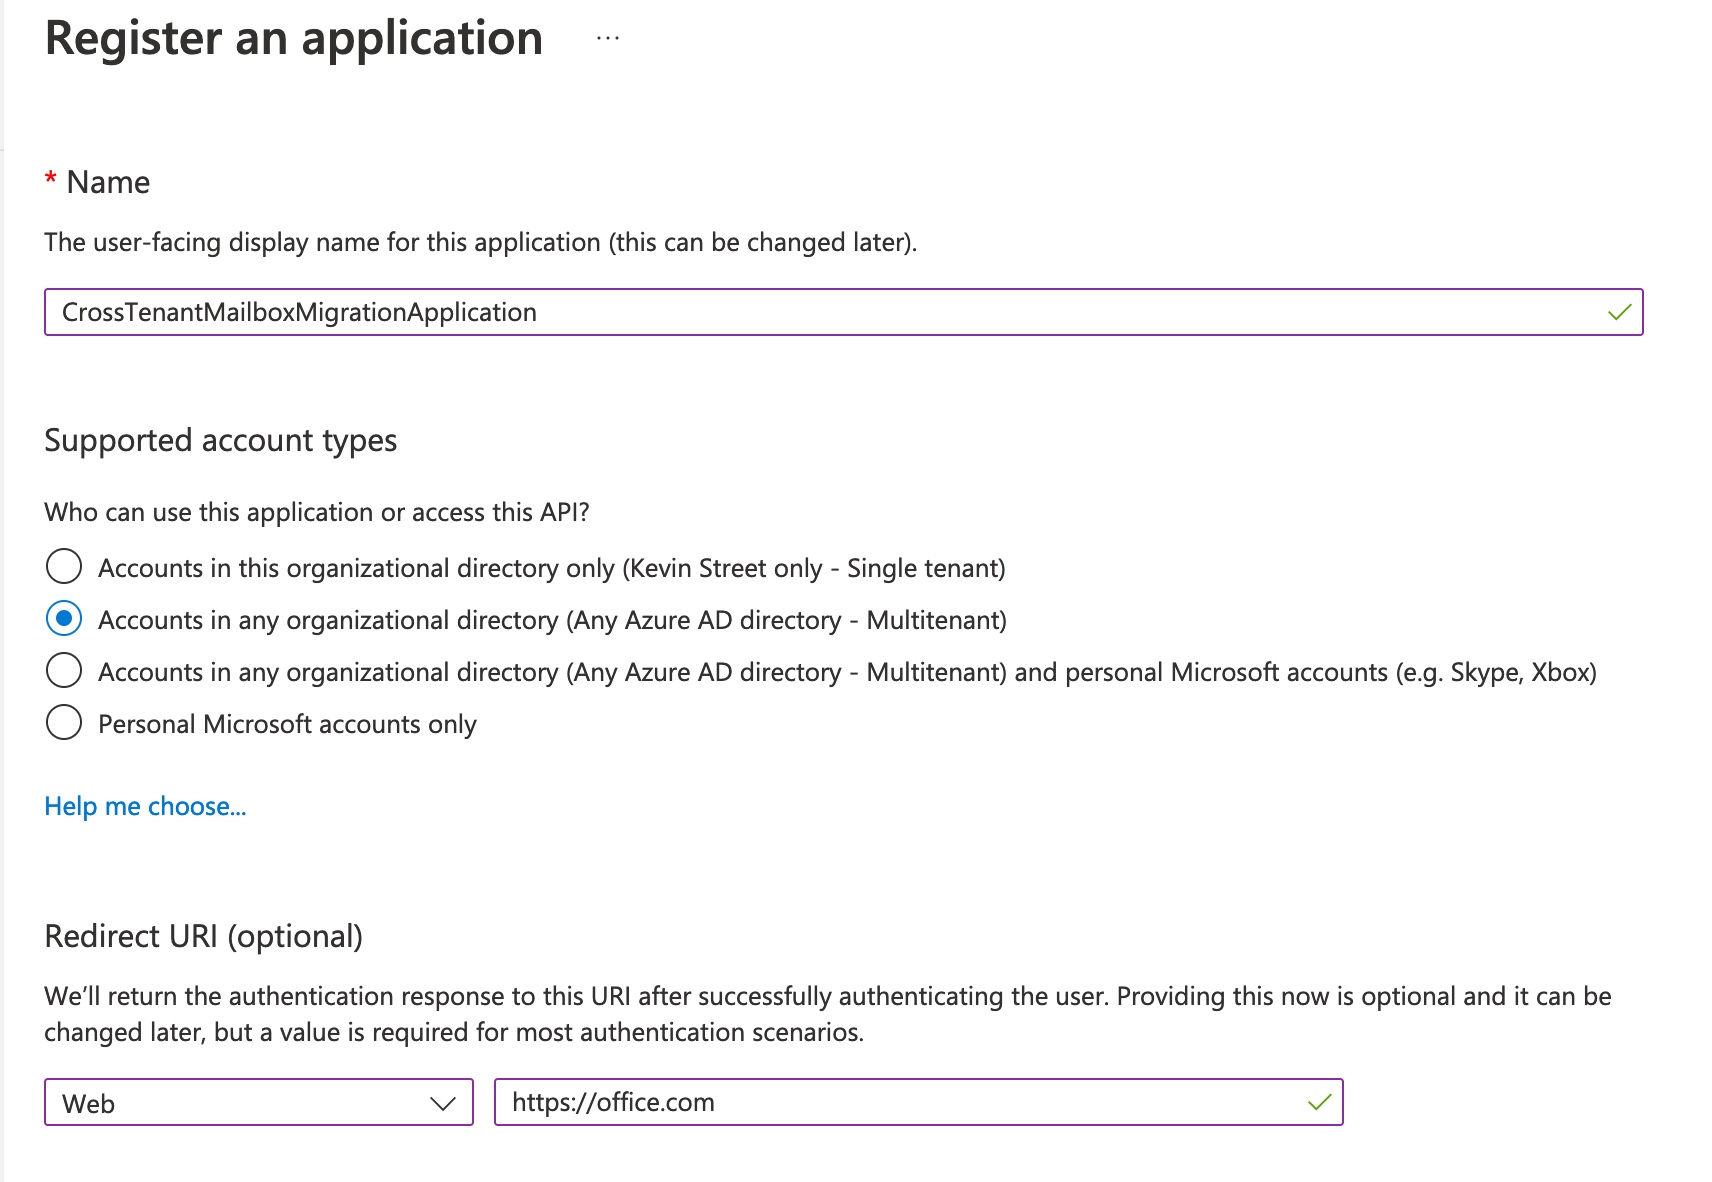
Give the app a descriptive name (such as “CrossTenantMailboxMigrationApplication”) and under Supported account types select “Accounts in any organizational directory (Any Azure AD directory – Multitenant)”. In the Select a platform drop down select Web and enter “https://office.com” in the box next to it.
Click register at the bottom of the page.
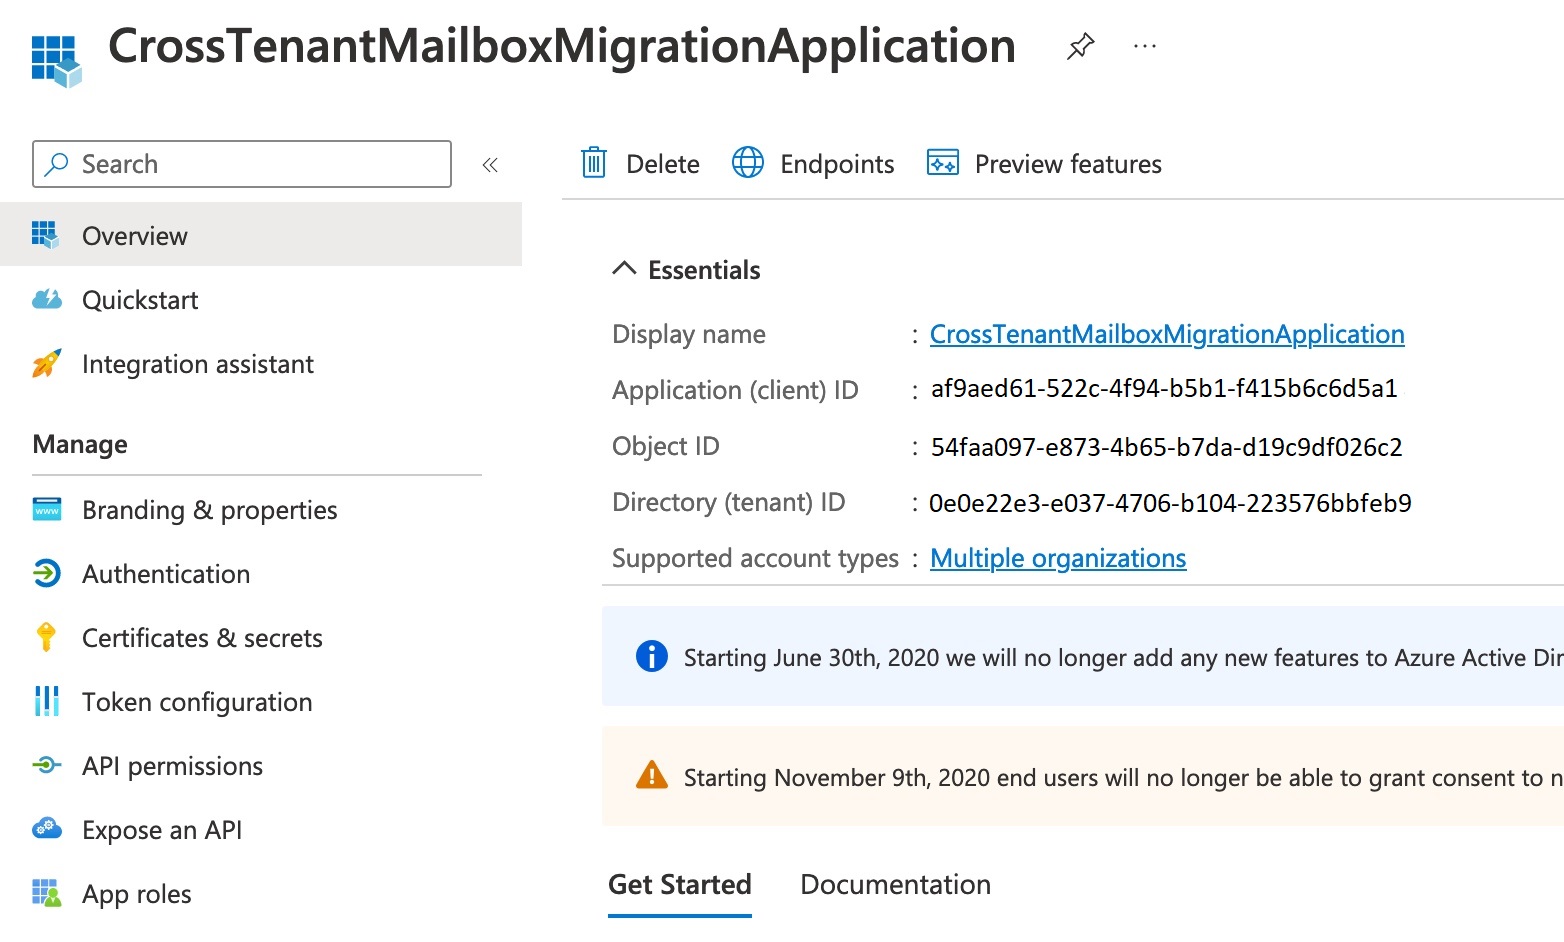
You should be taken to the Overview page for your new app, but if not, from the Azure Active Directory page click on App registrations on the left and click on your app to bring up the overview.
You need to note down the Application (client) ID here as this will be used later to create URL that will be used to register this app in the source tenant.
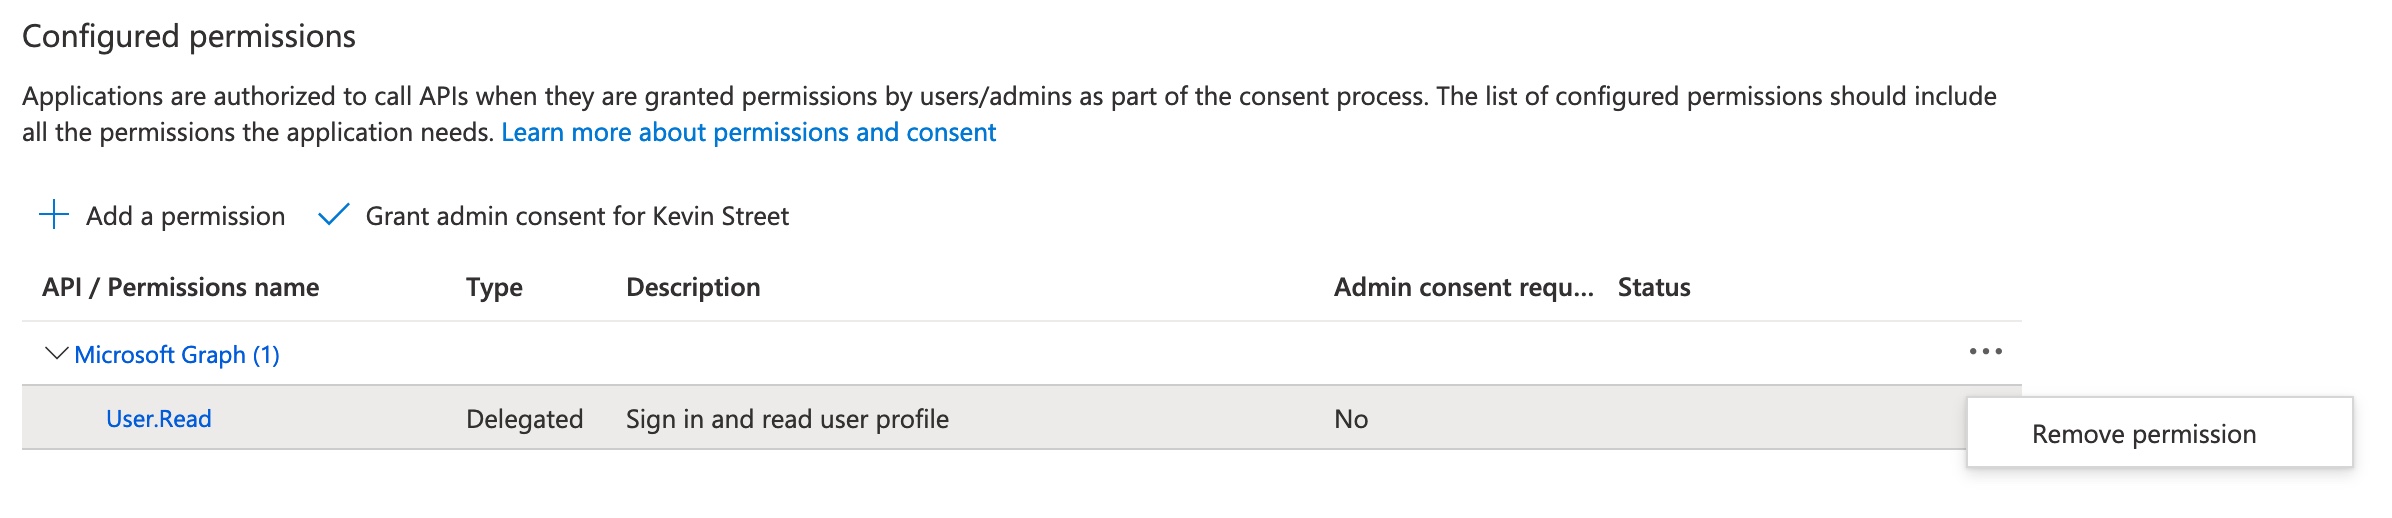
On the left, click on API permissions. By default, the permission User.Read will be granted, however this is not needed so remove it by clicking on the three dots at the end of the line and selecting Remove permission. Confirm this by clicking Yes, remove in the pop-up warning that appears.
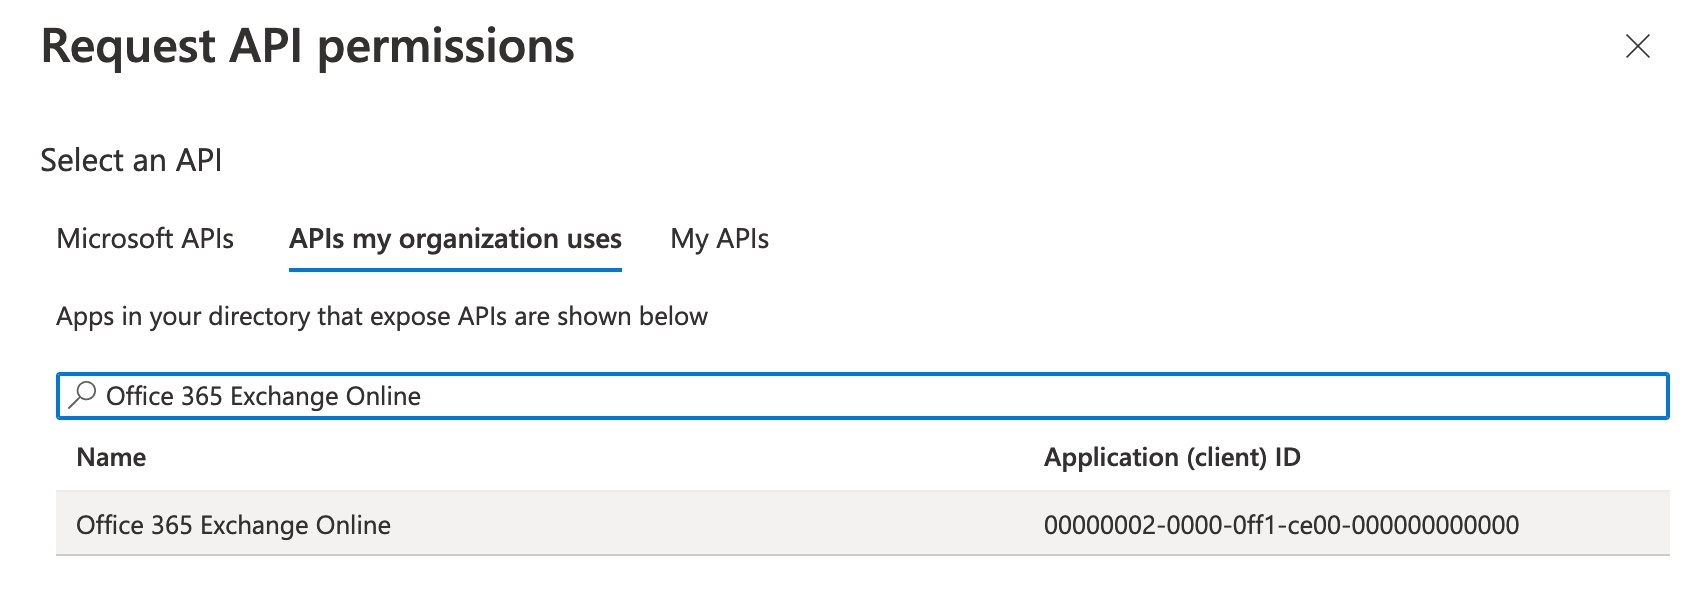
Now to add the permissions that are needed, click + Add a permission. In the menu that appears on the right, click on the APIs my organisation uses tab and search for Office 365 Exchange Online.
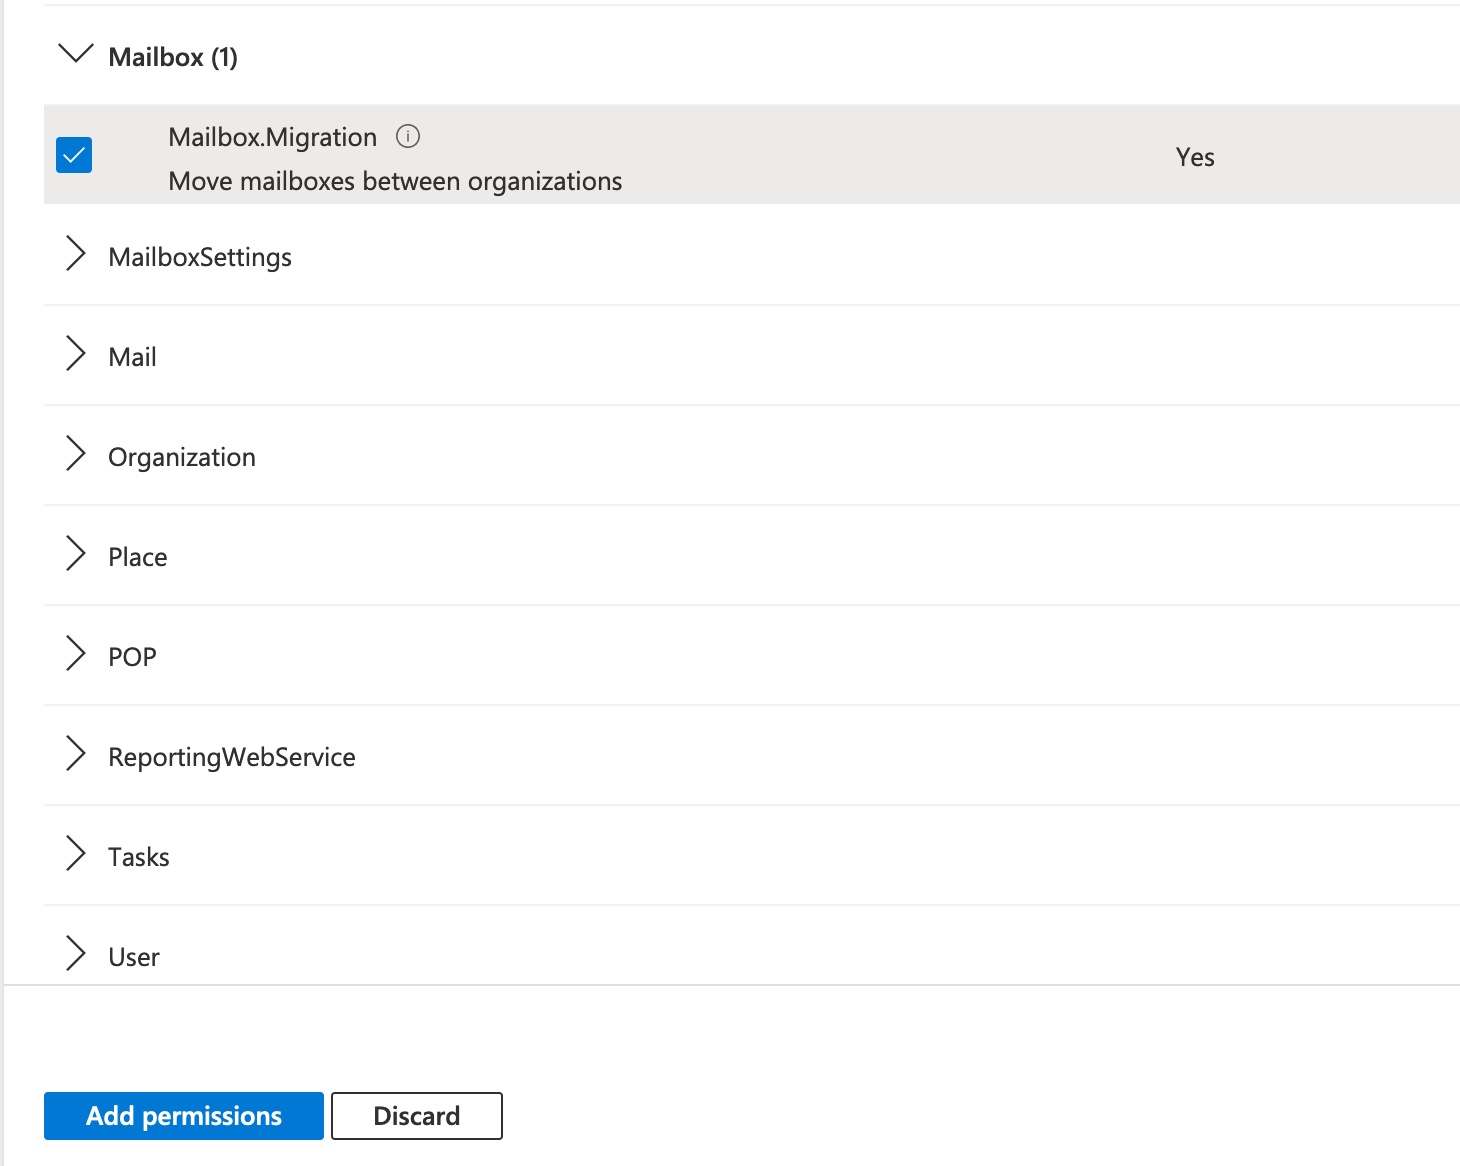
Click on Office 365 Exchange Online and select Application permissions. Expand Mailbox and select Mailbox.Migration. Then click Add permissions at the bottom of the screen.
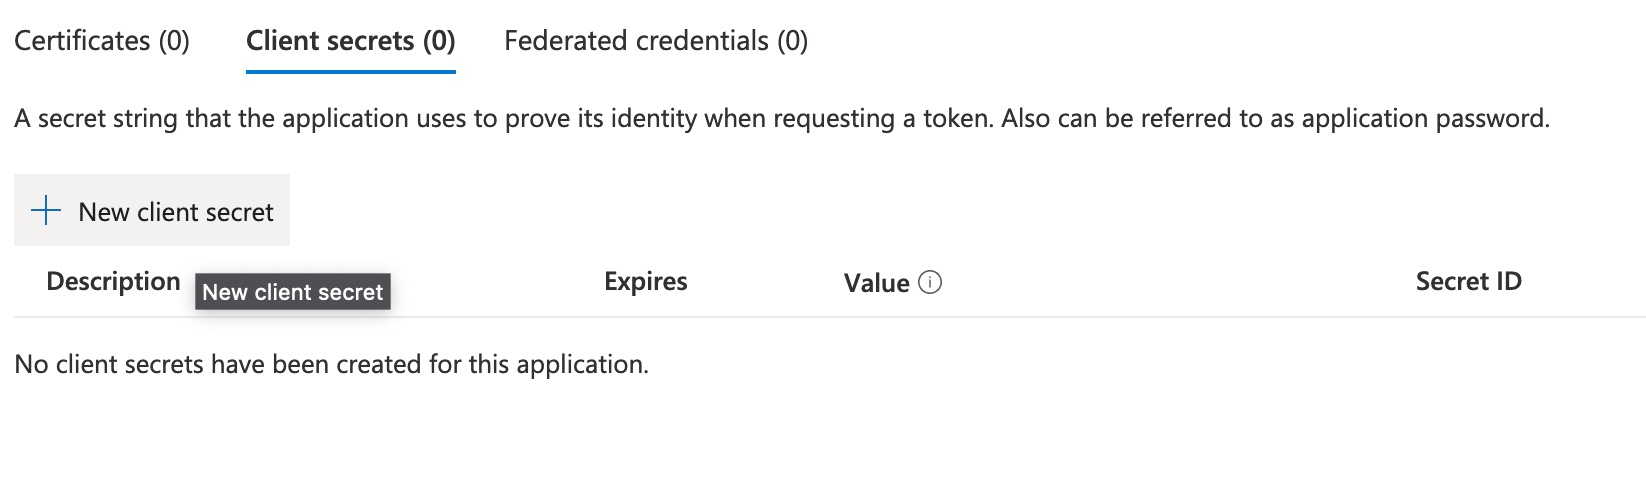
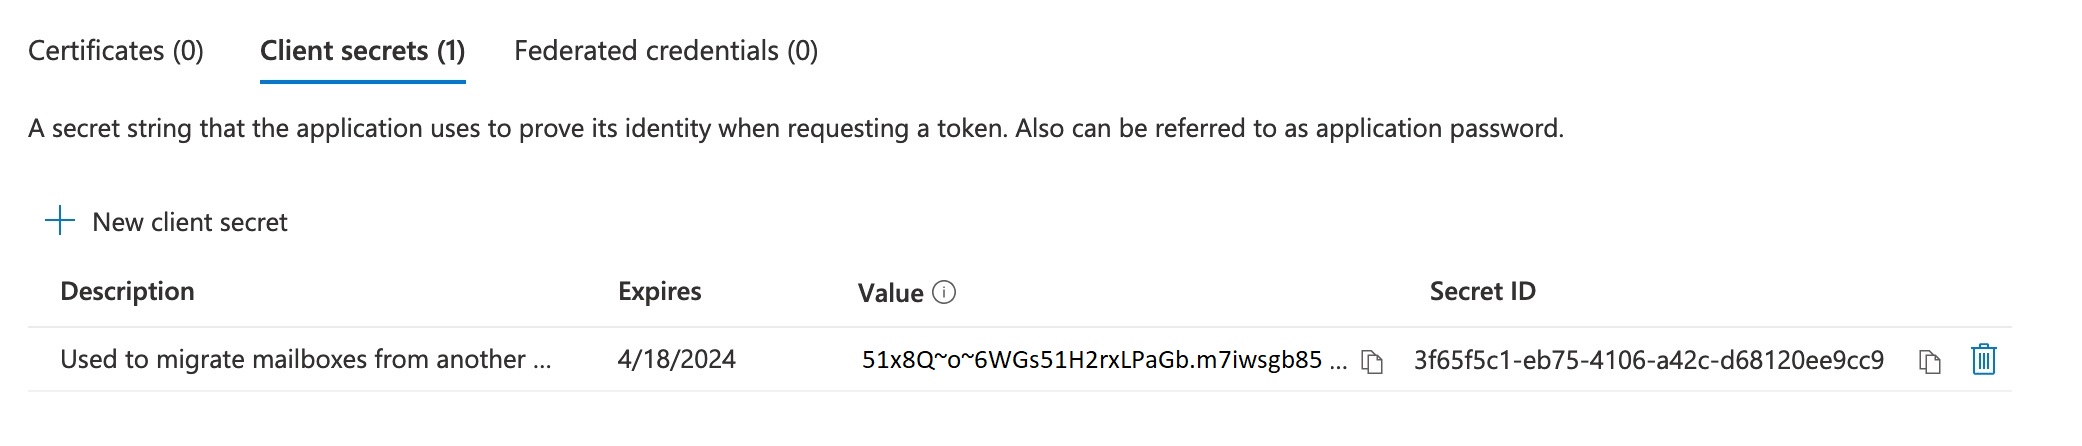
Next, click on Certificates & secrets on the left. Make sure you’re in the Client secrets tab and click + New client secret.
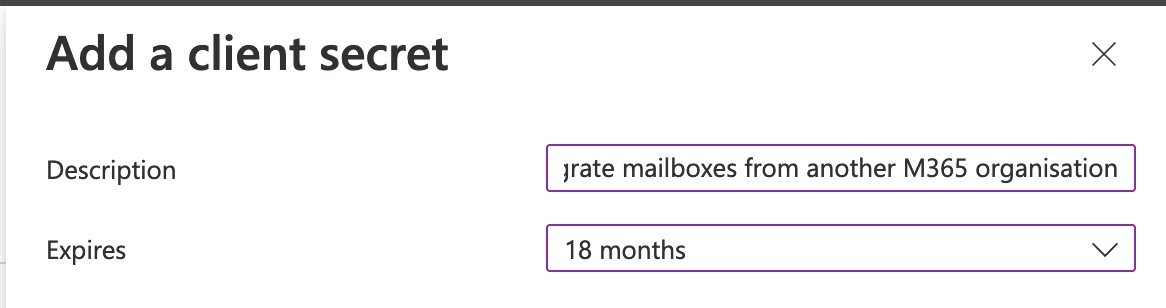
Give the secret a description (such as “Used to migrate mailboxes from another M365 organisation”) and an expiration date. This secret should remain valid for the duration of your mailbox migration project (or you’ll need to create a new client secret later when this one expires). Click Add at the bottom of the screen.
Make a note of the data in the value field; this is the client secret. You should endeavour to store this somewhere secure as it is a secret and should not end up the wrongs hands. This is also your only chance to store the secret as it will not be visible on this page on future visits.
Don’t worry, the secret that is visible here has been deleted before publication!
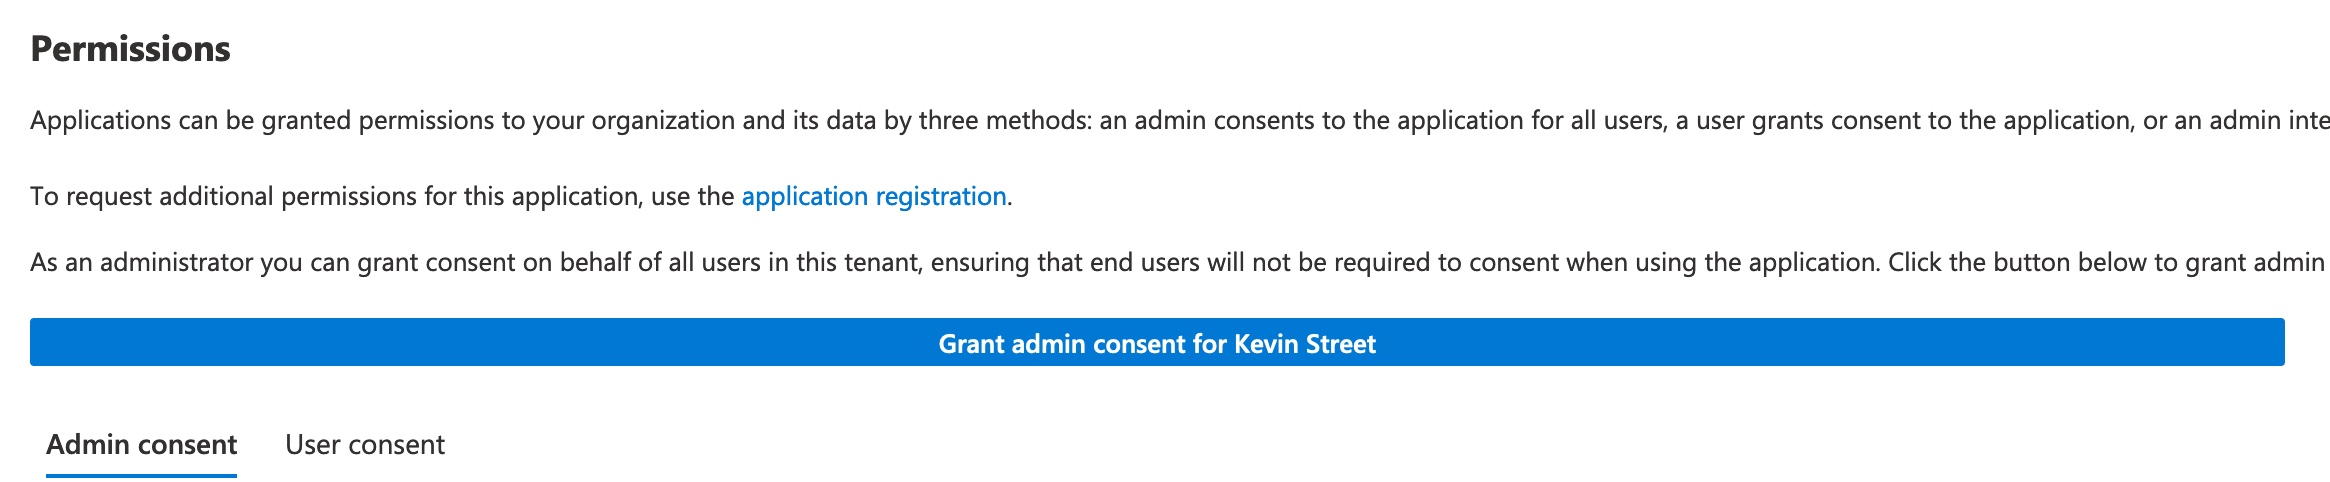
Now you must consent to the permissions you granted the application a few steps ago. To do this go back to the Azure Active Directory landing page by clicking Microsoft Azure in the top left corner of the screen and then select Azure Active Directory. From there, click on Enterprise applications on the left and then click on the application you created. On the left, select Permissions and then click Grant admin consent for [your tenant name].
A new browser window will pop up and you may be required to re-enter your account password. A Permissions requested box will follow on from that and you should review the permissions and click Accept.
Now, if you click Refresh at the top of the screen you should see the Office 365 Exchange Online – Mailbox.Migration permission granted.
Next it is time to formulate the URL that will be used to register this application in the source tenant. The URL template is:
sourcetenant = The onmicrosoft.com domain for the source tenant (where the mailboxes are migrating from). If you need to find out the onmicrosoft.com address for the source tenant, go to the Azure Portal -Domains page and log in with your source tenant admin credentials – be careful here as you may already be logged in with your target tenant credentials at this stage due to the work you’ve just been doing in Azure. Use an Incognito window to make sure you switch accounts to be certain. Amongst the listed domains will be a something.onmicrosoft.com domain – this is what you need. application_id = The Application (client) ID you noted down earlier.
In my environment my source tenant is kevinstreetlab.onmicrosoft.com and my Application (client) ID from the application I created is af9aed61-522c-4f94-b5b1-f415b6c6d5a1, so my URL is:
sourcetenant = The onmicrosoft.com domain for your source tenant (where the mailboxes are migrating from). This is the same as you used earlier when formulating the URL. endpoint_name = Any descriptive name you want for this endpoint (I used “MailboxMigrationEndpoint”).
The last bit of preparation to do in the target tenant is to create an organisation relationship between your source tenant and your target tenant.
First you need to log on to Azure in your source tenant to make a note of the source tenant ID.
Go to Azure Portal and log in if needed (source tenant credentials). Click on Azure Active Directory.
On the Overview page, make a note of your Tenant ID. In your notes make sure this is clearly labelled as the source Tenant ID so that you do not confuse it with the target Tenant ID that you noted down earlier.
Create the following variable:
$SourceTenantID="source_tenant_id"
source_tenant_id = The source Tenant ID that you just noted down.
Run the following two commands to see what existing organisation relationships exist (and particularly if any already exist for the same tenant):
organization_relationship_name = Any descriptive name of your choosing (such as “OrgRelationshipForMailboxMigrations”).
That’s it for the target tenant preparation.
Preparing the source tenant (where the mailboxes will be migrated from)
Now we move on to the preparation needed in the source tenant. If you are still logged in to the target tenant, you may prefer to log out to minimise the possibility of confusing which tenant you are working in.
Open your web browser and navigate to the URL you formulated earlier so that you can accept the migration application in the source tenant.
If you are asked to sign in, make sure you sign in with your source tenant admin account. You will be prompted to accept the permissions needed to use the migration app so click Accept to continue.
If you want to confirm the app has been registered, go to the Azure AD Portal, and select Enterprise applications from the left and confirm that the CrossTenantMailboxMigrationApplication appears in the list (or whatever name you chose).
For the next steps you need to connect to your source tenant through Exchange Online PowerShell. Start by disconnecting from the previous session:
Disconnect-ExchangeOnline
Press Y to confirm you want to disconnect from all active sessions. Now connect to your source tenant:
Before we can create the organisation relationship, we need to create a scoping group for the mailboxes that will be allowed to migrate. The idea here is that you add mailboxes to this group if they are allowed to migrate, which helps to protect mailboxes in your organisation that may not be migrating. To create the group, run the following command:
New-DistributionGroup -Type Security -Name "Mailboxes for Migration" -Alias "MigratingMailboxes"
You can choose anything for the Name and Alias fields. This will be a mail enabled security group so the value in the Alias field will become the email address that is created for this group.
We’ll add a mailbox to this group later when doing a test migration.
Now we’re going to create the organisation relationship in the source tenant, just like we did in the target tenant earlier. Run the following commands:
target_tenant_id = The target Tenant ID you noted down earlier. application_client_id = The Application (client) ID that you noted down earlier. scoping_group_name = The value you used for the Name of the scoping group you created earlier.
Run the following two commands to see what existing organisation relationships exist (and particularly if any already exist for the same tenant):
organization_relationship_name = Any descriptive name of your choosing (such as “OrgRelationshipForMailboxMigrations”).
This completes the preparation steps for both tenants and the next section will cover migrating a single test mailbox.
Migrating a mailbox from the source tenant to the target tenant
For any mailbox migrating to the target tenant, you must provision a MailUser object in the target tenant and assign it some very specific attributes that are gathered from the user’s mailbox in the source tenant. Specifically, you will need the ExchangeGUID value, the ArchiveGUID value (if the user has an Online Archive), the LegacyExchangeDN value and any x500 addresses already configured on the mailbox.
In this guide I am going to migrate one mailbox over, a pretend user called Alex Wilber. His primary email address will change from AlexW@dev.kevinstreet.co.uk to AlexW@kevinstreet.co.uk as his mailbox migrates from my dev/lab tenant to my production tenant.
To follow along select or create a test user and mailbox in your source Office 365 tenant.
The first thing to do is to add this mailbox to the scoping group that we created in the source tenant preparation. Start by logging in to your source tenant in Exchange Online PowerShell and run the following command:
mailboxes_for_migration = The name of the scoping distribution group you created. mailbox_alias = The alias of the mailbox you wish to migrate. If you do not know the alias, you can get it in PowerShell by using the following command:
Get-Mailbox -Filter { EmailAddresses -eq "user_email_address" } | Select-Object Alias
user_email_address = One of the email addresses assigned to the user.
With that done, it’s time to collect the information we need for the MailUser. Run the following command to get the information we need:
mailbox_alias = The alias of the mailbox you are migrating.
Make a note of the ExchangeGUID, LegacyExchangeDN and any existing x500 addresses in the EmailAddresses field. Also, if the ArchiveGUID has a value (other than 00000000-0000-0000-0000-000000000000) this means the Online Archive is enabled for the user and you should make a note of this value as well.
With these values gathered it’s time to create the MailUser in the target tenant. Disconnect from the current Exchange Online PowerShell session and re-connect to your target tenant.
When creating a MailUser you will need to assign it a password, so use a password generator or something similar to create a password you will use, and assign it to a variable with the following command:
Where the following value are: alias = The alias for this MailUser. This could be the same as the alias that is used in the source tenant. displayname = How the display name will appear for this user. This could be the same as the display name that is used in the source tenant. firstname = The users first name. lastname = The users last name. primary_smtp_address = This is the main email address that the user will have after they have migrated (this must use a domain that is registered in the target tenant). external_email_address = This is the email address that the user has in the source tenant. It must be prefixed with SMTP:. microsoft_online_services_id = This will be the UPN for the user and is most likely the same as the users primary_smtp_address.
Your organisation may have guidelines that are followed to assign values such as alias and display name, so you should follow those as required.
For my test user Alex Wilber that looks like this:
Now that the MailUser has been created we need to edit it to assign the values that we collected from the user in the source tenant. First let’s see what values are currently set:
alias = The alias of the MailUser you just created.
You should see that both ExchangeGUID and ArchiveGUID are set to 00000000-0000-0000-0000-000000000000. These values need to be identical to the values the user had in the source tenant. If your user didn’t have the Online Archive enabled in the source tenant, then there is no need to set this in the target tenant.
To set the ExchangeGUID, use the following command:
archive_guid = The users ArchiveGUID that you noted down earlier.
If you re-run the Get-MailUser command from a few steps ago you will now see the ExchangeGUID (and perhaps ArchiveGUID) are set to the same values that the user has in the source tenant.
The next thing that needs to be done is the LegacyExchangeDN that you noted down for the user needs to be added as a x500 proxy address to this MailUser. This is done by prefixing the LegacyExchangeDN value with x500: and adding it to the EmailAddresses value on the MailUser.
For example, the LegacyExchangeDN I noted down for my test user was:
/o=ExchangeLabs/ou=Exchange Administrative Group (FYDIBOHF23SPDLT)/cn=Recipients/cn=93531982d8b14ac389c31f982281535d-AlexW
So, this will become:
x500:/o=ExchangeLabs/ou=Exchange Administrative Group (FYDIBOHF23SPDLT)/cn=Recipients/cn=93531982d8b14ac389c31f982281535d-AlexW
alias = The alias you chose for the MailUser. legacy_exchange_dn_x500 = The x500 address you just created just now.
In addition to adding this address, you also need to ensure the user has a @targettenant.onmicrosoft.com email address. This usually takes the form of alias@targettenant.onmicrosoft.com (you can find the onmicrosoft.com domain for your target tenant in Azure AD or in the domains sections of your Office 365 portal).
If the MailUser does not already have one of these set, set it now:
Finally, you need to re-add any x500 addresses that the user already has set in the source tenant. These can be found in the EmailAddresses field and are prefixed with x500:. There’s a good chance there won’t be any, but if there are you should copy them and add them with the same Set-MailUser command used to add the previous 2 addresses.
Now re-run the following command to check that all the fields look correct:
endpoint_name = The name of the migration endpoint you created during the target tenant preparation (if you need to remind yourself what it was called run the command Get-MigrationEndpoint and take note of the identity value). migrating_user_smtp = The email address of the user who is migrating (this must be their new email address in the target tenant).
That’s it for the mailbox preparation and it is now time to migrate the mailbox.
Migration time!
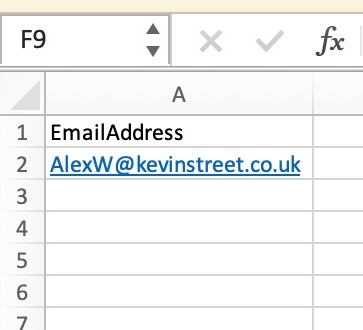
Migrations are initiated and managed from the target tenant. In Exchange Online PowerShell connect to your target tenant (if you aren’t already). Next you need to create a simple CSV file with one header: EmailAddress. Then below that enter the primary SMTP address of the migrating user in the target tenant.
Note: There are other headers that you can add to the CSV if you wish and these are detailed in this article. However, EmailAddress is the only mandatory header. In this guide I am only migrating 1 user however you can have up to 2000 users per batch.
Save this CSV somewhere on your computer.
Now run the following command to create the migration batch:
migration_batch_name = You can choose any name for the batch. This could be “AllFinanceUsers” or just “Migration_20102022” – whatever works for you. endpoint_name = The name of the endpoint you created in the target tenant preparation. path_to_csv = The path to the CSV you created. targettenant.onmicrosoft.com = The onmicrosoft.com domain for your target tenant.
Now that you have created the migration batch, you can start it when ready. This will begin the sync of the mailbox to the target tenant, and it will reach 95% and then stop. Every 24 hours it will automatically do a delta sync to keep the mailbox at 95% until you are ready to complete the cutover. This will not affect the user and is a good way to get entire groups of users sync’d and ready to cutover in a single evening depending on your migration project plans.
Once the status moves to Completed the user will no longer be able to open their mailbox in the source tenant and should be able to open it in the target tenant!
Now that the migration has completed, the MailUser has converted to a UserMailbox and it has entered a 30 day grace period where it will work without a license. You should assign a license now or before the 30 days expires to avoid disruption to the user.
You should read the documentation for the New-MigrationBatch, Start-MigrationBatch and Complete-MigrationBatch commands to fully utilise them. For example, on the New-MigrationBatch command you can use the -AutoStart switch on so that it starts the sync immediately, and the -CompleteAfter switch to specify when it completes (removing the need to use Start-MigrationBatch and Complete-MigrationBatch separately).
If you have not read it before now, you should read the main article from Microsoft about this feature to learn about the limitations and gotcha’s. For example, if any user has an auto-expanding archive set their mailbox cannot be migrated using this tool. The FAQ on the Microsoft page answers many questions you may have and covers limitations and known issues with the tool.
In ConfigMgr version 2002 Microsoft introduced the ability to remotely collect client logs using the client notification channel and have them delivered to your Management point. This is very useful as it means you can troubleshoot client issues without disturbing your users.
Assuming that the connection between your Management point and your client(s) is healthy and the request is making it to the client, a new log will appear in C:\Windows\CCM\Logs called Diagnostic.log when the log collection is initiated. A successful log collection will generate three lines in the log:
In a rare case, however, client log collection may not work. One reason may be that the size of the compressed client logs exceeds 100 MB, which is the limit according to Microsoft’s documentation. Another reason, which is not documented anywhere, is that if the full path of any log (including the log name itself) exceeds 116 characters in length, the log collection will fail.
For example, the following would work as the full path is exactly 116 characters:
If you attempt to collect client logs from a client that has log files that exceed the 116-character path limit, you will see the following errors in Diagnostics.log:
This is very unlikely to cause you a problem as none of the ConfigMgr client log files are this long. However, if you capture application install\uninstall logs and decided to put them in the same folder as the ConfigMgr client logs directory, there is a possibility that they will exceed this path length. If this is the case, you will need to choose a new path to store these logs and move them on all your clients.
Many IT security departments these days frequently scan their servers using a vulnerability scanner such as Nessus or Qualys to look for software that needs patching or settings that need to be changed, in the hopes of finding and fixing them before the bad guys exploit them. On web servers, the findings may include needing to enable HSTS (HTTP Strict Transport Security) and configuring the server to only use the latest versions of TLS and use the most secure ciphers. As many ConfigMgr roles rely on a web server, this may mean your ConfigMgr server(s) appears on the vulnerability report with findings.
So, the big question is: Does enabling HSTS cause problems for ConfigMgr? I have tested this extensively and I believe the answer is no, it does not cause problems. If you are concerned, there is a way to minimise the risk by settings the “max-age” for HTST to just 1 hour to begin with (in the end you should set this to 1 year as that is the industry recommended time).
The second question is: Does ConfigMgr still work if you limit the TLS protocols and ciphers to only the most secure? Again, the answer is yes, ConfigMgr continues to work just fine.
Considerations Before you begin, you must understand what HSTS is and how it could break things if it is set incorrectly. HSTS instructs browsers to always expect a secure connection to a site and they will refuse to connect in the future if they do not find a valid SSL certificate. Due to this you must only set HSTS if you are running ConfigMgr with SSL certificates and can guarantee that you will always be doing so in the future.
To enable HSTS you must be running all ConfigMgr roles in HTTPS mode. This includes the Management point and Distribution point, as well as the Enrollment point and Enrollment proxy point if you are still using those.
If you are running a Reporting services point, you must use Report Server Configuration Manager to configure SQL Server Reporting Services (SSRS) to use SSL. There is also a separate process to enable HSTS on SSRS if you are using the 2019 version.
You should be aware that this guide will set HSTS for all websites hosted on your server. If you run any other sites on your ConfigMgr server, you should make sure that you can guarantee HTTPS connections to those sites as well.
Configuring HSTS in IIS 10.0 Microsoft has confusingly continued to use version 10.0 for IIS in Windows Server 2016 and 2019 even though they have added features to IIS in the newer versions of Windows Server. In Windows Server 2016 the full version for IIS is IIS 10.0 version 1607 and in Windows Server 2019 it is IIS 10.0 version 1809. HSTS can be enabled in both versions but have slightly different procedures.
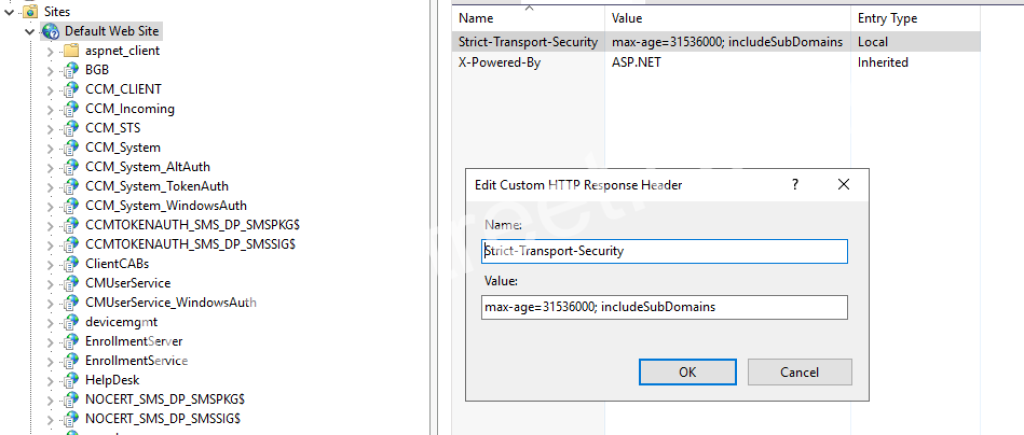
If you are running Windows Server 2016, open Internet Information Services (IIS) Manager and select the site your ConfigMgr roles are running from (by default this will be Default Web Site). Double click on HTTP Response Headers, then click Add from the Actions pane on the left. In the Name field enter “Strict-Transport-Security”, and in the Value field enter “max-age=31536000; includeSubDomains”. Click OK to save this header.
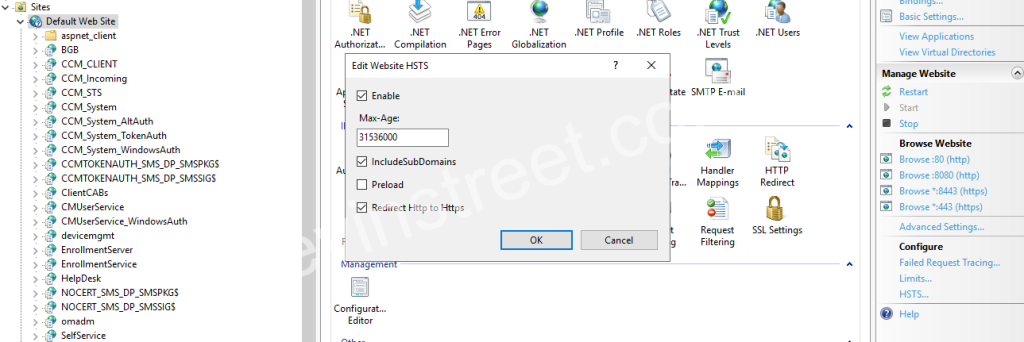
If you are running Windows Server 2019, open Internet Information Services (IIS) Manager and select the site your ConfigMgr roles are running from (by default this will be Default Web Site). In the Actions pane on the left click HSTS… and tick Enable, put the value 31536000 in the Max-Age field and tick includeSubDomains and Redirect Http to Https. Click OK to save this setting.
Note: The 31536000 value for max-age is equal to 1 year in seconds. This is the industry standard time for this value. If you want to test this before fully committing to a year you can set this value to 3600 (1 hour) or 86400 (1 day). Once you have completed your testing and are satisfied that HSTS is not causing any problems, you should set this to 31536000.
Configuring HSTS in SQL Server Reporting Services SQL Server Reporting Services (SSRS) has long been decoupled from IIS, so configuring HSTS for your IIS sites will not configure it for the reporting services site if you have a Reporting services point set up in ConfigMgr. In order to configure HSTS for SSRS you must be running SQL Server 2019 Reporting Services or later, as this is the first version where Microsoft has officially supported setting custom response headers.
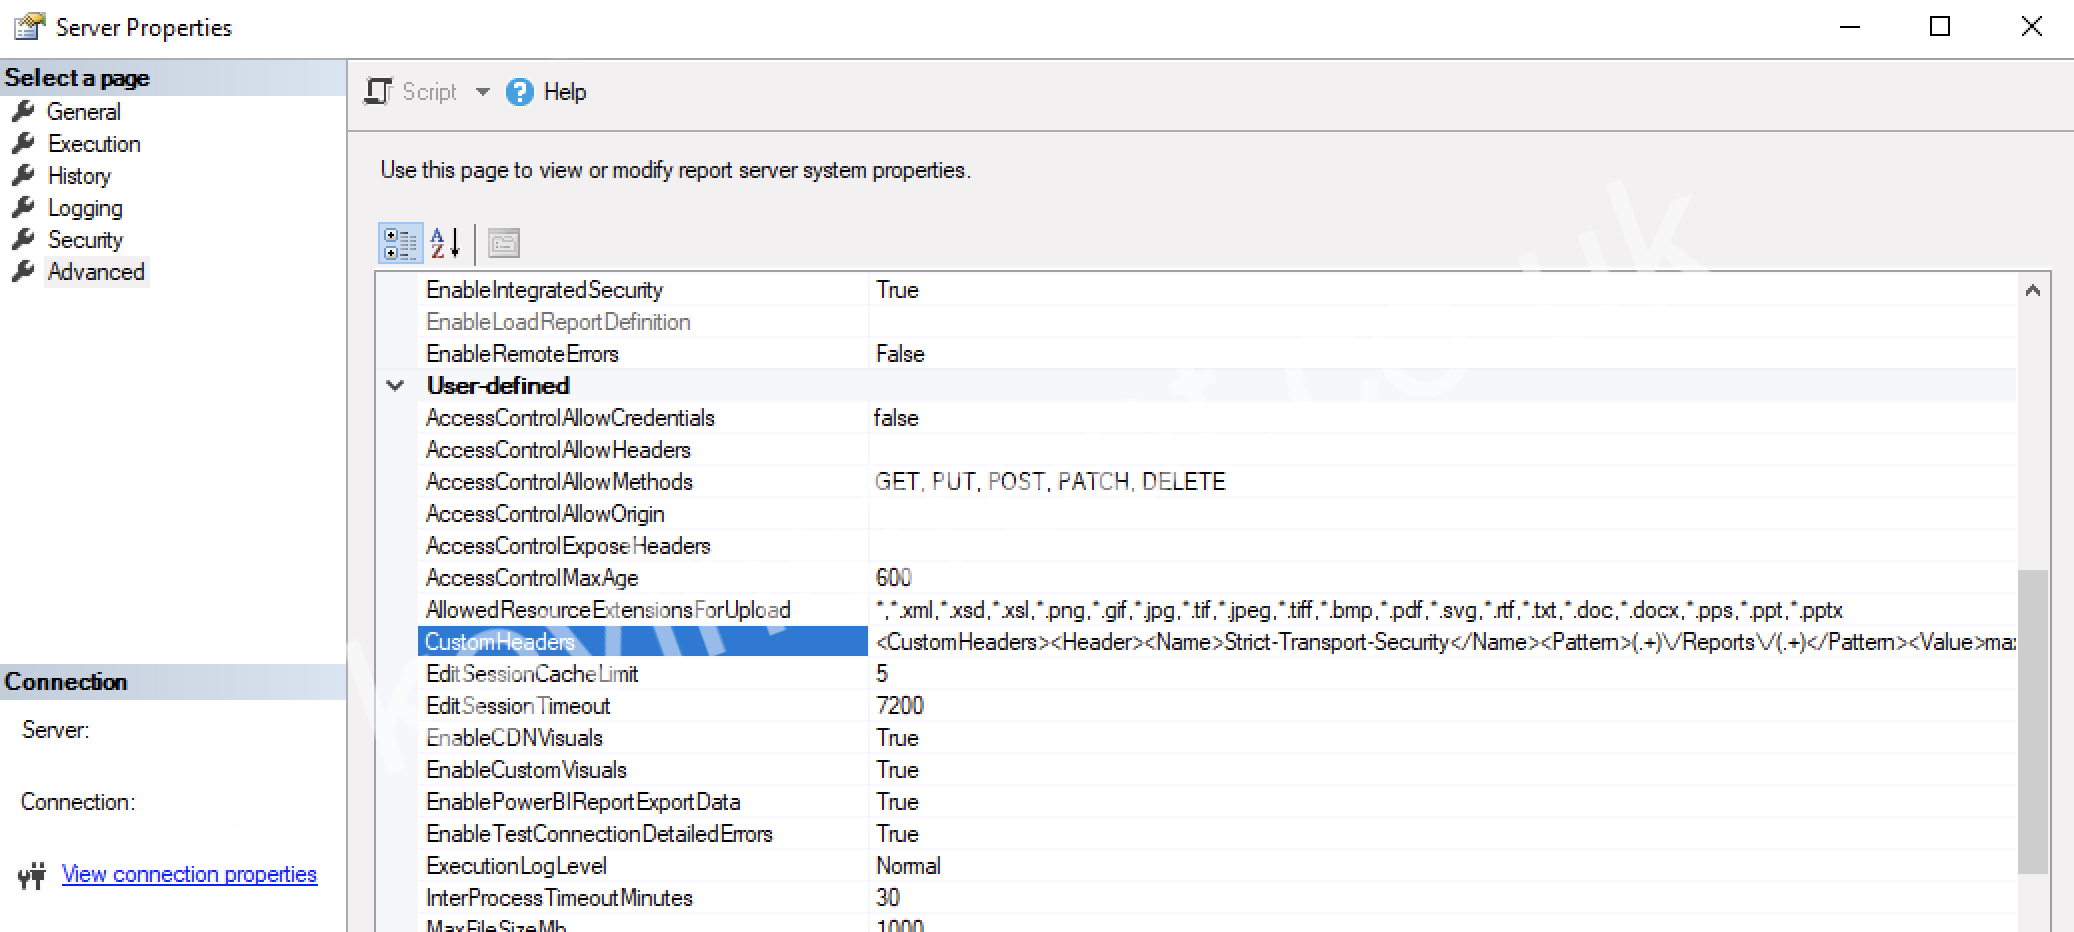
To configure the Strict-Transport-Security header in SSRS 2019, start by opening SQL Server Management Studio and selecting Reporting Services from the Server type drop down menu and entering the server’s name, followed by the authentication details you use. Once connected, right click on the server’s name in Object Explorer on the left and select Properties. Go to Advanced and look for the CustomHeaders field. By default, this is empty, so you should enter the following value:
This sets the header name (Strict-Transport-Security) and the value (max-age=31536000; includeSubDomains=true). You also have to use a regular expression to set which URLs will be matched and this header applied to. For a default install of SSRS, your ConfigMgr reports will be accessible at https://<ConfigMgrServer.com/Reports/. If this is the case, the regex “(.+)\/Reports\/(.+)” will work as this matches any URL that has characters before and after “/Reports/”. If you need to modify this regex for your environment, I recommend using a regex testing site such as this one.
Once you have entered the text in the CustomHeaders field click OK to close the Server Properties page. You must then restart the SQL Server Reporting Services service before it will take effect.
Configuring best practise for TLS versions and cipher suites offered by IIS The easiest way to disable old TLS versions and insecure cipher suites is to download the tool IIS Crypto from Nartac Software. Once downloaded, run it on your ConfigMgr server and click the Best Practices button at the bottom of the window. This will leave only TLS 1.0, 1.1 and 1.2 enabled and disable many less secure ciphers such as MD5 and 3DES. I would also recommend unticking TLS 1.0 to disable that.
You can review exactly what has been disabled by going through the list of protocols and ciphers that have been left enabled in the Schannel tab and the Cipher Suites tab. If you’re happy with the changes that it will make, click Apply and then close IIS Crypto. You must restart the server before the changes will take effect.
Once you have completed this you can ask your security team to rescan your ConfigMgr server and check that it no longer shows vulnerabilities relating to HSTS or insecure HTTPS protocols and cipher suites.
The October 2020 update to Windows 10 is now available to download using the Media Creation Tool. Historically Microsoft has called these xx09 (for example, 1809 or 1909) but starting this year it is referred to as 20H2, meaning year 2020 half 2.
Using the GUI, you can download the consumer ISO which contains the Home, Professional and Education SKUs of Windows 10.
If you want to download the Enterprise version of Windows 10, but don’t have access to Microsoft VLSC, Visual Studio or Action Pack subscriptions, it is possible to download it using the Media Creation Tool if you know the right command line switches.
To download Windows 10 Enterprise 20H2 using the Media Creation Tool, log in with a local administrator account (for some reason it isn’t good enough to run the tool using Run as administrator, you actually do have to be logged in as an administrator) and download the tool. Open a CMD prompt, change directory to the directory you saved the Media Creation Tool in and enter the following command:
When you’re prompted for a product key, you can use the Windows 10 Enterprise KMS client key from this site on Microsoft Docs.
This will download an ISO that contains the various Enterprise SKUs (Enterprise, Enterprise N, Education, Education N, Professional and Professional N) with en-US installed and set to default. If you’d prefer to get en-GB, use the following command:
This will download an ISO containing the same SKUs as above, but with en-GB installed and set to default.
As far as I can tell, this works for any of the language pack region tags listed on this site. So, for example, to download Windows 10 Enterprise 20H2 with French installed and set to the default language, you can use this command:
If you don’t specify the /MediaLangCode switch it will default to downloading an ISO with the same language pack as the OS you are running it from.
If you want to download the 32-bit version of Windows 10 Enterprise instead, you should change /MediaArch to x86.
When you have downloaded the ISO, you may unpack it and find that the it does not contain an install.wim, but instead contains install.esd in the sources directory. Depending on what you are doing, you may need the .wim file (for example, if you’re planning to use it with MECM/SCCM). Thankfully obtaining a .wim file from the .esd is quite straightforward using DISM.
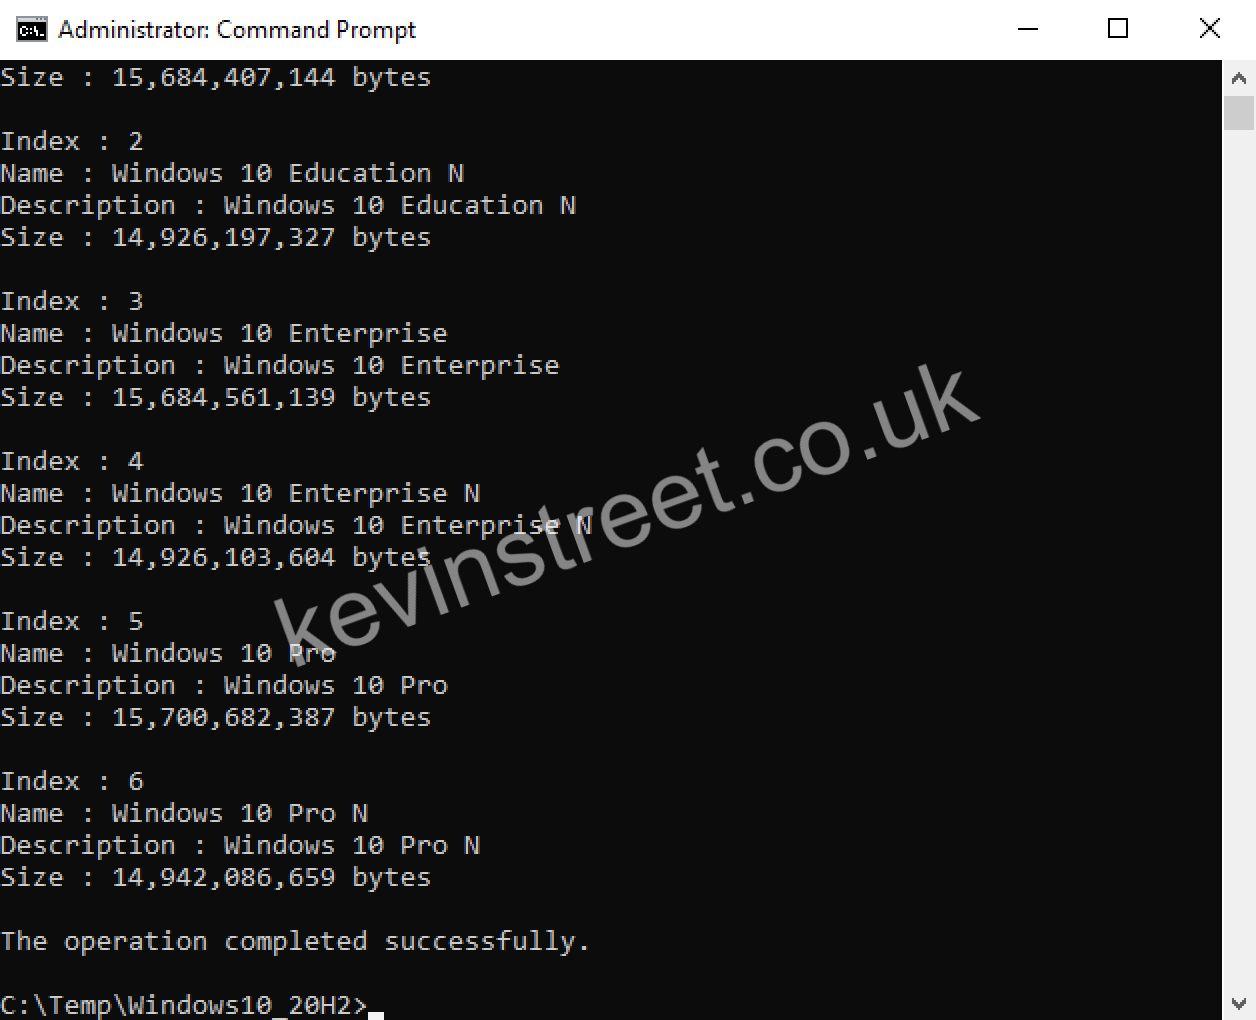
Open a CMD prompt and use the following command (changing the path for /WimFile to match where your install.esd file is):
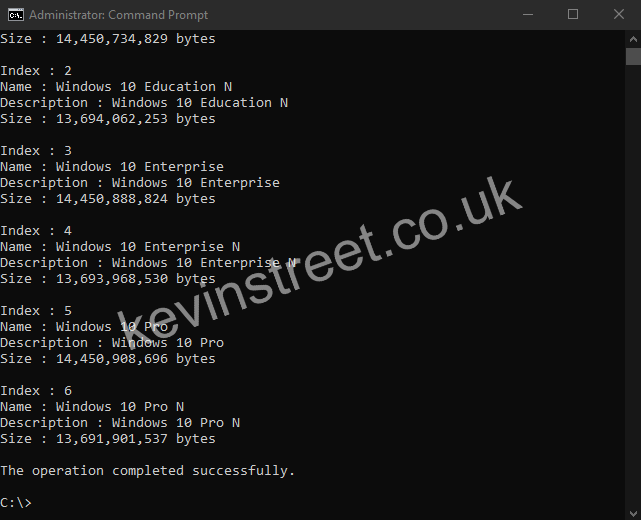
This will list each of the SKUs in the install.esd file. Make a note of the index of the SKU you want (in my case, I want the Enterprise SKU which is index 3).
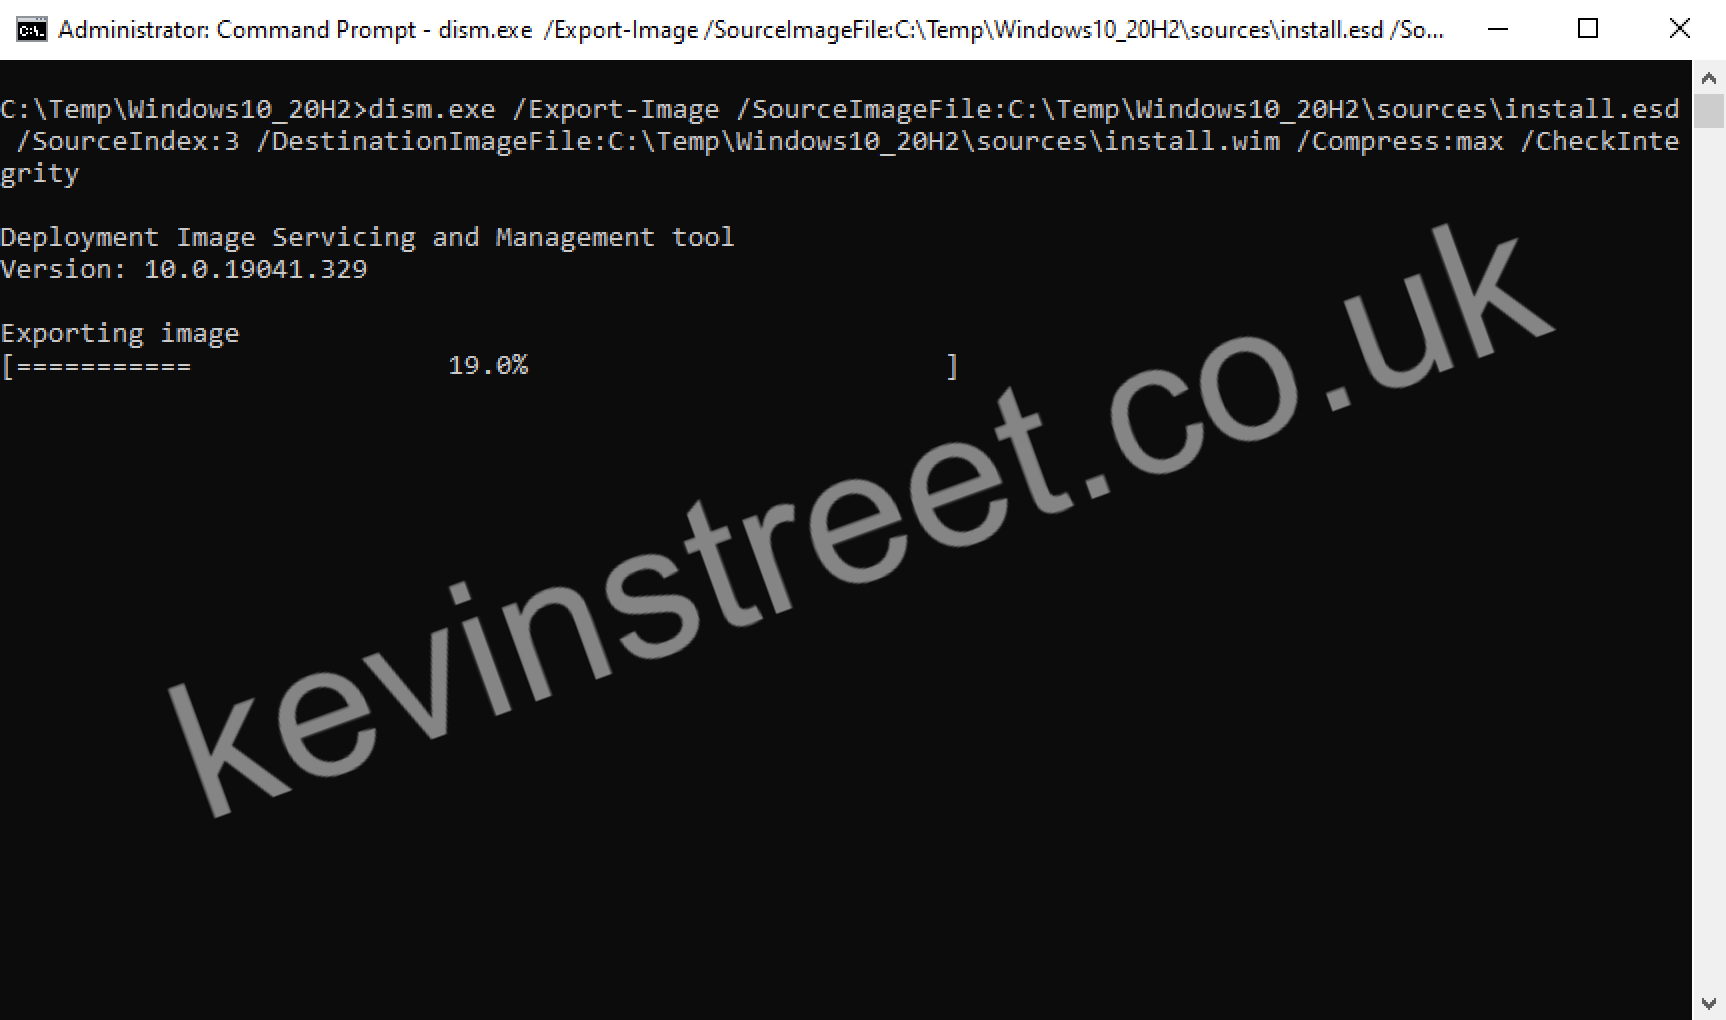
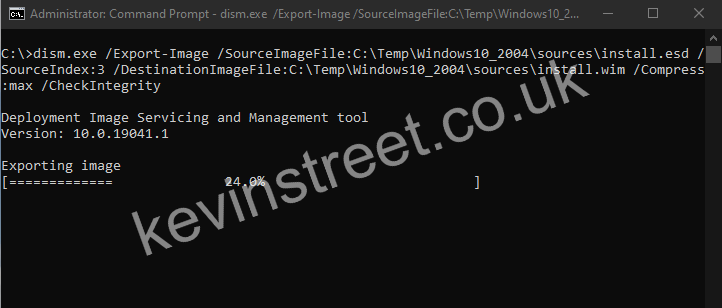
Now use the following command to create an install.wim file that contains the SKU you want:
Make sure the path for /SourceImageFile and /DestinationImageFile are correct for you and change the /SourceIndex to match the index you noted earlier.
Once that is done you can delete the install.esd file if you want, to save space.
Unfortunately, this version of the Media Creation Tool still has no way to get the LTSC version of Windows 10 Enterprise (as far as I can tell).
If you administer ConfigMgr frequently you have probably come across your fair share of clients that are not appearing in the console, or don’t appear to be completing their registration process. The first place most of us go is the ClientIDManagerStartup.log file as this log details the CcmExec process start up and is one of the first log files that errors will show up in if there are problems communicating with the site server.
You may see the following error appear in the log file: 0x87d00231.
Unfortunately, 0x87d00231 is a fairly generic error message that pretty much just means “something went wrong”. If you Google it, you will see a variety of solutions ranging from reinstalling the client to checking your PKI environment is functioning correctly or checking the health of your Management Point(s). These are very valid suggestions; however, they could lead you down a time-consuming rabbit hole. Before you go down that rabbit hole there is one very simple thing it could be, and the answer can be quickly found in the CcmMessaging.log file:
Yes, it could be as simple as the user of the device having set their connection as a metered connection. This can be done on Windows 8.1 and Windows 10 clients. Now you know the reason the user’s device isn’t completing its registration, you can find out why they are using a metered connection and correct it if it’s in error.
The May 2020 update to Windows 10 is now available to download using the Media Creation Tool. Using the GUI, you can download the consumer ISO which contains the Home, Professional and Education SKUs of Windows 10.
If you want to download the Enterprise version of Windows 10, but don’t have access to Microsoft VLSC, Visual Studio or Action Pack subscriptions, it is possible to download it using the Media Creation Tool if you know the right command line switches.
To download Windows 10 Enterprise 2004 using the Media Creation Tool, log in with a local administrator account (for some reason it isn’t good enough to run the tool using Run as administrator, you actually do have to be logged in as an administrator) and download the tool. Open a CMD prompt, change directory to the directory you saved the Media Creation Tool in and enter the following command:
When you’re prompted for a product key, you can use the Windows 10 Enterprise KMS client key from this site on Microsoft Docs.
This will download an ISO that contains the various Enterprise SKUs (Enterprise, Enterprise N, Education, Education N, Professional and Professional N) with en-US installed and set to default. If you’d prefer to get en-GB, use the following command:
This will download an ISO containing the same SKUs as above, but with en-GB installed and set to default.
As far as I can tell, this works for any of the language pack region tags listed on this site. So, for example, to download Windows 10 Enterprise 2004 with French installed and set to the default language, you can use this command:
If you don’t specify the /MediaLangCode switch it will default to downloading an ISO with the same language pack as the OS you are running it from.
If you want to download the 32-bit version of Windows 10 Enterprise instead, you should change /MediaArch to x86.
When you have downloaded the ISO, you may unpack it and find that the it does not contain an install.wim, but instead contains install.esd in the sources directory. Depending on what you are doing, you may need the .wim file (for example, if you’re planning to use it with MECM/SCCM). Thankfully obtaining a .wim file from the .esd is quite straightforward using DISM.
Open a CMD prompt and use the following command (changing the path for /WimFile to match where your install.esd file is):
This will list each of the SKUs in the install.esd file. Make a note of the index of the SKU you want (in my case, I want the Enterprise SKU which is index 3).
Now use the following command to create an install.wim file that contains the SKU you want:
Make sure the path for /SourceImageFile and /DestinationImageFile are correct for you and change the /SourceIndex to match the index you noted earlier.
Once that is done you can delete the install.esd file if you want, to save space.
Unfortunately, this version of the Media Creation Tool still has no way to get the LTSC version of Windows 10 Enterprise (as far as I can tell).
With all the configuration done, in this final part of the guide I am going to demonstrate how to patch Google Chrome, Adobe Acrobat Reader DC and Power BI Desktop using Ivanti Patch for SCCM.
Client preparation For this end-to-end demonstration I have prepared a Windows 10 client running Google Chrome 75 (June 2019), Adobe Acrobat Reader 2019.008.20071 (October 2018) and Power BI Desktop (October 2019 release). I will be aiming to update all three applications using Ivanti.
Publishing the updates Note: You may have already published Google Chrome while following the instructions in Part 4. If you did, just skim past those bits in this part.
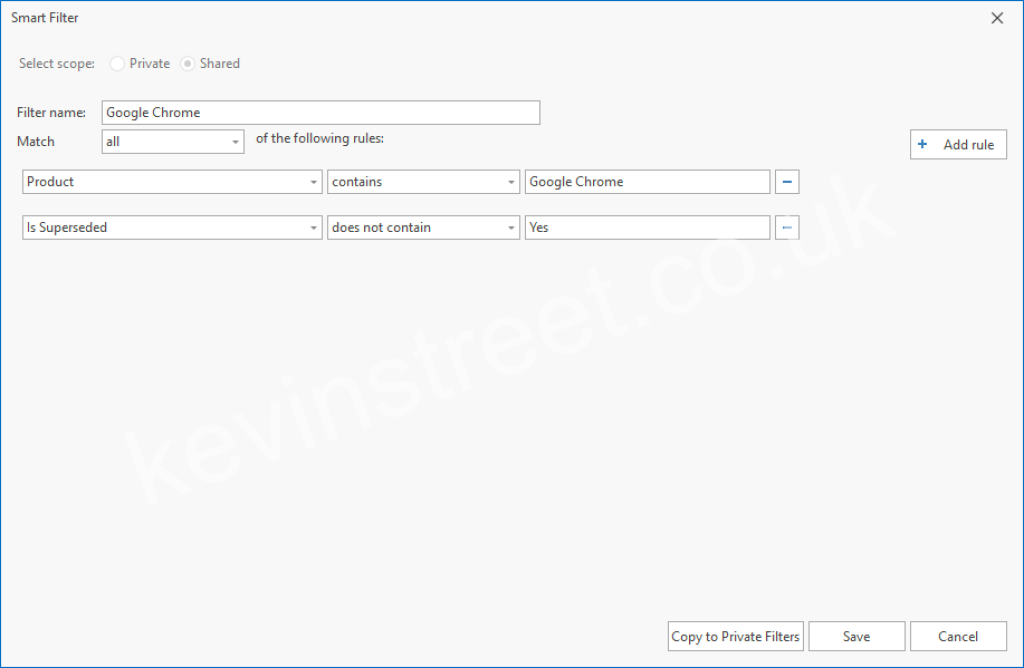
Open the SCCM console and navigate to Software Library > Software Updates > Ivanti Patch. Search for Google Chrome, and then click on the New SmartFilter button. Fill it in with the following details:
Scope: Shared Filter name: Google Chrome Match all of the following rules: Product contains Google Chrome Is Superseded does not contain Yes
Click Save.
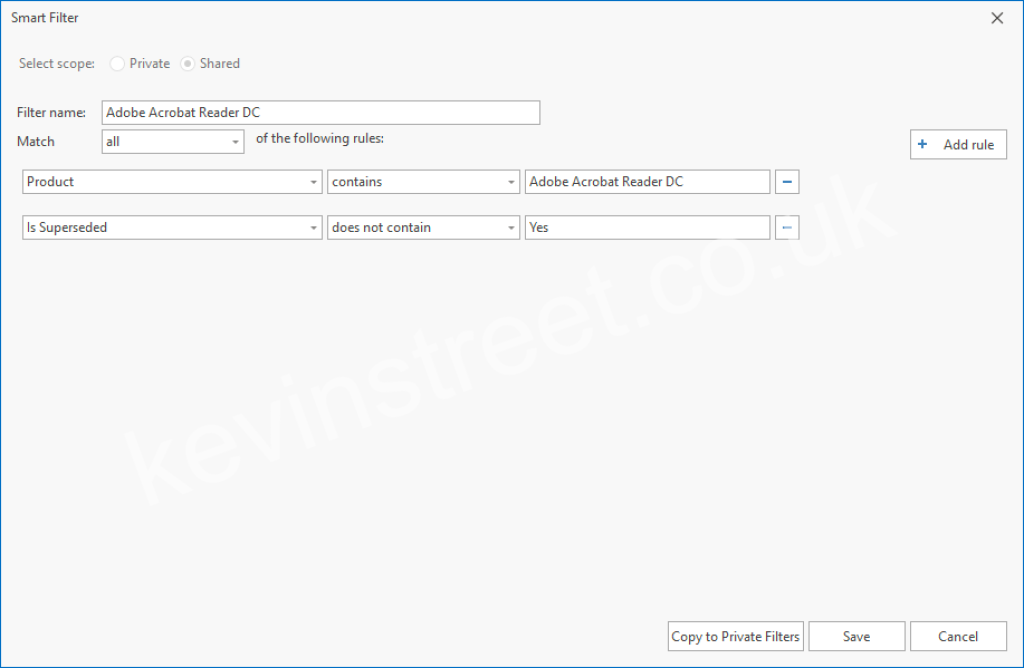
Next create a smart filter for Adobe Acrobat Reader DC using the following details:
Scope: Shared Filter name: Adobe Acrobat Reader DC Match all of the following rules: Product contains Adobe Acrobat Reader DC Is Superseded does not contain Yes
Click Save.
Finally, create a smart filter for Power BI Desktop using the following details:
Scope: Shared Filter name: Power BI Desktop Match all of the following rules: Product contains Power BI Desktop Is Superseded does not contain Yes
Click Save.
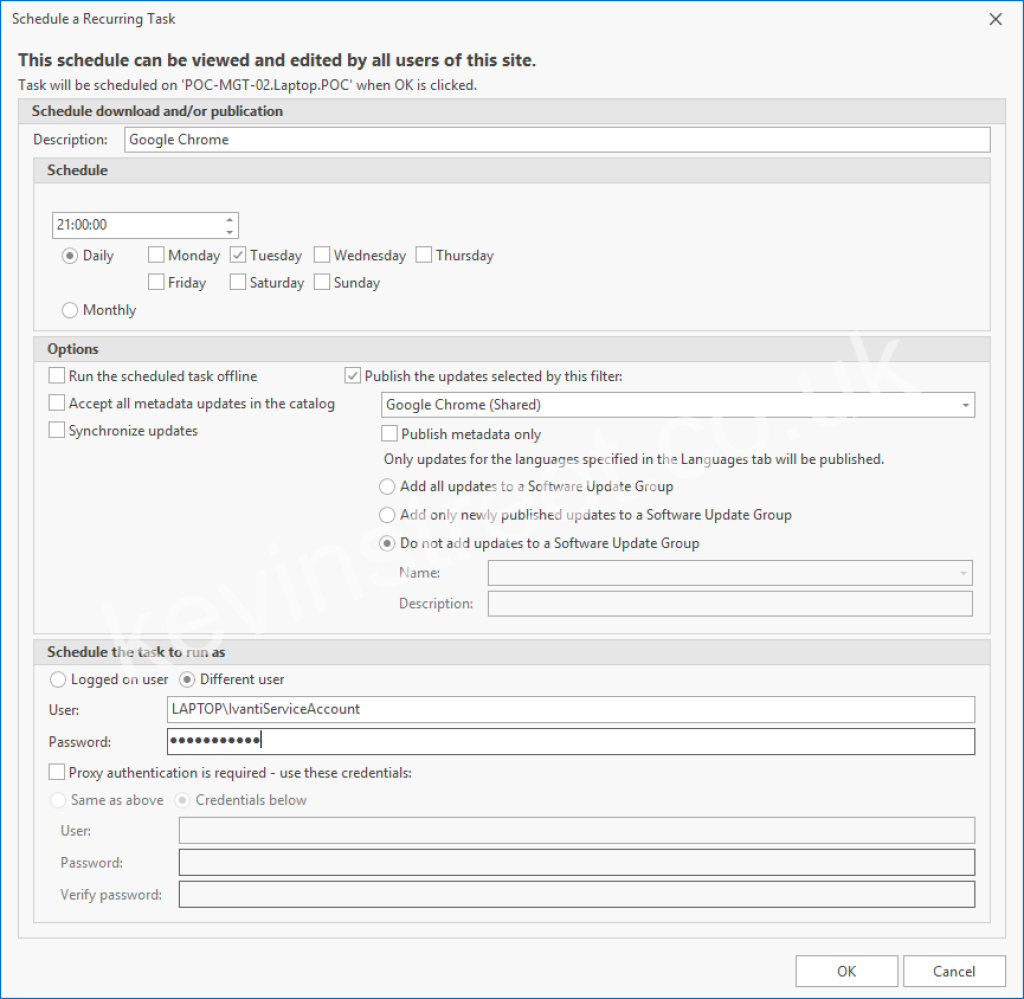
With all three smart filters ready to go, click Scheduled Tasks in the ribbon. Create a new scheduled task for Google Chrome with the following details:
Description: Google Chrome Schedule: Daily, Tuesday, 21:00:00 Publish the updates selected by this filter: Google Chrome (Shared) Do not add updates to a Software Update group Schedule the task to run as: Your Ivanti service account
Click OK to save this task.
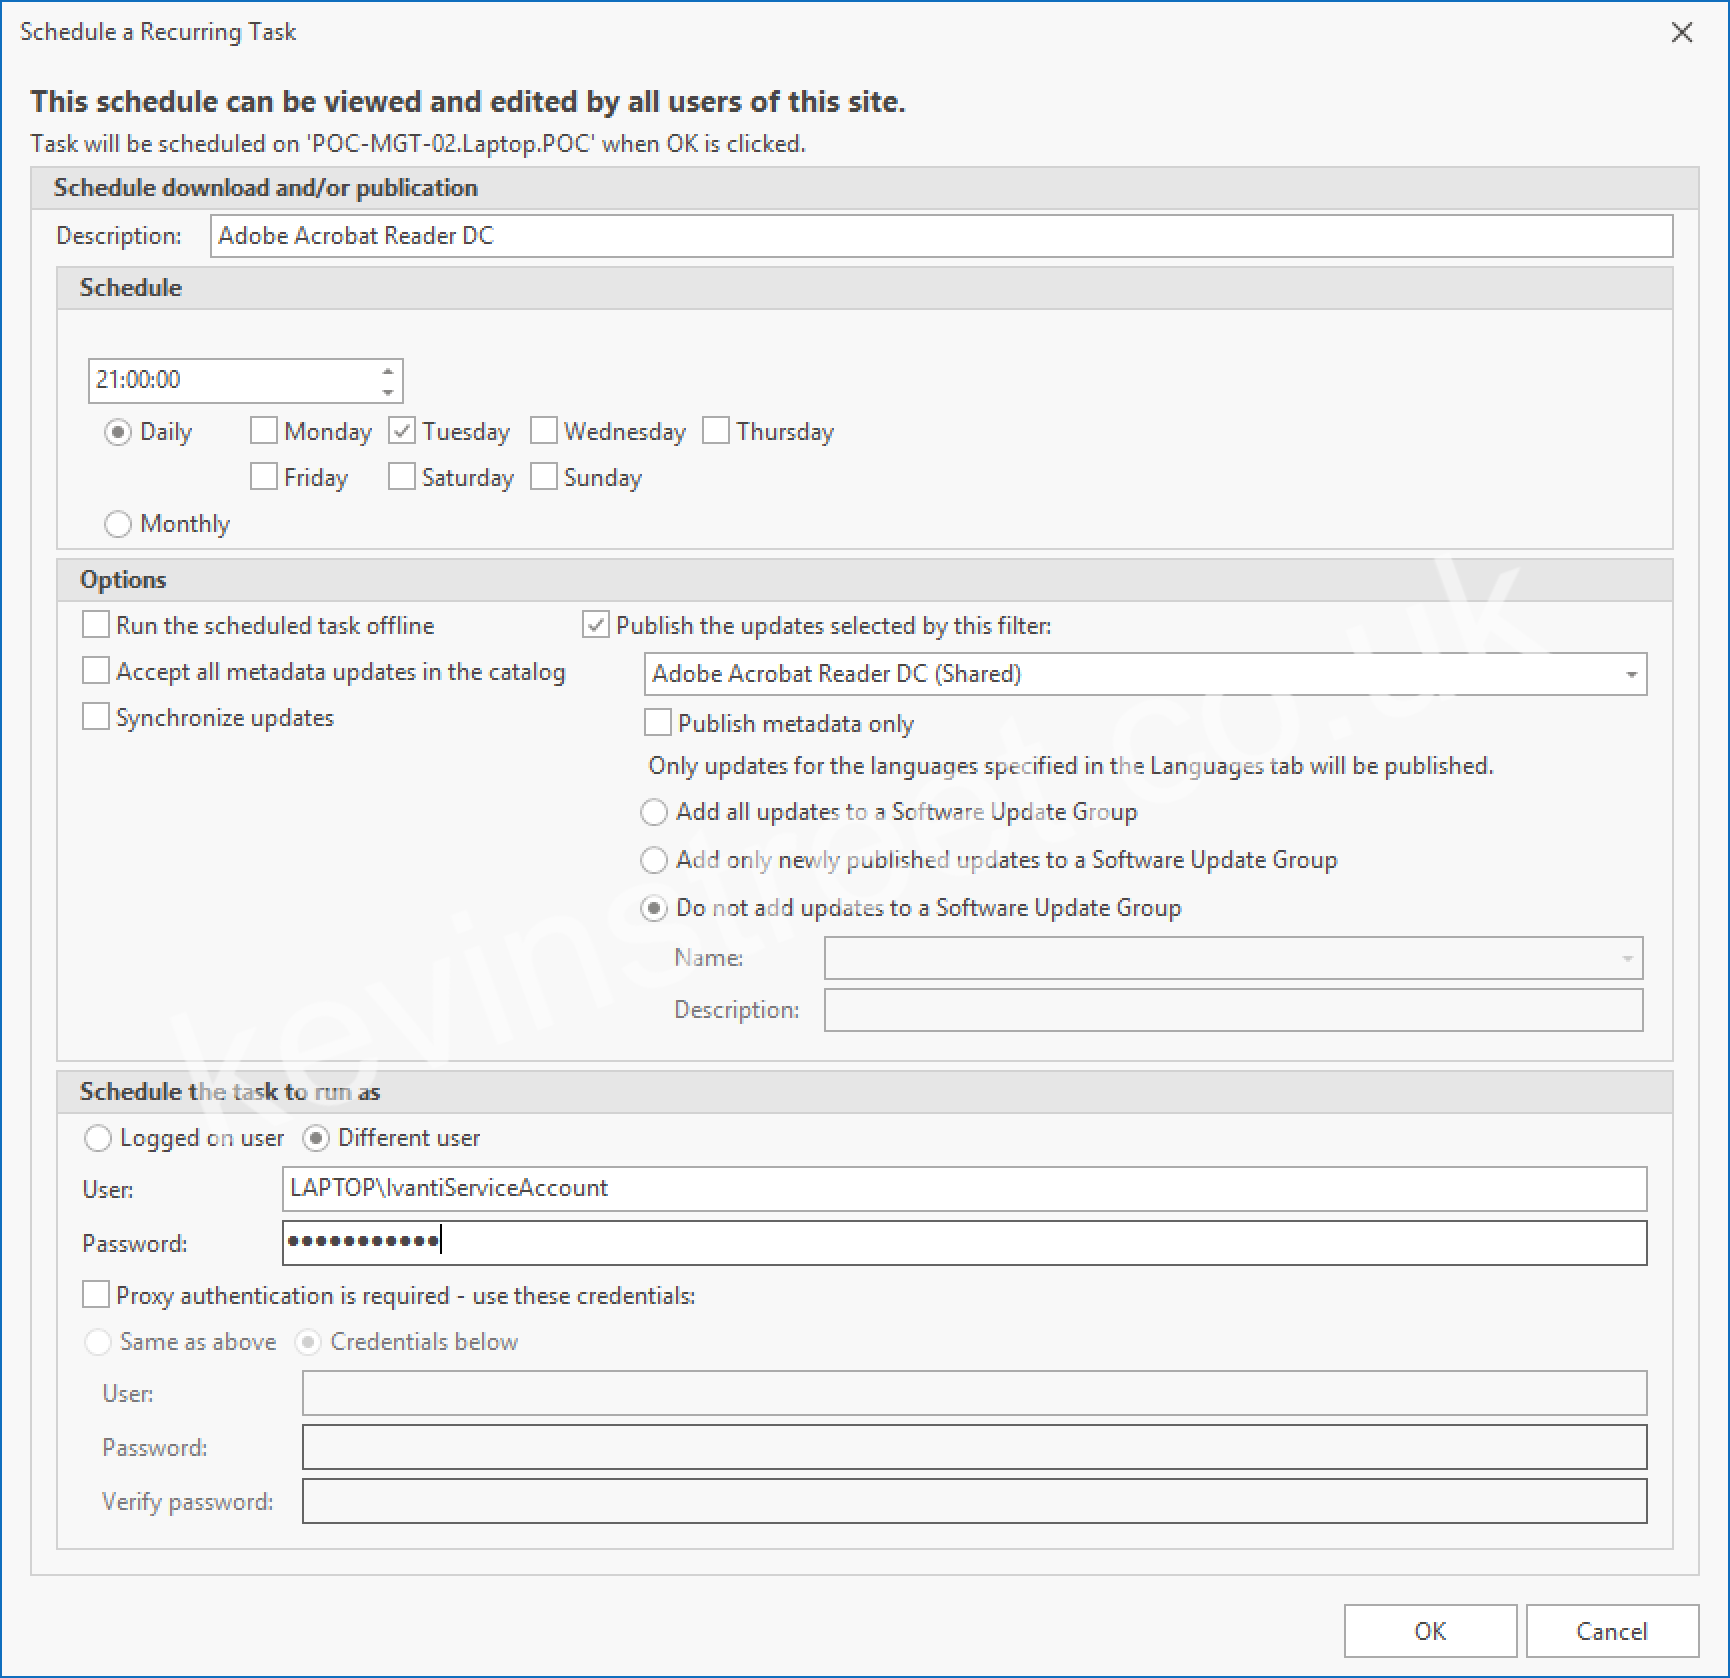
Next, create a scheduled task for Adobe Acrobat Reader DC using the following details:
Description: Adobe Acrobat Reader DC Schedule: Daily, Tuesday, 21:00:00 Publish the updates selected by this filter: Adobe Acrobat Reader DC (Shared) Do not add updates to a Software Update group Schedule the task to run as: Your Ivanti service account
Click OK to save this task.
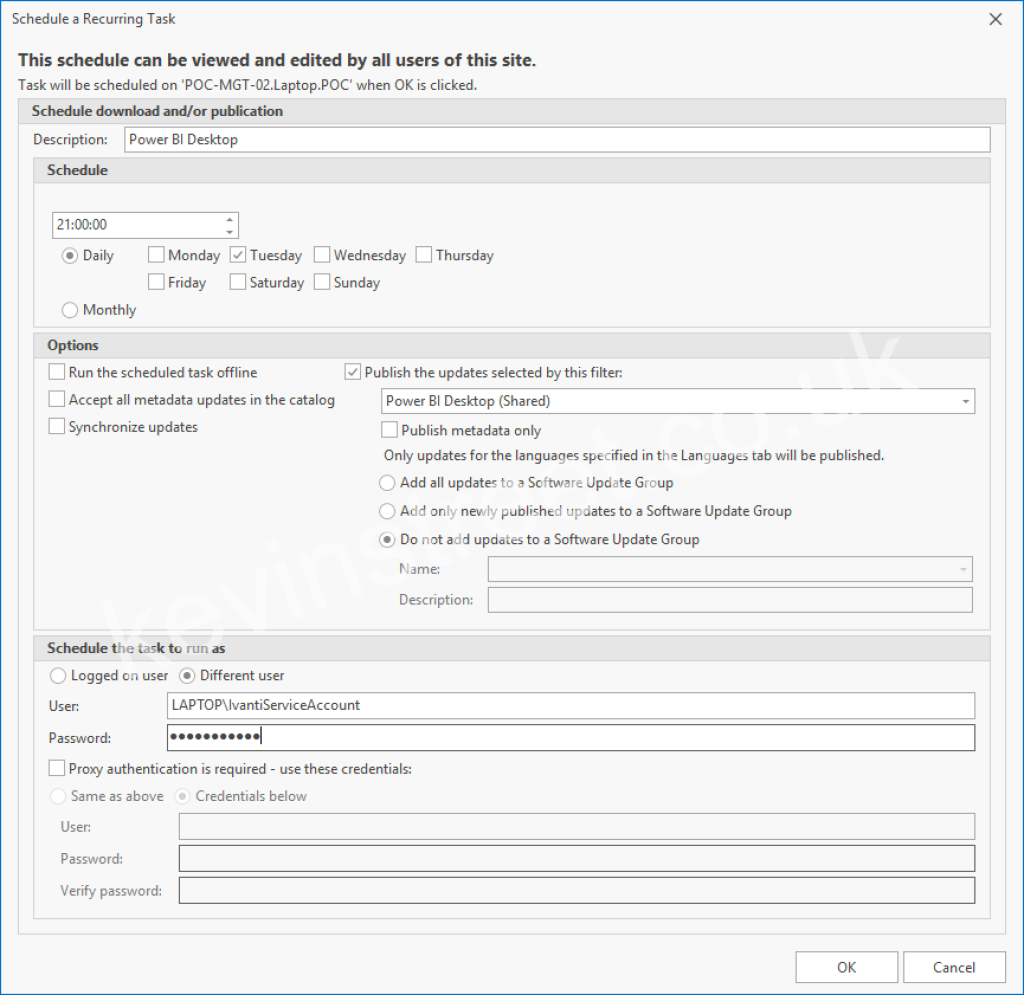
Finally, create a scheduled task for Power BI Desktop using these details:
Description: Power BI Desktop Schedule: Daily, Tuesday, 21:00:00 Publish the updates selected by this filter: Power BI Desktop (Shared) Do not add updates to a Software Update group Schedule the task to run as: Your Ivanti service account
Click OK to save this scheduled task.
Open Windows Task Scheduler and navigate to Task Scheduler Library > Ivanti > Patch and select each scheduled task in turn and click Run in the actions pane on the right. Switch back to Ivanti in the SCCM console and monitor the status column for each of the three products, watching as each one gets packaged and then published.
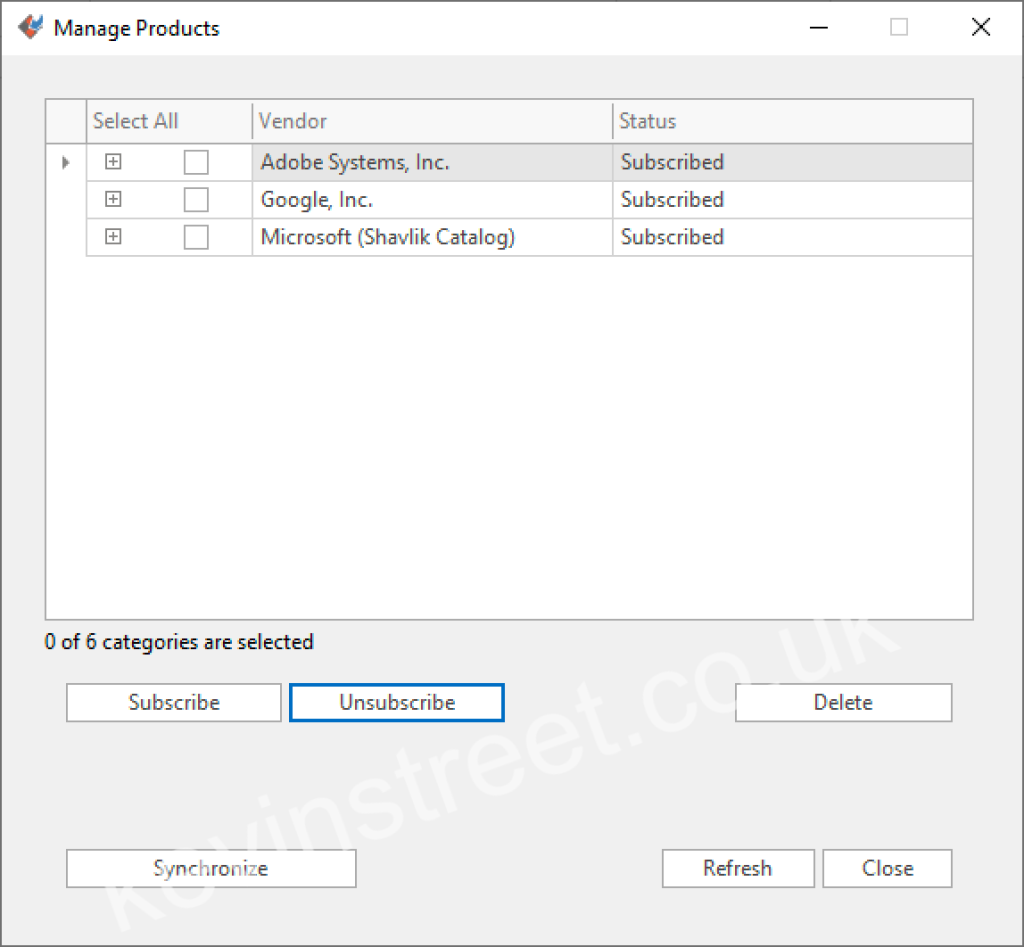
Once that is done, click Synchronize Software Updates in the ribbon and monitor the wsyncmgr.log file to see when it completes. When it has completed, click on Manage Products in the ribbon and subscribe to all three vendors.
Click close, and once again click Synchronize Software Updates. This time the updates will be synchronised with SCCM and will appear in All Software Updates when the sync has completed.
Go to Automatic Deployment Rules and click Create Automatic Deployment Rule in the ribbon. I am going to create a single ADR for all third-party updates; however, you may choose to separate products out as you see fit.
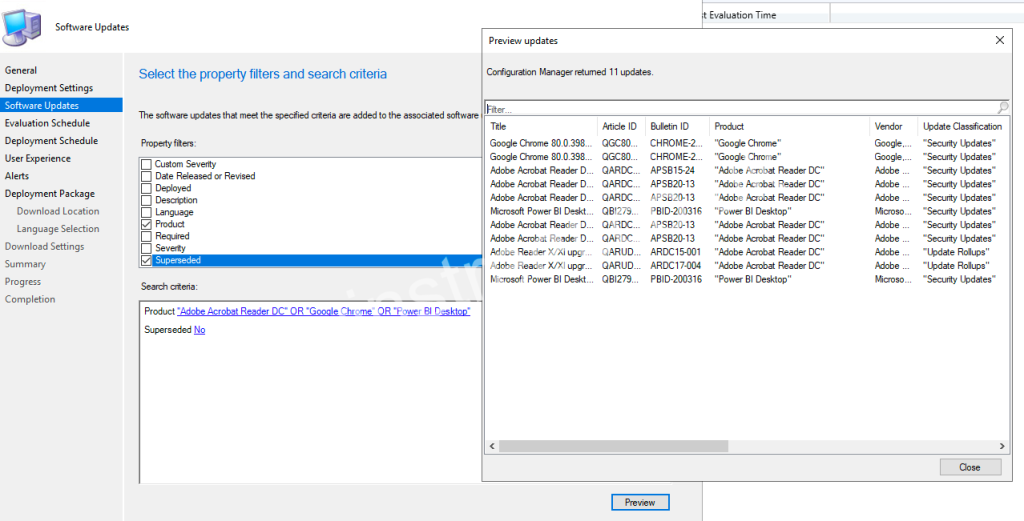
Name the rule All Third-Party Updates and select the collection that contains your clients. Select to have new updates added to an existing Software Update Group each time is runs. On the search criteria screen, select Product and choose Adobe Acrobat Reader DC, Google Chrome and Power BI Desktop. You should also add Superseded and change it to No. Click preview to see the patches that will be gathered by these criteria.
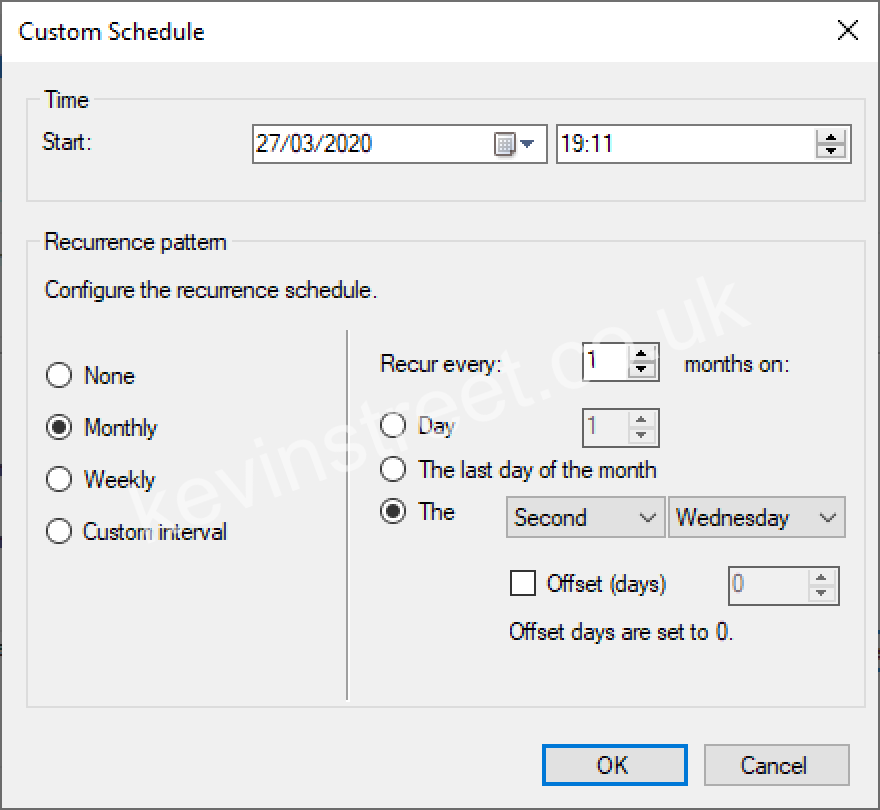
Click Next and select to run the rule on a schedule. Customise the schedule and select that it should run monthly, on the second Wednesday of the month (or, whatever schedule is suitable for your organisations patching policies).
Click OK to accept the schedule and click Next. Decide when you want the updates to become available (typically immediately after they are deployed) and when you want the installation deadline. On the next screen, decide if you want the updates to appear in Software Center or not, and what clients should do when the deadline is reached.
Continue through the wizard, selecting a deployment package to add these updates to (or creating a new one) and finally complete the wizard. If you’re ready to get the patches out right now, select the new ADR and click Run Now.
Back on the client After leaving this for a few hours to give my client time to run a software update scan, I checked Software Center to see what updates were waiting for me…
Just what I was hoping to see! After clicking Install All and waiting a few minutes, all three updates install and my third-party software on this client is up to date. If I left this configuration in place, next month I would expect to see these patches appear automatically, as the Ivanti scheduled task would run, followed by the Automatic Deployment Rule in SCCM that would deploy them to my client. This is assuming the vendors release new versions of this software by the time the tasks run.
If you have read this whole series, or even just parts of it, I hope this has been useful in helping you implement Ivanti Patch for SCCM or argue the case for it. Products like this make it very easy to patch third-party software using SCCM and it is as important nowadays to patch software from third parties as it is to patch Windows. Sometimes, it is even more important!